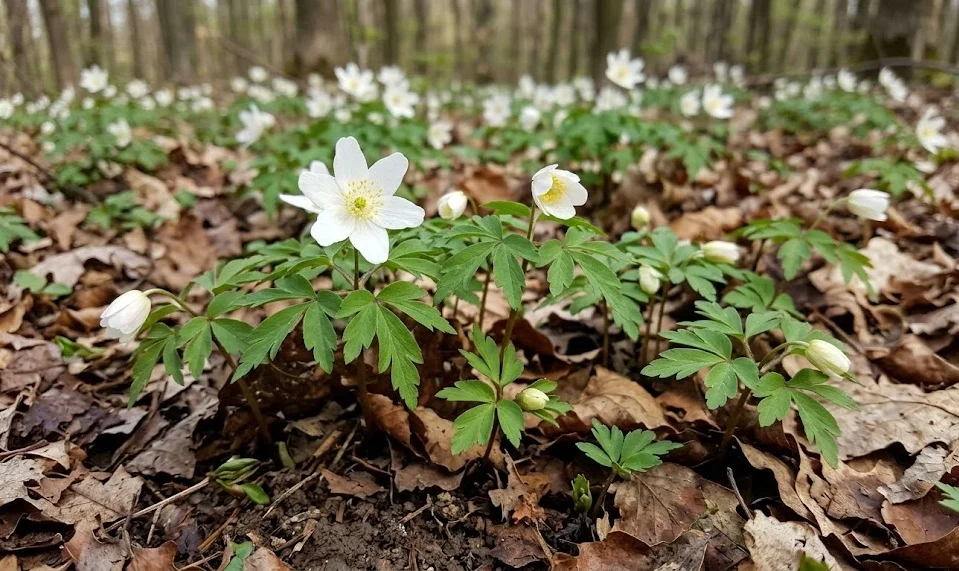
Planting wood anemone is a rewarding endeavor that brings the quiet beauty of the forest floor directly into your personal garden space. These plants are best established using their unique rhizomes, which are horizontal underground stems that store energy and nutrients. When you choose the right location and prepare the ground correctly, you set the stage for a colony that will expand and bloom for decades. Success depends on timing your activities to match the plant’s natural dormant and active phases throughout the year.
The ideal time to plant wood anemones is in the late summer or early autumn when the rhizomes are in their dormant state. During this window, the plant is not actively growing foliage, which minimizes the transplant shock and allows it to settle in before winter. You should handle the rhizomes with extreme care, as they are often quite brittle and can easily snap if handled roughly. Getting them into the ground early allows them to develop a small root system before the spring growth spurt begins.
When selecting a site, look for areas that receive dappled sunlight in the spring but are shaded during the hot summer months. The base of deciduous trees or the north side of a building often provides the perfect light conditions for these woodland natives. You should avoid areas where water tends to pool after rain, as the rhizomes are susceptible to rotting in waterlogged soil. A gentle slope or a raised bed can be an excellent solution if your garden soil is naturally heavy or poorly drained.
Preparation of the planting site should involve deep loosening of the soil to accommodate the spreading nature of the rhizomes. You should mix in a generous amount of organic matter, such as well-rotted leaf mold or garden compost, to a depth of about six inches. This not only provides nutrients but also creates the friable texture that the delicate roots need to penetrate easily. Once the soil is prepared, you are ready to begin the actual process of placing the rhizomes into their new home.
Techniques for rhizome planting
The actual process of planting wood anemone rhizomes is relatively straightforward but requires a gentle touch and attention to detail. You should plant the rhizomes horizontally, about two inches below the surface of the soil, ensuring they are not buried too deeply. It is common to see several small buds or growing points on each rhizome; these should ideally face upwards if possible. Spacing the rhizomes about four to six inches apart will give the colony room to expand without immediate overcrowding.
More articles on this topic
After placing the rhizomes in the soil, you should firm the earth gently over them to remove any large air pockets. Avoid pressing down too hard, as this can damage the brittle stems or compact the soil too much for the emerging shoots. Once the area is covered, a thorough watering is necessary to settle the soil and provide the moisture needed to trigger root development. This initial hydration is crucial, especially if the planting is done during a dry autumn period.
Applying a mulch layer immediately after planting is a professional technique that significantly increases the survival rate of the new colony. You should use a two-inch layer of shredded leaves or bark to insulate the ground and retain moisture. This mulch mimics the natural forest floor and protects the shallow rhizomes from sudden temperature changes during the winter. It also helps to suppress weed growth that might otherwise compete with the young anemones in the spring.
It is helpful to mark the location of your newly planted rhizomes with small stakes or labels that will survive the winter. Because there will be no visible growth for several months, it is very easy to forget exactly where you planted them. Marking the spot prevents you from accidentally digging in the same area or stepping on the hidden shoots. By the time the first green tips appear in the spring, you will be glad you took the extra step to protect your investment.
Propagation through division
Propagating wood anemones by division is the most effective and common way to expand your collection or share plants with friends. This process is best performed every few years when an established clump has become dense and the flowering in the center begins to decline. You should wait until the foliage has completely died back in early summer before attempting to lift the colony. Using a garden fork, gently lift the entire mass of soil and rhizomes from the ground, being careful not to slice through them.
More articles on this topic
Once the clump is out of the ground, you can gently shake off the excess soil to reveal the network of interconnected rhizomes. You will notice that they have naturally branched out, and you can easily snap or cut them into smaller sections. Each new piece should have at least one healthy-looking bud or “eye” to ensure it can produce a new plant. You should keep these sections moist and cool while you prepare the new planting areas to prevent them from drying out.
Replanting the divisions should follow the same principles as planting new rhizomes, with a focus on soil quality and depth. It is often a good idea to enrich the original planting site with fresh compost before putting some of the divisions back. This rejuvenates the soil and gives the remaining plants a fresh start with less competition for resources. The surplus divisions can then be used to start new colonies in other shaded parts of your garden.
This method of propagation is highly successful because it uses the plant’s natural vegetative reproduction strategy to your advantage. Unlike growing from seed, which can be slow and unpredictable, divisions produce flowering-sized plants almost immediately. You will find that the newly moved sections often bloom the very next spring, provided they are settled in before the winter freeze. Regular division keeps the plants vigorous and prevents the build-up of old, less productive rhizome material.
Growing from seed
Growing wood anemones from seed is a more challenging but deeply satisfying method of propagation for the patient gardener. The seeds must be collected as soon as they are ripe, which usually occurs in late spring or early summer just before the foliage disappears. You will know they are ready when the seed heads begin to turn brown and feel slightly loose when touched. It is vital to sow the seeds immediately, as they lose their viability very quickly if allowed to dry out.
To start the seeds, you should use a seed tray filled with a mixture of peat-free compost and sharp sand for excellent drainage. Scatter the seeds thinly over the surface and cover them with only a very fine layer of grit or compost. You should then place the tray in a cold frame or a shaded, sheltered spot outdoors where it can experience natural temperature fluctuations. The seeds require a period of cold stratification, meaning they need the winter chill to break their dormancy and trigger germination.
Germination usually occurs in the following spring, but it can sometimes take two full winters for all the seeds to sprout. You will see tiny, single leaves appearing, which look quite different from the mature foliage of the adult plants. It is important to keep the seedlings consistently moist and protected from direct summer sun during their first year of growth. They are very delicate at this stage and can easily be lost to drought or heavy rain.
It generally takes three to five years for a wood anemone grown from seed to reach flowering size and produce its first blooms. During this time, the plant is focusing its energy on developing the underground rhizome that will eventually support a full colony. While this process is slow, it allows you to produce a large number of plants at a very low cost. It also introduces more genetic diversity into your garden, which can lead to subtle variations in flower size or color.
Establishing a new colony
Successfully establishing a new colony of wood anemone requires ongoing attention during the first two growing seasons. You should monitor the moisture levels closely, especially during the spring when the plants are in full bloom and active growth. Even a short period of intense drought can cause the young plants to go dormant prematurely, which weakens the rhizomes. Providing a consistent environment during these formative years is the key to creating a permanent and self-sustaining feature.
You should also be vigilant about protecting the young colony from physical disturbances and competition. Aggressive grasses or persistent weeds can quickly overwhelm a new planting before it has a chance to form a solid mat of rhizomes. Hand-weeding is the safest method, as it allows you to remove competitors without damaging the shallow anemone roots. Over time, as the colony becomes denser, it will naturally suppress many weeds on its own through its thick spring canopy.
Applying a light mulch of leaf mold every autumn will help to build the soil structure and nourish the expanding colony. You will notice that as the soil becomes more like a forest floor, the anemones will begin to spread more rapidly. The rhizomes will naturally find their way into the most hospitable areas, creating a beautiful and irregular carpet of white flowers. This natural expansion is a sign that your planting and propagation efforts have been successful.
Finally, remember that patience is a virtue when working with these slow-spreading woodland plants. It may take a few years for a small initial planting to become the impressive display you envisioned. However, once established, wood anemones are incredibly long-lived and require very little intervention to maintain their beauty. By following professional planting and propagation techniques, you are creating a lasting legacy of spring beauty in your garden.