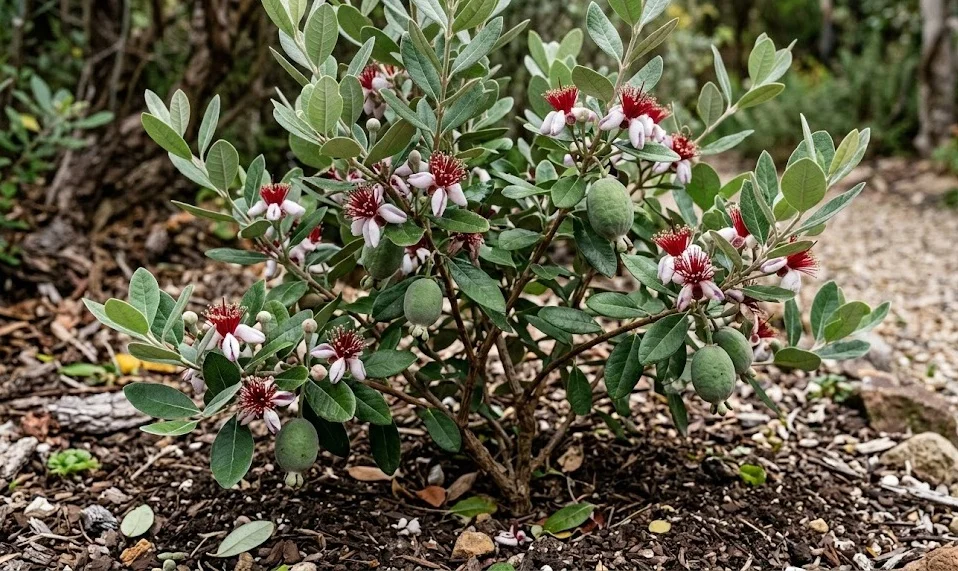
The successful establishment of the pineapple guava begins with a thoughtful approach to planting and a clear understanding of its propagation methods. Whether you are starting with a young nursery plant or attempting to grow new specimens from scratch, the initial steps are crucial for long-term vitality. This plant offers multiple ways to expand your collection, ranging from simple seed sowing to more advanced vegetative techniques. By mastering these foundational tasks, you can ensure that your garden remains filled with healthy and productive shrubs.
Choosing the perfect location
The site you select for your pineapple guava will dictate its growth rate and its ability to produce high-quality fruit. These plants require a position that receives full sun for at least six to eight hours a day to maximize their flowering potential. While they can tolerate some partial shade, you will notice that sun-drenched plants are generally more compact and yield better harvests. Consider the path of the sun throughout the seasons to ensure the plant isn’t shaded by structures or taller trees in the winter.
Soil drainage is the most important physical characteristic of the planting site to ensure the health of the roots. You should avoid low-lying areas where water tends to collect after heavy rains or where the soil remains soggy for long periods. If your garden has heavy clay, you might want to create a mound or use a raised bed to provide better drainage. Testing the soil texture before planting allows you to make the necessary amendments to create a hospitable environment for the new shrub.
Wind protection is another factor that can significantly impact the success of your planting, especially in exposed areas. While the shrubs are hardy, strong winds can damage the delicate flowers and cause the developing fruit to fall prematurely. A location near a fence, a wall, or a taller windbreak can provide the shelter needed for the plant to flourish. You should also ensure that there is enough space around the planting site for the shrub to reach its mature width without being crowded.
Proximity to other plants should also be considered to facilitate pollination and prevent the spread of localized diseases. If you are planting multiple shrubs, space them at least eight to ten feet apart to allow for proper air circulation and easy access for maintenance. This spacing also ensures that each plant has enough room to develop its natural shape without competing for light or nutrients. A well-planned layout is the first step toward a thriving and manageable home orchard or garden hedge.
More articles on this topic
Planting techniques for success
The best time to plant your pineapple guava is during the mild weather of spring or early autumn when the soil is warm. You should dig a hole that is twice as wide as the root ball but no deeper than the container the plant came in. This allows the roots to expand easily into the surrounding soil while keeping the crown at the correct level. Breaking up the sides of the hole with a garden fork can prevent the roots from becoming circled or pot-bound in heavy soils.
Before placing the plant in the hole, you should gently loosen any tight roots to encourage them to grow outward into the new environment. Position the shrub in the center of the hole and ensure that it is standing straight and at the same depth it was in its previous pot. You can fill the space around the root ball with a mixture of native soil and a small amount of aged compost. Firm the soil down gently with your hands to remove any large air pockets without compacting the ground too tightly.
Immediately after planting, the shrub requires a deep and thorough watering to settle the soil around the roots and reduce transplant shock. You should continue to monitor the moisture levels daily for the first few weeks, especially if the weather is warm or windy. A layer of organic mulch around the base of the plant will help retain this vital moisture and keep the soil temperature stable. Be sure to keep the mulch a few inches away from the trunk to prevent moisture-related bark issues.
Staking is usually not necessary for these shrubs unless the plant is particularly top-heavy or the site is very windy. If you do choose to use a stake, ensure that it is placed outside the root ball and that the ties are loose enough to allow for some natural movement. This movement actually helps the trunk develop strength and resilience as it grows. Removing the stake after the first year is generally recommended once the root system has become firmly established in the ground.
More articles on this topic
Propagation through seeds and cuttings
Growing pineapple guava from seed is an accessible and rewarding way to produce a large number of plants for hedges or experimental purposes. You should collect seeds from fully ripe fruit, wash away the pulp, and sow them immediately in a well-draining seed-starting mix. The seeds generally germinate within a few weeks if kept in a warm, bright location with consistent moisture. Keep in mind that seedlings may not be identical to the parent plant, which can lead to interesting variations in fruit size and flavor.
Cuttings offer a way to produce new plants that are genetically identical to the parent, ensuring the same fruit quality and growth habits. You should take semi-hardwood cuttings in late summer or early autumn when the new growth has begun to firm up. Each cutting should be about four to six inches long and have several nodes where leaves are attached. Removing the lower leaves and dipping the cut end in a rooting hormone can significantly improve your success rate.
Providing the right environment for your cuttings is essential for them to develop a healthy and robust root system. You should place them in a sterile, sandy potting mix and keep them in a humid environment, such as a covered propagator or a plastic bag. Indirect light is best at this stage to prevent the cuttings from drying out or becoming stressed by intense heat. You will know the cuttings have rooted when you see new growth or feel resistance when gently tugging on the stem.
Once the new plants have developed a strong root system, they should be gradually acclimated to the outdoor environment before being planted in their permanent spots. This process of hardening off prevents the young plants from suffering from sudden changes in temperature or light intensity. You can move them to a sheltered outdoor area for a few hours each day, slowly increasing their exposure over a week or two. Patience during this stage ensures that your home-grown plants have the best start possible in the garden.
Advanced propagation methods
Grafting is a more technical approach that allows you to combine the best traits of two different plants into a single specimen. This method is often used to attach a high-quality fruiting variety onto a more vigorous or disease-resistant rootstock. You should perform grafting in the early spring just as the sap begins to flow and the buds are starting to swell. While it requires some practice and precision, grafting is the gold standard for maintaining specific cultivars in a professional or enthusiast setting.
Air layering is another effective vegetative propagation technique that can be used on larger branches that are difficult to root as cuttings. This involves wounding a small section of a stem and wrapping it in damp sphagnum moss and plastic to encourage root growth while it is still attached to the parent plant. You should check the progress of the roots periodically and remove the branch once a thick mass of roots is visible through the plastic. This method produces a much larger plant in a shorter amount of time than seeds or cuttings.
The timing and selection of the parent material are critical for the success of these more advanced propagation techniques. You should always choose healthy, vigorous branches that are free from pests and diseases to ensure the best results for the new plant. Using clean, sharp tools is also essential to prevent the spread of pathogens and to create clean wounds that heal quickly. Mastering these skills allows you to take full control over the genetics and quality of the pineapple guava plants in your collection.
Maintaining detailed records of your propagation attempts will help you refine your techniques and understand what works best in your specific climate. You should note the dates, the methods used, and the success rates of each batch to identify the optimal timing for your garden. Over time, you will develop a deep intuition for the needs of these plants and how they respond to different propagation environments. Sharing your successful plants and your knowledge with other gardeners is a great way to celebrate the growth of your skills.