Establishing a vibrant collection of trailing geraniums starts with the correct planting technique and a strategic approach to propagation. Whether you are starting from nursery plants or trying to grow your own from cuttings, the initial steps determine the future vigor of the specimen. Proper spacing, substrate selection, and timing are the critical components that ensure a successful transition to the permanent growing site. By mastering these early stages, you can create a professional-looking garden that thrives from the very beginning of the spring season.
The best time to start planting is after the threat of the last frost has completely passed and the soil has begun to warm up. These plants are native to warmer climates and will not tolerate even a light freeze during their early development stages. You should monitor local weather patterns closely before moving your young plants outdoors for the summer. Gradually hardening off the plants by exposing them to outdoor conditions for a few hours each day will prevent transplant shock.
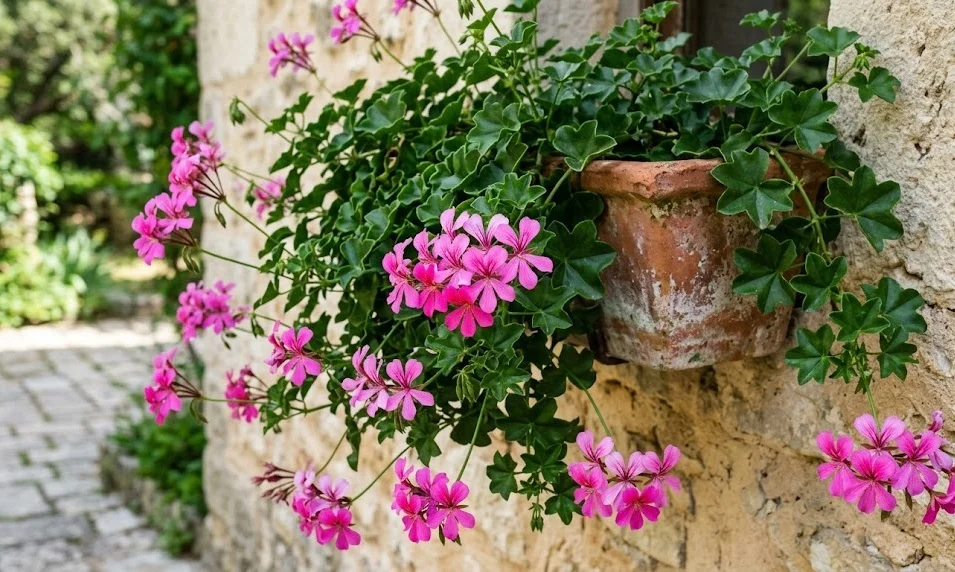
Choosing the right container is essential for the long-term health of the root system and the overall stability of the plant. Trailing geraniums need enough room for their roots to spread, but the pot should not be so large that the soil stays wet for too long. A standard window box or a large hanging basket is usually sufficient for three to four plants depending on the variety’s growth rate. You must ensure that the container is heavy enough to provide a counterweight to the long, cascading stems.
The depth at which you plant the geranium is a small detail that has a significant impact on its structural health. You should aim to place the root ball so that the top of the soil is level with the surface of the new substrate. Burying the stems too deeply can lead to rot, while planting them too high may cause the roots to dry out. Once the plant is in place, gently firm the soil around it to remove any large air pockets that could hinder root growth.
Professional propagation through cuttings
Taking cuttings is the most effective and popular way to multiply your favorite trailing geranium varieties without spending a fortune. You should select healthy, non-flowering shoots that are about ten centimeters long for the best results. Using a sharp, sterilized knife or shears is vital to make a clean cut that heals quickly and resists infection. The ideal cutting should have at least two or three nodes, which are the points where the leaves attach to the stem.
More articles on this topic
Once you have removed the cutting, it is a good practice to let the wound callus over for a few hours before planting. This simple step creates a protective barrier that prevents soil-borne pathogens from entering the fresh tissue. You should then remove the lower leaves to ensure that no foliage is buried beneath the surface of the rooting medium. Some gardeners use a rooting hormone to speed up the process, but geraniums usually root easily even without chemical assistance.
The rooting medium should be a sterile, well-draining mix such as a combination of perlite and peat moss. You must keep the medium consistently moist but never soggy, as excess water will cause the delicate stems to decay before they can form roots. Placing the cuttings in a warm, bright spot away from direct sunlight provides the perfect environment for cellular growth. You will know the roots have formed when you see new leaves appearing or feel resistance when gently tugging on the stem.
Transitioning the newly rooted cuttings into their first small pots requires a gentle hand to avoid damaging the fragile new roots. You should use a high-quality potting soil that is rich in nutrients but still light enough for easy root penetration. Keep the young plants in a protected environment for a few weeks until they show signs of vigorous growth. This careful start ensures that the new generation of plants will be just as strong as the parent specimen.
Sowing seeds for genetic diversity
Growing trailing geraniums from seed is a rewarding challenge for the patient gardener who wants to explore a wider range of colors. You should start the seeds indoors at least ten to twelve weeks before the last expected frost date to give them a head start. The seeds are often quite hard, so some experts recommend lightly scarifying them with sandpaper to improve germination rates. Using a dedicated seed-starting mix will provide the best conditions for the tiny sprouts to emerge.
More articles on this topic
Temperature control is the most critical factor during the germination phase of the seed-growing process. You should maintain a constant soil temperature of around twenty-one to twenty-four degrees Celsius using a heating mat if necessary. Cover the seed trays with a clear plastic dome to maintain high humidity levels until the first green shoots appear. Once the seeds have germinated, you must move them to a very bright location to prevent the seedlings from becoming leggy.
As the seedlings develop their first true leaves, they will need a light application of diluted liquid fertilizer to support their growth. You should be careful not to overwater them, as young seedlings are particularly susceptible to damping-off disease. Providing good air circulation with a small fan can help strengthen the stems and reduce the risk of fungal issues. When the plants have at least two sets of true leaves, they are ready to be transplanted into individual pots.
The final step in growing from seed is the gradual adaptation to the outdoor environment through a hardening-off process. You should begin by placing the pots in a shaded, wind-protected area for a few hours each day during the late spring. Gradually increase the exposure to direct sunlight and wind over the course of a week or two. This transition prepares the young plants for the challenges of life on a balcony or in a garden bed.
Optimizing the planting environment
Preparing the final planting site involves more than just filling a pot with soil and sticking a plant in it. You should ensure that the location receives at least six hours of direct sunlight every day for the best flowering results. If you are planting in window boxes, check that the brackets are strong enough to support the weight of wet soil and fully grown plants. The orientation of the building can create microclimates that might be warmer or colder than the general area.
The arrangement of plants within a container should follow a logical pattern that allows for future expansion. You should place the trailing varieties toward the front edge of the pot so they can naturally spill over the side. If you are mixing them with other plants, ensure that all the species have similar water and light requirements. Leaving a few centimeters of space between the plants will allow for proper air circulation as they grow larger.
Watering the plants immediately after transplanting is a vital step that helps settle the soil around the roots. You should use a gentle stream of water to avoid washing away the top layer of substrate or damaging the foliage. This initial watering also eliminates any remaining air pockets that might dry out the root system. Adding a thin layer of mulch or decorative stones can help retain moisture and keep the soil surface cool during the summer.
Regularly checking the stability of the plants in the first few weeks will ensure they have taken root successfully. You might need to add a bit more soil if some of it has settled after the first few waterings. It is also a good time to check for any early signs of pests that might have been brought in from the nursery. Establishing a healthy environment from day one is the best way to prevent problems later in the season.