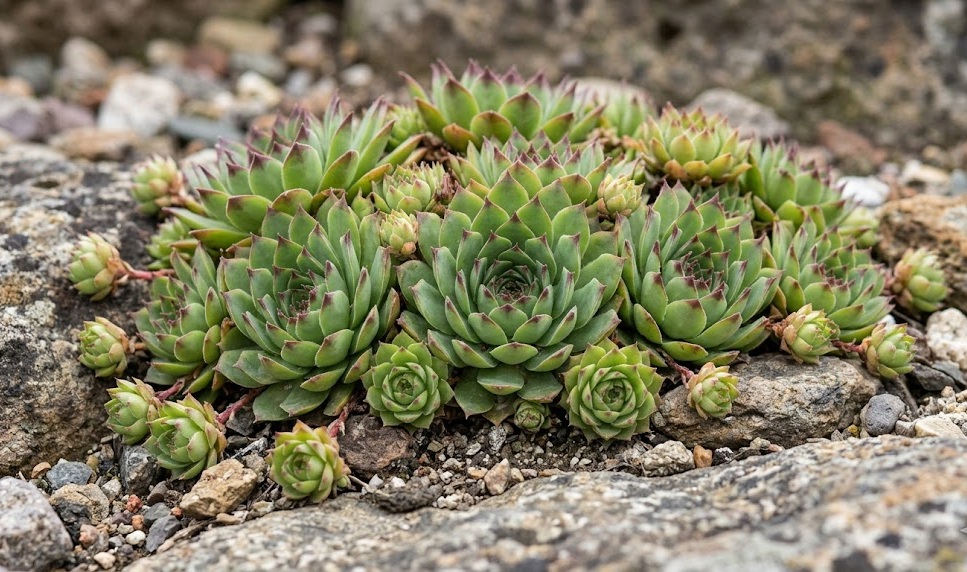
The process of planting the common houseleek begins with the selection of a site that offers perfect drainage and maximum light exposure. These hardy succulents are built for survival in harsh conditions, but they are particularly sensitive to “wet feet” during the initial establishment phase. Whether you are creating a rock garden, a green roof, or a decorative container, the goal is to provide a stable base that mimics their native alpine ledges. A successful planting will result in a plant that anchors itself firmly and begins to colonize its surroundings within a single growing season.
When selecting a location, look for areas where water does not pool after a heavy rain, such as slopes or raised beds. If your garden has heavy clay soil, you must amend the planting area by digging out a portion and replacing it with a gravelly mix. It is often helpful to plant the rosettes at a slight angle so that water can easily run off the foliage. This prevents moisture from sitting in the center of the rosette, which is a common cause of rot in newly planted specimens.
The actual planting process is quite simple because these plants do not require deep holes to thrive. You only need to create a shallow depression in the soil that is large enough to accommodate the existing root ball. Gently press the plant into the substrate and firm the soil around the base to ensure good root-to-soil contact. Avoid burying the fleshy lower leaves, as they should ideally sit just above the surface of the growing medium.
Once the houseleek is in the ground, it is beneficial to surround the base with a layer of grit or small pebbles. This “mulch” serves to keep the plant stable while the roots grow and prevents soil from splashing onto the leaves during rain. It also provides a clean, dry surface for the future offsets to rest upon as they begin to develop. After planting, a light watering is usually sufficient to settle the soil around the roots without saturating the entire area.
Mastering the art of offset propagation
Propagation of the common houseleek is most commonly achieved through the removal and replanting of the “chicks” that grow around the mother plant. This method is incredibly reliable because the offsets are genetically identical clones of the parent and often come with small roots already started. The best time to perform this task is during the active growing season in spring or early summer. This gives the young rosettes plenty of time to establish themselves before the arrival of winter.
More articles on this topic
To propagate, simply identify a well-developed offset that has reached at least one-third the size of the parent. You can use a sharp, sterilized knife to cut the runner connecting the chick to the hen, or sometimes a gentle tug is all that is needed. If the offset already has small roots, it can be planted directly into its new permanent home. If it lacks roots, allow the cut end to callus over in a dry, shaded spot for a day or two before planting.
When planting the unrooted offsets, place them on top of a well-draining soil mix and press them down very slightly. You don’t need to bury them; the plant’s natural instinct is to send roots downward into the soil once it detects moisture. Keep the soil slightly damp but never soggy during this critical period of root development. Usually, within two to three weeks, you will notice the center of the offset beginning to show signs of new, bright green growth.
This method of propagation is so effective that a single mother plant can produce dozens of new individuals over a couple of years. It is an excellent way to fill in gaps in a rockery or to create large drifts of color across a landscape. Because the process is so straightforward, it is also a great way to introduce children or novice gardeners to the joys of plant multiplication. The high success rate almost guarantees a rewarding experience for anyone who tries it.
Exploring propagation from seed and leaves
While propagating from offsets is the standard practice, growing common houseleeks from seed offers the excitement of potential genetic variation. This method is primarily used by hybridizers who are looking to create new colors or leaf shapes within the species. Seeds should be sown on the surface of a fine, sandy compost and kept in a bright location with consistent but moderate moisture. They require light to germinate, so do not cover them with soil, though a very thin dusting of fine sand can help hold them in place.
More articles on this topic
Germination can be slow and uneven, sometimes taking several weeks or even months depending on the freshness of the seeds. Once the tiny seedlings appear, they are quite delicate and must be protected from direct, scorching sun and heavy rain. As they grow, they will eventually form miniature rosettes that can be transplanted once they are large enough to handle. This path requires significantly more patience than using offsets but can lead to a very diverse and unique collection.
Leaf propagation is another theoretical possibility, though it is far less successful with houseleeks than with other succulents like Echeveria. If a leaf is cleanly pulled from the stem, it may occasionally produce a tiny new plantlet at the base, but this is quite rare. Most of the time, the leaf will simply shrivel up or rot before any new growth occurs. For this reason, professional growers almost exclusively rely on offsets to maintain their stock and ensure the health of their cultivars.
If you choose to experiment with leaf propagation, it is vital to ensure the leaf is healthy and fully turgid before removal. The “wound” must be allowed to dry completely to prevent pathogens from entering the plant tissue. Place the leaf on a bed of dry sand and wait for several weeks, checking periodically for the appearance of tiny pink roots. While the success rate is low, the thrill of seeing a new life emerge from a single leaf is a rewarding challenge for dedicated enthusiasts.
Optimizing the environment for young plants
Newly planted or propagated houseleeks require a bit more protection than established colonies. While they need light to grow, the intense midday sun can sometimes be too much for an offset that hasn’t yet developed a strong root system. Providing some dappled shade during the hottest hours can help prevent the young plants from drying out too quickly. Once you see significant new growth, you can gradually increase their exposure to full sun.
The choice of container or planting vessel can also impact the success of your new plants. Breathable materials like terracotta or unglazed ceramic are ideal because they allow moisture to evaporate through the walls. If using plastic or glazed pots, you must be extra vigilant about ensuring the drainage holes are large and unobstructed. A layer of coarse material at the bottom of the pot can further enhance the movement of water away from the roots.
During the first few months, monitor the stability of the rosettes, as wind or heavy rain can sometimes dislodge them before they are fully anchored. If a plant becomes loose, simply press it back into the soil and perhaps add a few more small stones around it for support. This physical stability is crucial for the roots to grip the substrate and begin their expansion. A well-anchored plant is a healthy plant that is ready to face the elements.
Consistency in the environment helps the young houseleeks build the internal reserves they need for long-term survival. Avoid moving the plants around frequently, as this forces them to constantly readapt to new light and temperature levels. By providing a stable, well-considered starting point, you set the stage for a colony that will thrive for years. The effort put into the initial planting and propagation phases pays dividends in the form of a beautiful, resilient garden feature.