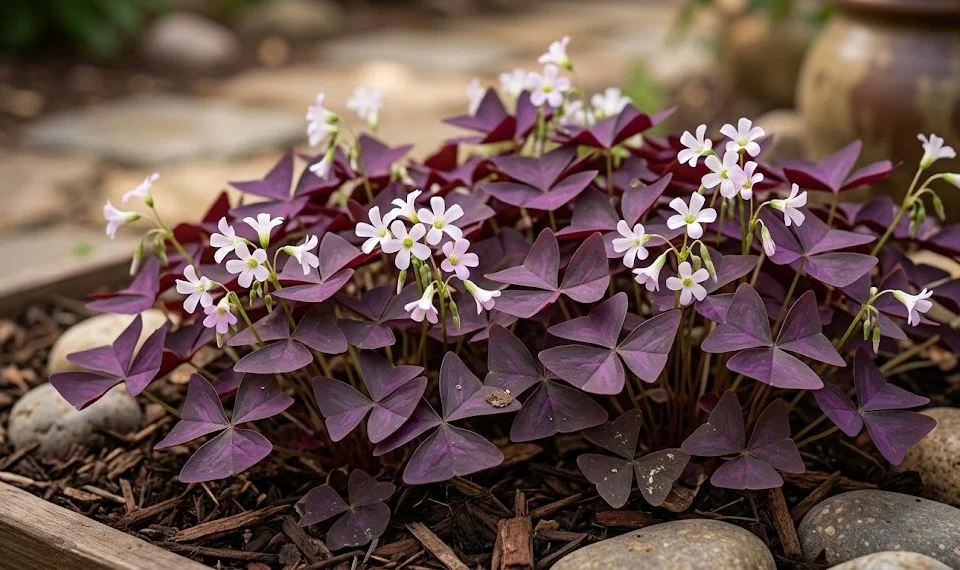
Watering and feeding are the two pillars of maintenance that determine the longevity and vibrancy of your false shamrock. Finding the perfect balance is often a matter of trial and error, as every home environment has a different evaporation rate and light level. This plant is quite vocal about its needs, showing clear physical signs when it is thirsty or over-saturated. By developing a professional eye for these signals, you can ensure that your plant always has exactly what it needs to flourish.
The fundamental principles of hydration
The golden rule for watering this species is to allow the top two or three centimeters of soil to dry out between sessions. This plant does not like to sit in “wet feet,” which can quickly lead to the aforementioned rhizome rot. When you do water, you should do so thoroughly until the liquid runs freely from the bottom of the container. This ensures that the entire root ball is hydrated and helps wash away any accumulated minerals from the soil.
The quality of the water you use can actually have a noticeable impact on the health of the foliage over time. If your tap water is heavily chlorinated or contains high levels of fluoride, the plant might develop brown, crispy edges on its leaves. Many professional growers prefer to use filtered water or allow tap water to sit out overnight before using it. This allows some of the volatile chemicals to dissipate and brings the water to a safe room temperature.
The temperature of the water is just as important as its chemical makeup for a sensitive indoor plant. Cold water straight from the tap can shock the roots and cause the leaves to fold up in a stress response. Aim for lukewarm or room-temperature water to keep the root system happy and the metabolic processes running smoothly. This small detail can make a big difference in how quickly the plant bounces back after a watering session.
You should always water the soil directly rather than pouring water over the top of the foliage. The dense canopy of leaves can trap moisture against the stems, which can encourage fungal growth or “damping off” in certain conditions. Using a watering can with a long, thin spout allows you to get beneath the leaves and deliver the water exactly where it is needed. This practice keeps the leaves dry and the soil evenly moist without creating unnecessary risks.
More articles on this topic
Adjusting for seasonal and environmental changes
As the seasons change, so do the hydration requirements of your plant, and you must be ready to adapt. During the long, bright days of summer, the plant will photosynthesize rapidly and use up water much faster than in the winter. You might find yourself watering twice a week during a heatwave, whereas once every ten days might be enough in the spring. Always let the soil’s actual moisture level be your guide rather than a strict calendar schedule.
When the plant begins to enter its dormant phase, your watering habits must shift dramatically to avoid killing it. As the leaves start to yellow and die back, you should gradually increase the time between waterings. Eventually, you will stop almost entirely, giving just enough water to prevent the rhizomes from completely shriveling into nothingness. This mimicry of a dry season allows the plant to rest and gather its strength for the next cycle.
High humidity or low light levels in your home will also slow down the rate at which the soil dries out. If you have moved your plant to a darker corner or a bathroom, you must be extra careful not to overwater. In these conditions, the plant’s metabolism slows down, and the risk of fungal issues in the soil increases. Always stick your finger into the soil to check the moisture before you decide to reach for the watering can.
Conversely, if your plant is sitting near a heater or in a very drafty spot, it will lose moisture through its leaves much faster. You might notice the leaves drooping more frequently, even if the soil feels slightly damp to the touch. In this case, you might need to supplement the regular watering with a fine mist or a humidity tray. Balancing the moisture in the air with the moisture in the soil is the key to preventing leaf stress.
More articles on this topic
Nutrient requirements and fertilization strategy
Fertilizing is essential for maintaining the deep purple color and encouraging the plant to produce its delicate flowers. However, this species is not a “heavy feeder” and can easily be damaged by too much synthetic fertilizer at once. A balanced, water-soluble liquid fertilizer diluted to half the recommended strength is usually the best choice for indoor specimens. Apply this mixture once every two to four weeks during the active growing months of spring and summer.
The timing of your feeding schedule should align strictly with the plant’s periods of active growth. Never fertilize a plant that is dormant or struggling with a disease, as it cannot process the nutrients and the salts will build up in the soil. The best time to start feeding is about a month after the first new leaves appear in the spring. This gives the new root system time to establish itself before it has to handle concentrated nutrients.
Nitrogen is important for leafy growth, but too much of it can lead to weak, floppy stems that cannot support the leaves. Look for a fertilizer with a balanced ratio, such as a 10-10-10 or 20-20-20 formula, to ensure all parts of the plant are supported. Phosphorus is particularly helpful if you want to encourage the plant to bloom more frequently throughout the season. Potassium helps with overall plant health and makes the rhizomes more resilient to environmental stress.
If you prefer a more natural approach, you can use organic fertilizers like seaweed extract or worm castings. These options provide a slower release of nutrients and are much less likely to cause fertilizer burn on the roots. Organic matter also helps improve the structure of the potting mix over time, making it more hospitable for beneficial soil microbes. Regardless of the type you choose, consistency and moderation are the most important factors for success.
Recognizing and correcting common mistakes
Over-fertilization is a common problem that manifests as scorched leaf tips or a white, crusty buildup on the surface of the soil. If you suspect you have given the plant too much food, the best remedy is to flush the soil with plenty of clear water. This will help dissolve and carry away the excess salts before they can do permanent damage to the roots. Afterward, skip the next few feeding sessions to allow the plant to recover and use up what is left.
Under-watering is usually obvious because the leaves will lose their turgidity and the stems will lean over the side of the pot. While the plant is quite resilient and will usually pop back up after a drink, repeated drying out can stress the rhizomes. If the soil has become so dry that it has pulled away from the edges of the pot, regular watering might just run down the sides. In this case, you may need to bottom-water the pot in a basin for thirty minutes to re-hydrate the peat.
Over-watering is much more dangerous and harder to fix than under-watering because the damage happens where you can’t see it. If the leaves are turning yellow and the stems feel mushy at the base, the roots are likely suffocating from a lack of oxygen. If this happens, you should immediately stop watering and perhaps even repot the plant into fresh, dry soil. Inspect the rhizomes and cut away any rot to give the remaining healthy parts a chance to survive.
Finally, keep an eye on how the plant responds to your specific fertilization brand and frequency. Not all products are created equal, and some might be too acidic or too alkaline for your particular water source. If the plant looks healthy and is growing well, there is no need to increase the amount of fertilizer you are using. Observation is the most powerful tool in your gardening kit, so trust what the plant is telling you.
Long-term soil health and maintenance
Over several years, the structure of the potting soil will naturally break down and become compacted. This compaction reduces the amount of air available to the roots and can lead to drainage issues even if you haven’t changed your watering habits. Professionally managed plants are usually repotted every few years to replace the old soil with a fresh, airy medium. This practice ensures that the roots and rhizomes always have a healthy environment to grow in.
You can also supplement the soil health by adding a thin layer of compost or fresh potting mix to the top of the pot each spring. This “top-dressing” provides a gentle boost of nutrients and helps keep the surface of the soil from becoming too hard. It also covers any rhizomes that might have worked their way to the surface over the course of the year. This simple annual task keeps the plant looking vigorous without the stress of a full repotting.
Be mindful of the “salt crust” that can form on terracotta pots or the soil surface if you have hard water. This white residue is a collection of minerals and fertilizer salts that can be toxic to the plant in high concentrations. Wiping the rim of the pot and removing the very top layer of soil occasionally can help prevent this buildup. It also makes the overall presentation of the plant look much more professional and well-cared-for.
Ultimately, the goal of watering and fertilizing is to provide a stable, predictable environment for the plant. Large fluctuations in moisture and nutrient levels are much harder for the plant to handle than a consistent, moderate routine. By paying close attention to the seasons and the physical state of the leaves, you will become an expert at managing these two vital tasks. Your false shamrock will reward your diligence with a stunning display of deep purple beauty.