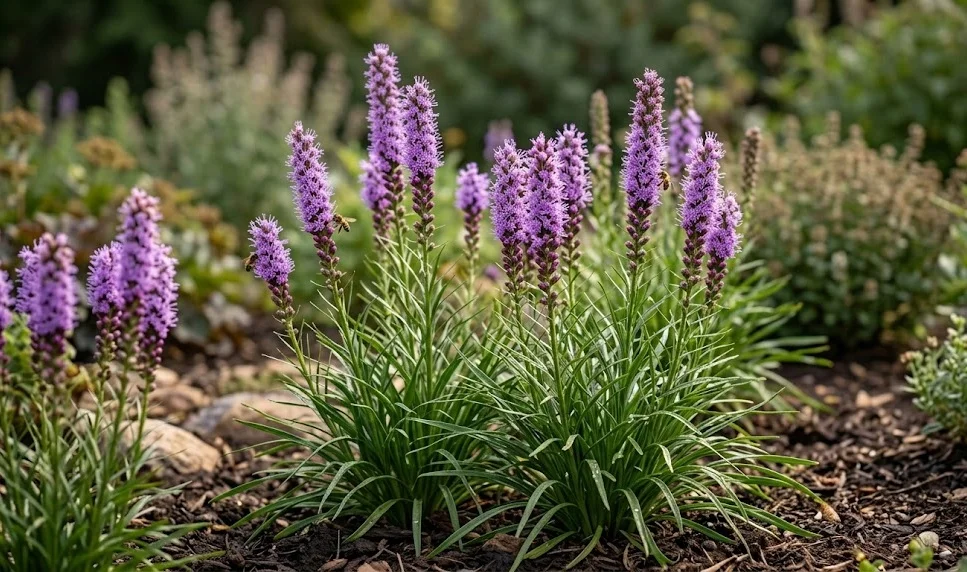
Successful establishment of the dense blazing star begins with a professional approach to site selection and soil preparation. This species is remarkably resilient, but its long-term vigor depends heavily on the initial conditions provided during the planting process. Whether starting with nursery-grown containers or dormant corms, the gardener must consider the ecological requirements of this prairie native. A thoughtful planting strategy ensures that the root system develops quickly and provides the foundation for several years of spectacular floral displays.
Site selection and soil preparation
The first step in a professional planting project is identifying a location that meets the specific light and drainage needs of the species. This perennial requires full sun for at least six to eight hours a day to develop strong, upright stems and vibrant flowers. Without adequate light, the plants may become leggy and prone to falling over, detracting from their architectural beauty. Observing the sun patterns in the garden throughout the day is essential before making a final decision on placement.
Soil quality is the next critical factor, as the dense blazing star prefers a medium that mimics its native prairie environment. While it can adapt to various soil types, it absolutely requires good drainage to prevent the rotting of its underground storage organs. In areas with heavy clay, incorporating coarse sand or fine gravel can help improve the aeration and drainage of the planting site. A professional will also ensure that the soil is not overly enriched with high-nitrogen fertilizers, which can lead to excessive foliage at the expense of flowers.
Clearing the planting area of perennial weeds and aggressive grasses is a prerequisite for a successful start. These competitors can quickly overwhelm young plants and steal valuable moisture and nutrients during the establishment phase. Using a mechanical or manual method to clear the soil ensures a clean slate for the new additions to the garden. Once the soil is prepared, leveling the surface and ensuring there are no low spots where water might pool is a vital finishing touch.
The timing of the planting operation significantly impacts the survival rate and the speed of establishment for these perennials. Early spring is often cited as the ideal time, as the cool temperatures and seasonal rains help the roots settle in before the summer heat. Alternatively, early autumn can also be a successful window, allowing the plants to develop a root system before entering winter dormancy. Avoiding the extreme heat of mid-summer is a professional standard that protects the investment of both time and plant material.
More articles on this topic
Planting techniques and spacing
When planting container-grown specimens, the depth at which the plant is placed in the soil is of paramount importance. The top of the root ball should be level with or slightly above the surrounding soil surface to prevent crown rot. Digging a hole that is twice as wide as the pot but no deeper ensures that the roots have loose soil to expand into. Firming the soil gently around the roots eliminates air pockets without causing excessive compaction that could hinder growth.
Spacing the plants correctly is a key design and horticultural decision that affects both the aesthetic and health of the garden. Generally, a distance of twelve to fifteen inches between plants allows for adequate air circulation and room for the clumps to expand. This spacing also ensures that each plant receives its fair share of sunlight and soil resources without being crowded by its neighbors. A professional layout often uses a triangular or staggered pattern to create a more natural and full appearance as the plants mature.
For those planting dormant corms, the orientation and depth of the corm are the two most critical factors to monitor. The corms should be planted about two to three inches deep, with the growing point or “eyes” facing upwards towards the sky. If the orientation is unclear, planting the corm on its side is a safe professional technique that allows the plant to find its own way up. Marking the planting sites with small stakes can help prevent accidental disturbance before the first shoots appear in the spring.
The final step of the planting process involves a thorough initial watering to settle the soil around the roots or corms. This “watering in” phase is essential for establishing good soil-to-root contact, which is necessary for moisture uptake. Applying a thin layer of organic mulch around the plants, being careful not to touch the stems, helps retain moisture and regulate temperature. This professional finish provides a protective environment that encourages rapid growth and reduces the need for immediate follow-up care.
More articles on this topic
Propagation by division
Division is the most common and effective method for propagating established clumps of the dense blazing star. This process is typically performed every three to four years when the center of the clump begins to show signs of reduced vigor. Spring is the preferred season for division, just as the new shoots are beginning to emerge from the soil. Using a sharp spade or garden fork, the entire clump is carefully lifted from the ground, minimizing damage to the storage organs.
Once the clump is lifted, the individual corms or sections can be separated by hand or with a clean, sharp knife. Each new division must have at least one or two healthy growing points and a portion of the root system to be successful. Any soft, damaged, or diseased sections should be discarded to ensure that only the healthiest material is replanted. A professional will keep the divisions moist and shaded during the process to prevent the delicate roots from drying out.
Replanting the divisions follows the same principles as planting new specimens, with a focus on proper depth and spacing. Because the divisions are already adapted to the local environment, they often establish very quickly and may even bloom in their first year. Enriched soil in the new planting site can give these young starts an extra boost as they begin their independent life. This method is an excellent way to maintain the vitality of the garden while expanding the population of this beautiful species.
The success rate of division is very high when the procedure is performed with care and attention to the plant’s physiology. It allows the gardener to replicate the exact characteristics of a favorite specimen, ensuring consistency in color and height. Furthermore, division is a cost-effective way to fill larger landscape areas with a proven and reliable performer. Professional horticulturists often use this technique to maintain the structural integrity and aesthetic balance of large-scale perennial borders.
Growing from seeds
Propagating the dense blazing star from seed is a rewarding but more time-consuming process compared to division. The seeds require a period of cold, moist stratification to break their natural dormancy and trigger germination. This can be achieved by sowing the seeds outdoors in the autumn and allowing nature to take its course over the winter. Alternatively, a professional can use a refrigerator to provide an artificial cold period for about sixty days before sowing indoors in early spring.
When sowing seeds in trays or pots, a well-draining seed-starting mix is essential to prevent fungal issues like damping off. The seeds should be covered only lightly with soil, as they may require some light to stimulate the germination process. Maintaining a consistent temperature and moisture level is the key to achieving a high germination rate among the collected seeds. Once the seedlings have developed two or three sets of true leaves, they are ready to be transplanted into larger individual containers.
Hardening off the young plants is a critical step before they can be safely introduced into the permanent garden landscape. This involves gradually exposing them to outdoor conditions, including direct sunlight and wind, over a period of one to two weeks. This process toughens the plant tissues and reduces the risk of transplant shock when they are finally placed in the ground. Professional gardeners never rush this stage, as it ensures the long-term survival and health of the nursery-grown stock.
Plants grown from seed usually take two to three years to reach their full flowering potential and mature size. This patient approach allows the plant to develop a substantial underground corm that will support large flower spikes in the future. While it requires more time, growing from seed allows for greater genetic diversity within the garden and the possibility of discovering unique variations. It is a fundamental skill for any professional gardener interested in the complete life cycle of their horticultural subjects.