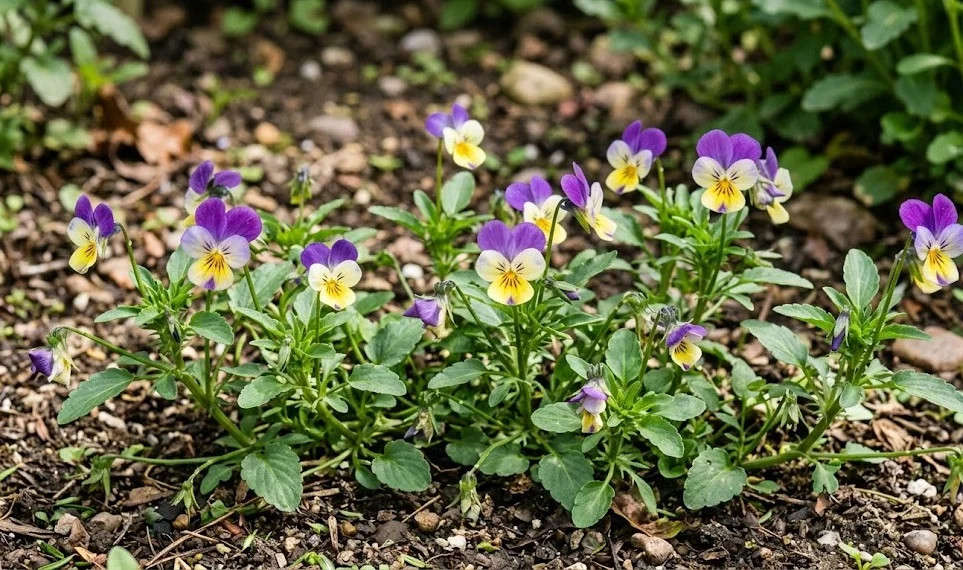
Mastering the techniques for overwintering the wild pansy is essential for gardeners who wish to enjoy their beauty across multiple seasons. While these plants are naturally cold-tolerant, the severity of modern winters can sometimes push them to their biological limits. Strategic protection and environmental management are the keys to ensuring that they survive the frost and bloom early the following spring. Understanding the specific physiological changes that the plant undergoes during the cold months allows for a more professional approach to winter care.
The wild pansy is actually quite remarkable in its ability to withstand freezing temperatures without dying. When the thermometer drops, the plant increases the concentration of sugars in its cells, which acts as a natural antifreeze. You might see the foliage turn a darker, almost purplish color as it adapts to the chilling conditions of late autumn. This natural resilience is what makes it one of the most beloved choices for winter-interest gardens and cold-weather landscaping.
However, the primary danger in winter is often not the cold itself, but the cycle of freezing and thawing that can occur. Rapid temperature changes can cause the soil to heave, which physically pushes the root system out of the ground. When roots are exposed to the cold air and drying winds, the plant can quickly dehydrate and perish before the spring arrives. Managing the stability of the soil temperature is therefore just as important as protecting the green parts of the plant.
Preparation for the winter months should begin well before the first hard frost is expected in your local area. A plant that is healthy and well-fed throughout the summer and autumn will have much better chances of surviving the dormant period. You should ensure the plants are well-watered right up until the ground freezes, as they still need moisture to survive the winter. Professional garden maintenance involves thinking several months ahead to provide the best possible start for the next growing year.
Assessing cold hardiness and timing
The specific hardiness of your wild pansies can vary depending on the variety and how they were raised before you bought them. Some cultivars are specifically bred for extreme cold, while others might be more suited to milder, Mediterranean-style winters. Knowing the exact hardiness zone of your garden helps you decide how much extra protection your plants will require. It is always better to be slightly over-prepared than to lose a beautiful display to an unexpected cold snap.
More articles on this topic
Timing the application of winter protection is a delicate task that requires keeping a close eye on the local weather forecast. If you cover the plants too early while the weather is still warm, you might accidentally trap heat and moisture, leading to rot. Wait until the plants have experienced a few light frosts and have naturally slowed their growth for the season. This “toughening up” period is essential for the plant to enter its dormant state correctly and safely.
The duration of the winter dormancy can vary significantly from one year to the next depending on the prevailing climate patterns. In some years, your pansies might stay green and even produce a few small flowers during a mild January thaw. In other years, they may be completely covered by snow for several weeks, which actually acts as a very effective natural insulator. Be prepared to adjust your care routine as the winter progresses and the environmental conditions shift.
Monitoring the state of the plants during a mid-winter thaw can provide valuable information about their survival. If the foliage looks firm and green after the snow melts, it is a very positive sign for a spring recovery. However, if you see mushy, blackened leaves, it may indicate that the frost penetrated too deeply into the plant tissues. This is the time to make small adjustments, such as adding more mulch or checking the soil moisture levels if the ground is not frozen.
Mulching and physical protection
Applying a layer of organic mulch is the most effective way to insulate the roots and stabilize the soil temperature throughout the winter. Materials like shredded bark, pine needles, or even clean straw are excellent choices for protecting your pansies. Aim for a layer that is about five to eight centimeters thick, ensuring that you do not bury the crown of the plant completely. This layer acts as a thermal blanket that prevents the damaging freeze-thaw cycles that can heave plants out of the ground.
More articles on this topic
Garden fleece or specialized row covers can provide an extra layer of protection for the foliage during periods of extreme cold. These lightweight, breathable fabrics allow light and moisture to reach the plant while trapping a thin layer of warmer air underneath. They are especially useful for protecting the flower buds if you are hoping for a very early spring bloom. Make sure the fabric is securely anchored so that it does not blow away during winter storms or heavy winds.
Evergreen boughs placed over the pansy beds can also serve as a traditional and very effective winter shield. They provide a bit of shade to prevent “sunscald” on the leaves while still allowing for plenty of air circulation to prevent fungal issues. This method is particularly popular in colder regions where snow cover is inconsistent and the wind is a major factor. Plus, it can give your winter garden a neat and structured appearance during the dormant months.
Windbreaks are another important consideration if your garden is in an open or particularly exposed location. Cold winter winds can strip moisture from the leaves much faster than the roots can replace it, especially if the ground is frozen. Placing a temporary burlap screen on the windward side of your pansy bed can significantly reduce this drying effect. A professional setup involves identifying these micro-climates and addressing the specific stressors of each individual spot.
Winter care for container plants
Pansies grown in pots and containers are much more vulnerable to the cold because their roots are not insulated by the mass of the earth. The soil in a pot can freeze solid very quickly, which can damage the delicate root hairs and kill the plant. If possible, move your containers to a more sheltered spot, such as against a south-facing wall or under a covered porch. Grouping several pots together can also help them retain heat more effectively than if they were sitting alone.
Wrapping the outside of the containers with bubble wrap or specialized insulating jackets can provide a vital buffer against the frost. This helps to keep the soil temperature more consistent and prevents the pot itself from cracking due to ice expansion. Make sure that the drainage holes remain clear so that any melting snow or rain can still escape the pot. A waterlogged pot in winter is a death sentence for almost any variety of wild pansy.
Watering remains a critical task for container plants even when the temperatures are hovering around the freezing mark. Check the soil moisture during any period of thaw to ensure that the plants have not dried out completely in the winter air. Only water during the warmest part of the day so that the moisture has a chance to soak in before the night frost. Use lukewarm water to avoid shocking the plant’s system if the soil is still quite cold.
If you have a cold frame or an unheated greenhouse, these are the ideal places to overwinter your most prized pansy containers. These structures offer the perfect balance of light, protection, and controlled humidity for the dormant plants. You still need to provide ventilation on sunny days to prevent the temperature from rising too high inside the structure. A well-managed cold frame can produce flowering pansies much earlier than those left out in the open garden.
Early spring recovery and transition
As the days begin to lengthen and the soil starts to warm, your overwintered pansies will begin to show signs of new life. This is the time to gradually remove the winter protection so that the plants can acclimate to the increasing light and air. Start by thinning out the mulch layer and taking off the garden fleece during the warmest hours of the day. A slow transition prevents the tender new growth from being scorched by the sudden intensity of the spring sun.
Cleaning up the plants is the next step once the danger of hard frost has passed and the growth has clearly resumed. Remove any dead or damaged leaves that didn’t make it through the winter to improve the plant’s appearance and air circulation. If the plants have been heaved out of the soil, gently press them back into place and add a little fresh compost around the base. This “spring cleaning” gives the plants the best possible start for their most vigorous blooming season.
The first application of fertilizer in the spring should be light and well-balanced to support the emerging foliage. Wait until you see clear signs of active growth before feeding, as the roots need to be functional to absorb the nutrients. A liquid feed is often the best choice for this first boost because it is easily accessible to the plant in the cool soil. Avoid high-nitrogen formulas early on, as you want to encourage a sturdy plant rather than just rapid, soft growth.
Early spring is also a great time to evaluate which varieties performed the best in your specific winter conditions. Take notes on which plants survived with the least amount of damage and which ones started blooming first. This data is invaluable for planning your future winter displays and refining your overwintering techniques. A professional gardener is always learning from the successes and failures of each season to create a more resilient garden.