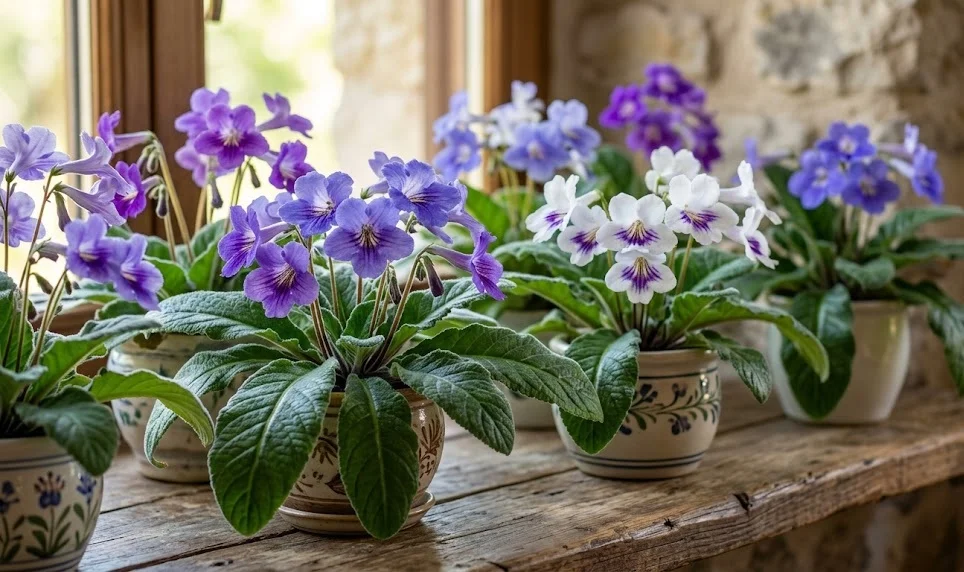
Understanding the fundamental needs of the Cape primrose is the first step toward achieving a vibrant and healthy indoor garden. These plants are beloved for their stunning, trumpet-shaped flowers and their relatively long blooming period throughout the year. To see them truly thrive, you must mimic their natural woodland habitat, which provides a balance of shade, moisture, and warmth. Many hobbyists find that once they grasp these basic environmental requirements, the plant becomes one of the most rewarding additions to their collection.
While they are often compared to African violets, these plants have their own unique personality and growth habits. You will notice that their leaves are long and velvety, which makes them sensitive to direct environmental stressors. It is important to treat them with a gentle hand and avoid moving them too frequently once they have settled into a spot. A consistent environment allows the plant to focus its energy on producing those iconic, colorful blossoms.
Temperature control plays a vital role in the daily maintenance of these delicate species during the growing season. They generally prefer a range that mirrors human comfort, ideally between 18 and 24 degrees Celsius during the daytime. If the room becomes too hot, you may see the leaves start to wilt or the flowers fade prematurely. Conversely, a sudden drop in temperature can shock the system, leading to a temporary halt in growth.
Finally, air circulation should never be overlooked when you are setting up your growing space. Stagnant air often leads to moisture buildup on the foliage, which can invite various fungal pathogens. A gentle breeze from a nearby window or a small fan can keep the atmosphere fresh without creating a harsh draft. Balancing these factors creates a sanctuary where your plants can reach their full aesthetic potential.
Creating the ideal potting environment
Selecting the right medium is perhaps the most critical technical decision you will make for your plant’s long-term health. A standard garden soil is far too heavy and will likely suffocate the sensitive root system within weeks. Instead, you should aim for a light, airy mix that provides excellent drainage while retaining just enough moisture. Many experts recommend a peat-based or coco-coir-based compost amended with plenty of perlite or vermiculite.
More articles on this topic
The container you choose should also be proportional to the current size of the root ball rather than the foliage. Because these plants have relatively shallow roots, a wide but shallow pot often works much better than a deep, narrow one. Plastic pots are frequently preferred because they hold moisture more consistently than terracotta, which can dry out too quickly. Ensure there are ample drainage holes at the bottom to prevent the dreaded “wet feet” syndrome.
When you are repotting, it is best to handle the plant by the root ball rather than the fragile leaves. Tearing a leaf can create an entry point for bacteria, so being deliberate and slow is always the best approach. Fill the pot loosely and avoid packing the soil down too firmly with your fingers. Oxygen needs to reach the roots just as much as water does, and loose soil facilitates this exchange beautifully.
The frequency of repotting typically depends on how quickly the plant outgrows its current home. Usually, once every year or two is sufficient to refresh the nutrients and provide a bit more room for expansion. If you notice roots poking out of the drainage holes, it is a clear signal that the plant is ready for a change. Refreshing the soil also helps to remove any accumulated salts from fertilizers that might harm the plant over time.
Humidity and its role in foliage health
Maintaining the correct humidity levels is a nuance that separates successful growers from those who struggle. These plants naturally grow in humid environments, so the dry air found in many modern homes can be a significant challenge. You should aim for a humidity level of at least fifty percent to keep the leaves looking lush and green. If the air is too dry, you might see the leaf tips turning brown and crispy.
More articles on this topic
One of the most effective ways to boost humidity without wetting the leaves directly is by using a pebble tray. Simply fill a shallow dish with stones and water, then place the pot on top, ensuring the bottom of the pot does not touch the water. As the water evaporates, it creates a localized microclimate of moist air around the plant. This method is much safer than misting, which can often lead to unsightly spots or rot on the velvety foliage.
Grouping your plants together is another natural way to increase the moisture content in the air. Plants naturally release water vapor through a process called transpiration, and several plants together can help each other stay hydrated. This collective environment is often more stable and easier to manage than trying to treat each plant individually. It also creates a beautiful display that highlights the variety within your collection.
During the winter months, when central heating is active, the humidity in your home can plummet drastically. You might need to move your plants to a naturally more humid room, like a bathroom or kitchen, provided they still get enough light. Alternatively, a high-quality humidifier can be a game-changer for serious collectors during the colder seasons. Monitoring these levels with a hygrometer will take the guesswork out of the process and ensure your plants stay happy.
Managing seasonal growth cycles
Just like most perennials, these plants go through distinct phases of activity and rest throughout the calendar year. During the spring and summer, you will see a burst of new leaf growth and a heavy production of flowers. This is the time when the plant requires the most attention in terms of feeding and monitoring. You will likely find yourself checking the soil moisture more frequently during these long, warm days.
As autumn approaches and the days begin to shorten, the plant’s metabolic rate naturally starts to slow down. You should begin to scale back your maintenance routine to reflect this transition into a rest period. Reducing the frequency of watering and stopping fertilization allows the plant to prepare for the winter months. Forcing a plant to grow vigorously when it wants to rest can lead to weakened stems and poor performance next year.
In the dead of winter, the plant may look somewhat stagnant, and this is completely normal behavior. Do not be tempted to overwater or fertilize in an attempt to “wake up” the plant during this time. The goal is simply to keep it alive and healthy until the light levels increase again in the spring. Understanding this cycle will prevent many common mistakes that lead to plant loss during the off-season.
When spring finally returns, you can gradually reintroduce more frequent watering and a light feeding schedule. You will often notice a few small green shoots appearing at the base of the older leaves. This is the perfect time to clean up any old, withered foliage and prepare the plant for its next big show. Watching this renewal every year is one of the most satisfying parts of being a gardener.
Essential daily maintenance habits
Checking your plants daily is the best way to catch any potential issues before they become serious problems. You don’t need to spend hours; just a quick glance at the leaves and a touch of the soil is usually enough. Look for signs of stress like drooping leaves, which can indicate either too much or too little water. Early detection of pests or diseases makes treatment significantly more effective and less stressful for the plant.
Cleaning the leaves is a small task that can have a big impact on the plant’s ability to photosynthesize. Because the leaves are hairy, they tend to collect dust over time, which can block light and harbor small insects. You can use a soft, dry makeup brush or a paintbrush to gently whisk away any debris from the leaf surface. Avoid using water or leaf shine products, as these can damage the delicate leaf structure.
Removing spent flowers, a process known as deadheading, encourages the plant to produce even more blooms. Instead of letting the plant waste energy on producing seeds, you are directing that energy back into the root system and future buds. Use a pair of clean, sharp scissors to snip the flower stalk as close to the base as possible. This also keeps the plant looking tidy and prevents any rotting petals from falling onto the foliage.
Lastly, pay attention to the orientation of your plant in relation to its light source. Over time, the leaves will naturally lean toward the light, which can cause the plant to become lopsided. Gently rotating the pot by ninety degrees every week will ensure that it grows symmetrically and stays balanced. This simple habit keeps your Cape primrose looking professional and well-cared for.
Advanced care for long-lived specimens
If you have successfully kept a plant for several years, you may notice it becoming a bit woody at the base. This is a natural part of the aging process, but it can sometimes hinder the production of new growth. You might consider “dropping” the plant deeper into its pot during the next repotting session to cover the bare stem. This encourages new roots to form along the buried section of the stem, revitalizing the plant.
Regularly refreshing the top inch of soil can provide a quick boost of nutrients without a full repotting. Carefully scrape away the old, crusty topsoil and replace it with fresh, high-quality potting mix. This helps to keep the soil structure open and allows water to penetrate more evenly to the roots below. It is a great way to maintain large specimens that are difficult to move into a bigger container.
For those who want to take their care to the next level, monitoring the pH level of the soil can be beneficial. These plants generally prefer a slightly acidic environment, usually with a pH between 5.5 and 6.5. If the soil becomes too alkaline, the plant may struggle to take up essential micronutrients like iron. Using a simple test kit can help you decide if you need to adjust your watering or fertilization routine.
Ultimately, the best care comes from observation and intuition developed over time. Every home environment is slightly different, so what works for one grower might need adjustment for another. Don’t be afraid to experiment slightly with placement or soil mixes to see what your specific plants respond to best. With patience and consistency, your Cape primrose can live for many years, becoming a true centerpiece of your home.
Troubleshooting common growth issues
When things go wrong, the plant usually gives you very specific signals that you can learn to interpret. Yellowing leaves, for example, are often a sign of overwatering or a lack of nitrogen in the soil. If only the bottom leaves are yellowing, it might just be the natural aging process of the foliage. However, if the yellowing is widespread, you should immediately check the moisture levels at the bottom of the pot.
Wilting can be incredibly confusing because it happens both when the plant is bone dry and when it is drowning. If you see a wilted plant, the first thing you should do is stick your finger into the soil. If the soil is wet, the roots are likely damaged and can no longer take up water. In this case, you should let the plant dry out completely before attempting to water it again.
Small, stunted leaves often suggest that the plant is not receiving enough light to support its growth. While they don’t like direct sun, they still need bright, indirect light to produce the energy required for large leaves. If your plant looks “leggy” with long gaps between the leaves, try moving it closer to a window. Just be sure to monitor it closely for any signs of sun scorch after the move.
If your plant stops blooming entirely, it may be a sign that it is “root bound” or needs more fertilizer. Sometimes, simply giving the plant a slightly larger pot can trigger a new flush of flowers within a few weeks. It could also be that the plant is not getting the slight temperature drop at night that encourages bud formation. Addressing these environmental cues can often get a stubborn plant back on track.