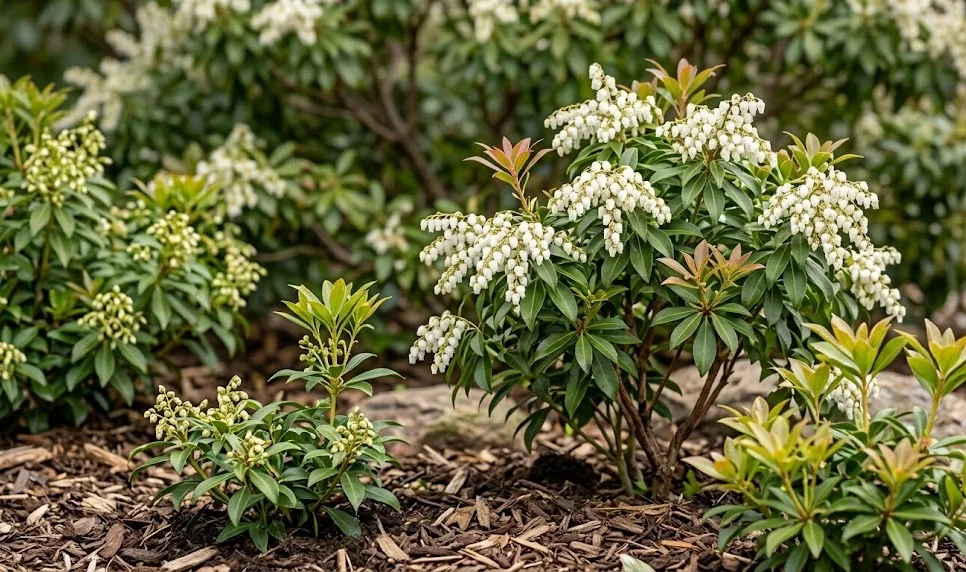
The successful establishment of Japanese andromeda in the garden begins with a precise planting technique that respects its unique root structure. This species is known for its shallow, fibrous roots that require an airy and acidic environment to flourish and expand. Before you even bring the plant home, you must prepare the site by ensuring the soil is free of compaction and rich in organic matter. Taking the time to plant correctly will save you from years of troubleshooting and will allow the shrub to reach its full aesthetic potential.
The first step in the planting process is choosing a location that offers the perfect balance of light and protection from the elements. Ideally, you should look for a spot with morning sun and afternoon shade, as this prevents the delicate leaves from scorching during the hottest part of the day. The site should also be sheltered from strong winds, which can be particularly damaging to the foliage in both summer and winter. Proper placement is the most important decision you will make, as transplanting an established shrub is often difficult and stressful for the plant.
When digging the hole for your new shrub, remember that width is far more important than depth for this specific species. You should aim for a hole that is at least twice as wide as the root ball but no deeper than the height of the container. This allows the shallow roots to spread out horizontally into the loosened soil, which is their natural growth habit. Planting the shrub too deeply is a common mistake that can lead to stem rot and the eventual death of the specimen.
Before placing the plant in the hole, you should gently loosen the roots if they have become pot-bound or are circling the container. If the root ball is very tight, you can make a few shallow vertical cuts to encourage new roots to grow outward into the surrounding soil. Once the plant is in position, backfill the hole with a mixture of native soil and acidic organic amendments like peat moss or aged pine bark. Firm the soil gently with your hands to remove large air pockets, but avoid packing it down too tightly with your feet.
Site preparation and soil enrichment
Achieving the correct soil chemistry is the most challenging but essential part of preparing the planting site for this shrub. You must ensure the pH level is firmly in the acidic range, as the plant cannot process nutrients effectively in alkaline conditions. If your garden has naturally alkaline soil, you may need to create a raised bed filled with a specialized ericaceous mix. This approach allows you to control the environment completely and provides the drainage that these plants find so necessary for health.
More articles on this topic
Organic matter is the key to creating a soil structure that holds moisture while still allowing for excellent drainage. You can incorporate large amounts of composted leaves, pine needles, or well-rotted manure into the planting area several weeks before you intend to plant. This preparation time allows the organic matter to begin integrating with the native soil and starts the process of lowering the pH. A rich, dark, and crumbly soil is the ideal medium for the delicate white roots of the Japanese andromeda to explore.
Drainage must be impeccable because, while the plant loves moisture, it cannot tolerate “wet feet” or standing water around its roots. You can test the drainage of your chosen site by digging a small hole, filling it with water, and seeing how long it takes to empty. If the water is still there after several hours, you will need to improve the drainage by adding grit or by choosing a different location. In heavy clay areas, planting on a slight mound can help excess water run away from the crown of the plant.
Finally, consider the long-term nutritional needs of the site before you finish the preparation phase. Adding a small amount of slow-release, acidic fertilizer to the planting area can provide the young shrub with a gentle boost as it settles in. However, you should avoid using high-nitrogen products at this stage, as the focus should be on root development rather than top growth. A well-prepared site is a gift to the plant that will pay dividends in the form of healthy foliage and abundant flowers for many years to can.
Propagation through semi-ripe cuttings
Propagating Japanese andromeda from cuttings is a rewarding way to expand your garden and share plants with other enthusiasts. The best time to take these cuttings is in late summer or early autumn when the current year’s growth has begun to firm up but is not yet fully woody. You should look for healthy stems that are free of pests and diseases, choosing tips that are about four to six inches long. Using a sharp, sterilized knife or pruning shears will ensure a clean cut that heals quickly and reduces the risk of infection.
More articles on this topic
Once you have taken the cuttings, you must prepare them by removing the leaves from the bottom half of the stem to expose the nodes. Dipping the cut end into a rooting hormone powder or gel can significantly increase the chances of success by stimulating the growth of new roots. You should then insert the cuttings into a well-draining propagation mix, such as a combination of perlite and peat moss. This medium provides the necessary support while allowing plenty of oxygen to reach the base of the cutting where roots will form.
Maintaining high humidity is essential during the rooting process because the cuttings have no roots to take up water and must absorb moisture through their leaves. You can create a mini-greenhouse effect by covering the pots with a clear plastic bag or by placing them in a specialized propagation chamber. The cuttings should be kept in a bright spot but out of direct sunlight, which would cause them to overheat and wilt. Regularly misting the foliage with water will help keep the humidity levels high and prevent the stems from drying out.
Patience is a virtue when propagating this species, as it can take several months for roots to develop sufficiently for transplanting. You can check for progress by very gently tugging on a cutting; if you feel resistance, it means roots are beginning to take hold in the medium. Once the roots are well-established, you should gradually acclimate the young plants to the lower humidity of the open air. These new specimens should be grown in containers for at least a year before they are strong enough to be planted out in the garden.
Alternative propagation methods and care
While cuttings are the most common method, some gardeners also find success with layering, which is a more natural way to propagate. This involves bending a flexible, low-growing branch down to the ground and burying a portion of it in the soil while it is still attached to the parent. You can encourage rooting by making a small nick in the bark on the underside of the buried section and pinning it down firmly. Over the course of a year, the buried section will develop its own root system and can eventually be severed from the main plant.
Growing Japanese andromeda from seed is a much slower process and is primarily used by plant breeders looking for new variations. The seeds are very fine and require a period of cold stratification to break their dormancy before they will germinate. They should be sown on the surface of an acidic seed-starting mix and kept consistently moist but never soggy. It can take several years for a seedling to reach a size where it is recognizable as a shrub, making this a task for the most patient of gardeners.
The care of young, propagated plants is much more intensive than the care of established specimens in the landscape. These juveniles have small root systems and are much more sensitive to fluctuations in moisture and temperature. You should keep them in a protected area where you can monitor them daily and provide supplemental water as soon as the soil surface feels dry. Protecting them from extreme cold during their first few winters is also essential to ensure their survival and long-term health.
Whether you choose cuttings, layering, or seeds, propagation allows you to understand the biology of the plant on a much deeper level. You will learn to recognize the subtle signs of growth and the specific conditions that encourage the development of healthy roots. This knowledge will make you a better gardener overall and will give you a greater appreciation for the mature shrubs in your landscape. Sharing the plants you have grown yourself is one of the greatest joys of the horticultural hobby and builds a sense of community.