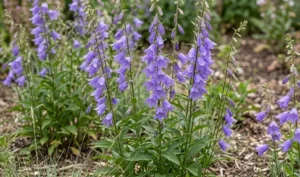
Successful establishment of the feltleaf ceanothus begins with a clear understanding of its unique planting requirements. This coastal native is known for its sensitivity to root disturbance and its preference for specific soil conditions from the very start. By following professional planting techniques, you can ensure that your new shrub settles into its home without unnecessary stress. Propagation also offers a rewarding way to expand your collection or share this beautiful species with others.
Site preparation and timing
The preparation of your planting site is the foundation upon which the future health of your ceanothus will be built. You should start by clearing the area of all weeds and grass that might compete with the young plant for nutrients. It is helpful to dig a wide area rather than just a small hole to encourage the roots to spread. Avoid adding heavy amounts of fertilizer to the planting hole as this can burn the sensitive new roots.
Timing is a crucial factor when you are planning to introduce a new specimen into your garden landscape. The best time to plant is typically in the late autumn or early spring when the weather is mild and cool. Planting during these windows allows the root system to establish itself before the intense heat of summer arrives. If you must plant in the summer, you will need to be extremely diligent with your watering schedule to prevent desiccation.
Understanding the light patterns in your selected spot is essential for the long-term success of the project. You should monitor how many hours of direct sunlight the area receives during the peak of the growing season. This species requires at least six hours of sun to develop its characteristic dense growth and abundant blue flowers. A spot that is too shady will result in a leggy, weak plant that is more prone to various diseases.
Soil drainage must be confirmed one last time before you commit to placing the plant in the ground permanently. You can improve the local drainage by incorporating some coarse sand or fine gravel into the surrounding soil. If the entire area suffers from poor drainage, you might consider building a small mound to elevate the root ball. Ensuring that water can move freely away from the base of the plant is the most important part of site preparation.
More articles on this topic
The planting process
When you are ready to put the plant in the ground, you should handle the root ball with extreme care. Ceanothus species are notoriously sensitive to root disturbance, which can lead to a condition known as transplant shock. Gently remove the plant from its nursery container without pulling on the main stem or breaking the soil mass. If the roots are slightly circled, you can very gently loosen only the outermost ones to encourage outward growth.
The planting hole should be no deeper than the root ball itself but at least twice as wide for the best results. You want the top of the root ball to be level with or slightly above the surrounding soil surface. Planting too deep can cause the main trunk to rot, while planting too shallow can cause the roots to dry out. Fill the space around the root ball with the native soil you removed earlier, tamping it down lightly.
Watering immediately after planting is essential to settle the soil and remove any large air pockets that might exist. Use a gentle stream of water to thoroughly soak the entire planting area without washing away the surface soil. You might notice some settling of the earth, in which case you can add a little more soil to maintain the level. This initial hydration provides the moisture the plant needs to begin the process of anchoring itself into its new home.
Applying a layer of mulch around the base of the new plant provides several important benefits for its early survival. A two-inch layer of wood chips or bark helps to maintain a consistent soil temperature and conserve precious moisture. You must be careful to keep the mulch a few inches away from the actual trunk to prevent moisture-related rot. This simple step creates a protected zone that helps the young ceanothus compete against weeds and weather.
More articles on this topic
Propagation from cuttings
Taking semi-hardwood cuttings is the most common and effective way for home gardeners to propagate this species. You should look for healthy, non-flowering shoots that have begun to firm up toward the end of the summer season. Each cutting should be about four to six inches long and taken with a sharp, sterilized pair of pruning shears. Removing the lower leaves and dipping the cut end in a rooting hormone can significantly increase your success rate.
The medium you choose for your cuttings should be very well-draining and free of any pathogens or weed seeds. A mixture of perlite and peat moss or a dedicated seed-starting mix usually works best for these sensitive stems. Place the cuttings in a pot and keep them in a bright, warm location but out of direct sunlight. Covering the pot with a clear plastic bag can help maintain the high humidity levels that are necessary for root development.
Patience is required during this phase as it can take several weeks or even months for the roots to form. You should check the moisture of the medium regularly, ensuring it stays damp but never becomes soggy or waterlogged. Once you see new growth appearing on the top of the cuttings, it is a good sign that roots have developed. Gently tugging on a cutting can also help you determine if it has firmly anchored itself in the potting mix.
Gradually acclimating the young plants to the outdoor environment is a process known as hardening off. You should start by moving the pots to a sheltered spot outside for a few hours each day, slowly increasing the time. This helps the tender new growth adjust to the wind, temperature fluctuations, and the intensity of the sun. Once they are strong enough, you can transplant them into larger containers or their final positions in the garden border.
Growing from seeds
Starting ceanothus from seeds is a fascinating process, although it requires more effort and time than using cuttings. The seeds have a very hard outer coat that must be broken down before they can germinate successfully. In nature, this often happens during a wildfire, but gardeners can mimic the process using various heat treatments. Pouring hot water over the seeds and letting them soak overnight is one common method used by experts.
Cold stratification is often the next step after the heat treatment to simulate a winter period for the seeds. You can place the treated seeds in a moist medium and keep them in the refrigerator for about one to three months. This process tells the seed that the winter has passed and it is now safe to begin the germination cycle. Without this specific sequence of events, the germination rate of ceanothus seeds can be quite low.
Once the stratification period is over, you can sow the seeds in a light, sandy seed-starting mix in a warm spot. Keep the soil surface moist but not wet, and wait for the small green shoots to emerge from the ground. Seedlings are very delicate and should be protected from harsh conditions and pests like slugs or snails. It is often best to grow them in individual pots until they are large enough to handle the transition to the garden.
Growing from seed allows for a greater genetic diversity in your garden and can sometimes result in unique plant characteristics. However, you should be aware that the resulting plants may not be identical to the parent shrub if it was a hybrid. It takes several years for a seedling to reach a size where it can produce its first beautiful blue flowers. Despite the wait, the satisfaction of growing a tree-like shrub from a tiny seed is a rewarding experience for any gardener.