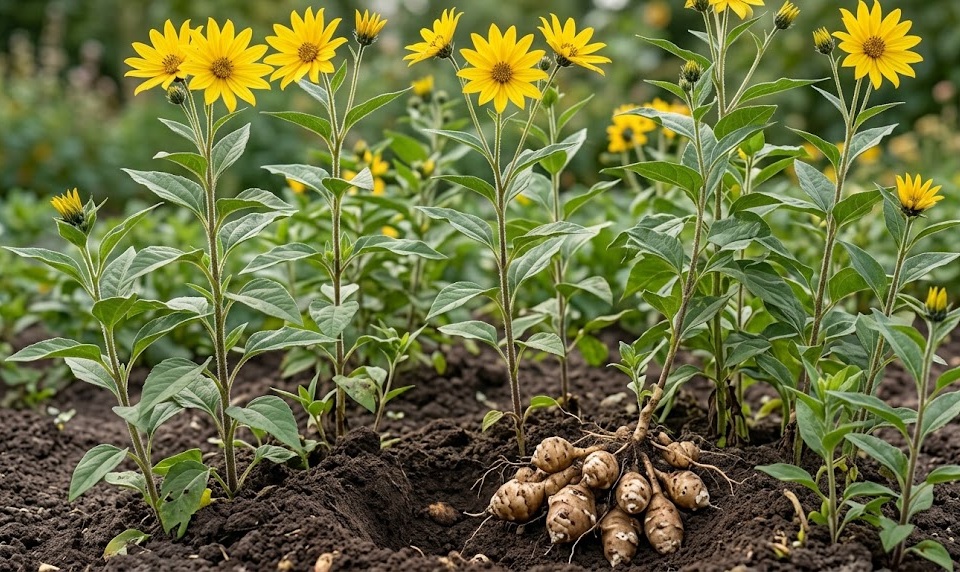
Successful propagation of the Jerusalem artichoke begins with a clear understanding of the plant’s unique growth habits and environmental preferences. Unlike many other root crops, this plant is remarkably easy to start from tubers, provided you select healthy specimens and prepare the ground appropriately. You must consider the long-term placement of your planting site, as these perennials are vigorous and will likely remain in the same spot for many years. Proper planning during the planting stage is the most effective way to ensure a high-yield harvest and manageable garden growth.
Choosing the right site for your new artichoke bed is the first critical step in the planting process. These plants thrive in areas that receive full sun, although they are remarkably adaptable to various light conditions and soil types. You should look for a spot with well-draining soil to prevent the tubers from rotting during the wet spring months when they are most vulnerable. Since they can grow quite tall, it is also wise to place them where they will not shade out other sun-sensitive plants in your garden.
Before you put any tubers in the ground, you must take the time to prepare the soil by removing weeds and loosening the earth to a depth of at least thirty centimeters. Incorporating organic matter such as compost or aged manure will provide the necessary nutrients for the initial burst of growth. The soil should be crumbly and easy to work with, allowing the new shoots to push through the surface without undue resistance. A well-prepared bed acts as a reservoir of moisture and nutrients that supports the plant through its entire life cycle.
The timing of your planting is just as important as the location, as the tubers need the cool soil of early spring to begin their natural development. You can typically start planting as soon as the ground can be worked and the risk of deep, penetrating frosts has passed. In most temperate climates, this window opens several weeks before the last expected frost date of the season. Getting the tubers in the ground early allows them to establish a strong root system before the intense heat of summer arrives.
Selecting and preparing the seed tubers
When choosing tubers for planting, look for specimens that are firm, healthy, and free from any visible signs of mold or soft spots. Larger tubers often contain more stored energy, which can lead to faster initial growth and a more robust plant in the first season. However, even smaller tuber fragments with at least two or three visible “eyes” or buds are capable of producing a successful crop. Selecting high-quality starting material is a simple insurance policy against poor germination rates or weak early growth.
More articles on this topic
If you have large tubers, you can choose to plant them whole or cut them into smaller sections to increase your total number of plants. Each section must contain at least one healthy bud to ensure that a new shoot will emerge once it is buried in the soil. If you do cut the tubers, allow the cut surfaces to dry and “callus” over for a day or two before planting them to reduce the risk of infection. This professional technique helps protect the internal tissues of the tuber from soil-borne pathogens and moisture-related decay.
You should also consider the specific variety of Jerusalem artichoke you wish to grow, as different cultivars offer various tuber shapes and skin colors. Some varieties produce smoother tubers that are much easier to clean and prepare in the kitchen, while others are prized for their specific flavor profiles. Researching the characteristics of different strains will help you choose the one that best fits your culinary preferences and local growing conditions. Consistency in your selection process ensures that you know exactly what to expect when harvest time arrives.
Before planting, some gardeners find it helpful to soak the tubers in room-temperature water for a few hours to rehydrate them. This can be particularly useful if the tubers have been in storage for a long time and appear slightly shriveled or dry. The extra moisture jump-starts the biological processes within the tuber and can lead to faster sprouting once they are placed in the warm earth. A little bit of preparation goes a long way in ensuring a uniform and healthy stand of plants.
Technical aspects of the planting process
The actual process of planting involves placing the tubers in trenches or individual holes at a depth of approximately ten to fifteen centimeters. You should space the tubers about thirty to forty centimeters apart within the row to allow enough room for the clusters to expand. If you are planting multiple rows, ensure there is at least a meter of space between them to facilitate easy maintenance and harvest. Proper spacing is essential for preventing overcrowding and ensuring that each plant has access to sufficient light and nutrients.
When placing the tubers in the soil, try to orient them so that the most prominent buds or “eyes” are facing upward toward the surface. While the plant is resilient enough to find its way even if planted upside down, this orientation reduces the energy needed for the shoot to reach the light. Gently firm the soil over the tubers with your hands or the back of a rake to ensure good contact between the tuber and the earth. Avoid packing the soil too tightly, as this can make it difficult for the delicate new shoots to emerge.
Once the planting is complete, give the area a thorough watering to settle the soil and provide immediate moisture to the dormant tubers. This initial hydration is critical for triggering the growth cycle and ensuring that the soil remains in close contact with the root-forming zones. You might also want to mark the ends of the rows with stakes so you don’t accidentally disturb the area before the shoots appear. A neat and organized planting site is much easier to manage as the season progresses and the garden becomes busier.
If you are planting in an area with a high population of burrowing animals, you might consider lining your planting trench with a fine wire mesh. This physical barrier prevents rodents from digging up and eating the tubers before they have a chance to sprout and establish themselves. While this adds a bit of extra work during the planting stage, it can save your entire crop from destruction in certain environments. Protecting your investment from the very beginning is a hallmark of an experienced and successful gardener.
Propagation through division and expansion
Beyond initial planting, Jerusalem artichokes are incredibly easy to propagate through the simple division of established tuber clusters. Every autumn or spring, you can dig up a portion of your existing crop and relocate a few tubers to a new area of the garden. This process allows you to expand your production without having to purchase new seed stock every year. The natural productivity of the plant makes it an ideal candidate for self-sustaining agricultural practices and long-term food security.
When dividing a cluster, aim to take a representative sample of different sizes to ensure a diverse and healthy new population. You should treat these relocated tubers exactly like new seed stock, ensuring they are planted at the correct depth and spacing in their new home. This constant cycle of renewal keeps the original bed from becoming overly congested and helps maintain the vitality of the genetics. Division is a natural part of the plant’s life cycle that you can harness for your own agricultural benefit.
You may also notice that small tubers left in the ground after harvest will spontaneously sprout the following spring, effectively self-propagating the crop. While this is convenient for maintaining a permanent bed, you must manage these “volunteers” to prevent them from becoming an unmanageable thicket. You can simply dig up and move any plants that sprout outside of your designated rows to keep the garden organized. Professional management involves guiding the plant’s natural enthusiasm rather than trying to suppress it entirely.
Finally, consider sharing your extra tubers with other gardeners or members of your community to spread the joy of growing this resilient crop. Because they are so productive, you will often find yourself with more tubers than you can reasonably eat or replant yourself. Sharing healthy propagation material is a great way to build local food networks and encourage others to experiment with sustainable gardening. The Jerusalem artichoke is a gift that keeps on giving, year after year, with minimal effort from the grower.