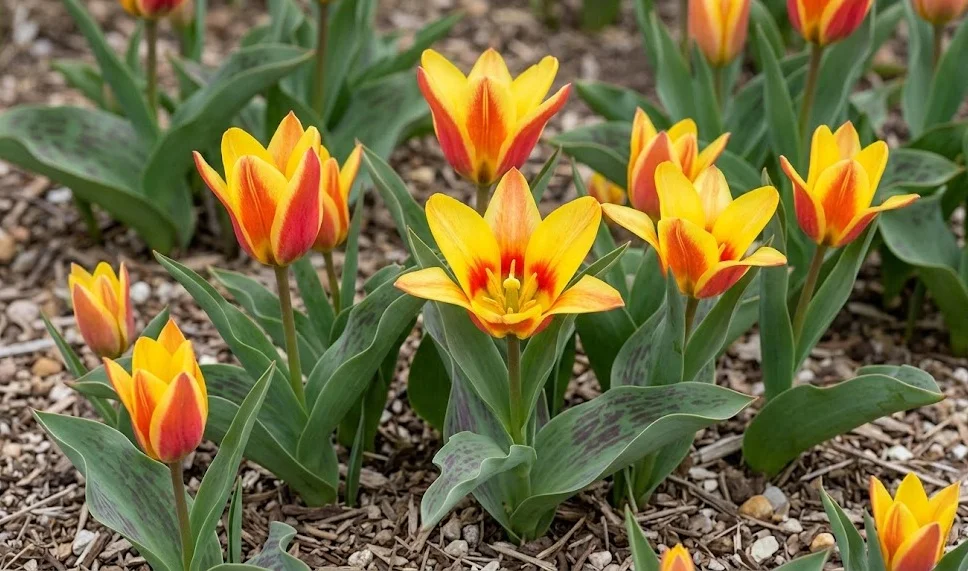
Successful establishment of the kaufmann tulip depends largely on the precision of the planting process and the timing of propagation. This species requires a specific set of conditions to transition from a dormant bulb into a thriving, flowering plant. You must pay close attention to the depth, orientation, and soil preparation to ensure the best possible results in the first growing season. Propagation, whether through natural division or intentional intervention, allows you to expand your collection and maintain the vigor of existing colonies.
The planting window for kaufmann tulips is typically in the mid-to-late autumn, once the soil temperature has dropped significantly. Planting too early can result in premature top growth, which may be damaged by the first hard frosts of winter. Conversely, planting too late might not leave enough time for the root system to establish itself before the ground freezes solid. Finding the perfect balance in October or November is key to a spectacular spring display.
Propagation of these tulips is most commonly achieved through the natural production of offset bulbs, often called bulblets. Over time, a single mother bulb will produce several smaller clones that eventually grow large enough to flower on their own. This process is highly efficient and ensures that the new plants will be genetically identical to the original specimen. Managing these offsets is a fundamental skill for any gardener looking to naturalize tulips in a permanent landscape.
While seed propagation is possible, it is a much slower method that is usually reserved for professional breeders or dedicated hobbyists. It can take several years for a seedling to develop a bulb large enough to support its first flower. Most home gardeners will find that vegetative propagation through offsets provides much more immediate and reliable results. Regardless of the method chosen, patience and attention to detail are the hallmarks of successful tulip propagation.
Site selection and soil preparation
The first step in planting kaufmann tulips is identifying a location that provides full sun and exceptional drainage. You should look for areas of the garden that are the first to thaw in the spring, as these spots usually have the best solar exposure. Avoiding low-lying areas where water tends to collect during the winter is essential for preventing bulb rot. A slightly elevated bed or a sloped rock garden is often the ideal environment for these Central Asian natives.
More articles on this topic
Preparation of the soil should involve deep cultivation to ensure that the roots can penetrate easily into the substrate. You should dig the planting area to a depth of at least twenty-five centimeters, breaking up any large clods or stones. Mixing in a generous amount of sharp sand or fine grit will enhance the drainage and provide the gritty texture these tulips prefer. If the soil is particularly poor, you can incorporate a small amount of well-decomposed organic matter to provide a baseline of nutrients.
The chemistry of the soil must also be considered during the preparation phase to ensure long-term success. You should aim for a neutral to slightly alkaline pH, which mirrors the limestone-rich soils of the tulip’s native habitat. If your soil test indicates a highly acidic environment, adding a small amount of dolomitic lime can help correct the balance. Providing the right chemical foundation from the start reduces the need for heavy fertilization later in the plant’s life.
Finally, consider the surrounding vegetation and how it might impact the tulips’ access to resources. You should clear away any aggressive weeds or grass that could compete with the young tulip shoots in the spring. Establishing a clean planting bed allows the bulbs to grow without the stress of nutrient or light competition. A well-prepared site is the best insurance policy for a healthy and productive tulip colony.
Planting techniques and depth
When you are ready to plant the bulbs, you must ensure that each one is oriented correctly with the pointed end facing upward. The basal plate, which is the flat part at the bottom of the bulb, is where the roots will emerge and must be in firm contact with the soil. If a bulb is planted sideways or upside down, it will waste valuable energy trying to reorient itself as it grows. Taking a few extra seconds to check the orientation of each bulb pays dividends in the spring.
More articles on this topic
The depth at which you plant the kaufmann tulip is critical for both its survival and its ability to flower. You should aim for a depth of approximately ten to fifteen centimeters, measured from the base of the bulb to the soil surface. Planting too shallowly leaves the bulbs vulnerable to temperature fluctuations and foraging animals like squirrels or chipmunks. Conversely, planting too deeply can make it difficult for the delicate shoots to reach the sunlight in early spring.
Spacing between the bulbs should be at least ten centimeters to allow room for the broad foliage to expand without overlapping. You should avoid overcrowding the bulbs, as this can restrict air circulation and increase the risk of fungal diseases. If you are planting in large drifts for a naturalized look, you can scatter the bulbs and plant them where they land for a less formal appearance. Proper spacing ensures that each plant has access to its own dedicated pocket of nutrients and moisture.
After the bulbs are placed in the soil, you should backfill the hole carefully and firm the soil down with your hands. You must avoid stepping on the planting area, as this can compact the soil and damage the emerging root systems. Watering the site immediately after planting helps settle the soil around the bulbs and eliminates any large air pockets. A layer of light mulch can then be applied to protect the site from erosion and sudden temperature changes.
Vegetative propagation through offsets
The most effective way to multiply your kaufmann tulips is by separating the offsets that form around the base of the mature bulbs. You should perform this task in late summer or early autumn when the plants are completely dormant. Digging up an established clump will reveal a cluster of bulbs of varying sizes, from large flowering-sized individuals to tiny bulblets. Carefully pulling these apart by hand is the first step in the propagation process.
Once the bulbs are separated, you should sort them by size to determine which ones are ready for immediate replanting in the main garden. The largest offsets will likely flower the following spring, while the smaller ones may need a year or two of growth in a nursery bed. You should treat the nursery bed bulbs with the same care as your main display, ensuring they have excellent drainage and adequate light. Growing them on in a dedicated area allows them to reach maturity without competing with larger plants.
The health of the mother bulb should be evaluated during the division process to ensure she is still vigorous enough to produce more offsets. You should discard any bulbs that feel soft, show signs of mold, or have significant physical damage. Selecting only the healthiest specimens for propagation ensures that your new colony will be strong and disease-resistant. This selective process is vital for maintaining the quality of your tulip collection over the years.
Replanting the offsets follows the same general rules as planting new bulbs, though smaller bulblets can be planted slightly shallower. You should keep the different sizes grouped together so you can easily track their progress toward flowering size. Labeling the planting areas is a professional touch that helps you remember which varieties and sizes are located in each part of the garden. Successful vegetative propagation is a rewarding way to create massive displays of color at very little cost.
Propagation from seed
Growing kaufmann tulips from seed is a task that requires an immense amount of patience and a long-term perspective. You must allow the flowers to be pollinated and wait for the seed pods to turn brown and begin to split open in early summer. Collecting the seeds at the right moment is essential, as they are light and can be easily scattered by the wind. Once collected, the seeds should be stored in a cool, dry place until they are ready for sowing in the autumn.
The seeds should be sown in a cold frame or a dedicated seed tray filled with a gritty, well-draining compost mix. You should cover them with a thin layer of fine grit to protect them from being washed away by rain while still allowing light to reach the surface. The trays should be kept outdoors where they can experience the natural temperature fluctuations of winter, which is often necessary to break seed dormancy. Germination typically occurs in the spring as the weather warms.
Young tulip seedlings look very much like blades of grass and can be easily mistaken for weeds if you are not careful. You must protect these tiny plants from drying out and ensure they receive adequate light throughout their first growing season. It is best to leave the seedlings in their original tray for at least two years to allow them to form a small, stable bulb. During this time, a very dilute liquid fertilizer can be applied to support their slow development.
After the second or third year, the small bulbs can be transplanted into a nursery bed where they will continue to grow for several more seasons. You can expect to wait anywhere from four to seven years before a seed-grown kaufmann tulip produces its first bloom. While this method is slow, it offers the exciting possibility of discovering new color variations or growth habits. For the professional gardener, seed propagation is the ultimate way to understand the full life cycle of the species.