The successful cultivation of gloxinia begins with precise planting techniques and a strategic approach to propagation. Whether starting from a dormant tuber or attempting to create new plants from leaf cuttings, attention to detail is paramount. This process requires a balance of warmth, moisture, and sterile conditions to ensure the young plants thrive. Mastering these foundational skills allows a gardener to expand their collection and maintain the vigor of their existing specimens.
Proper potting and tuber planting
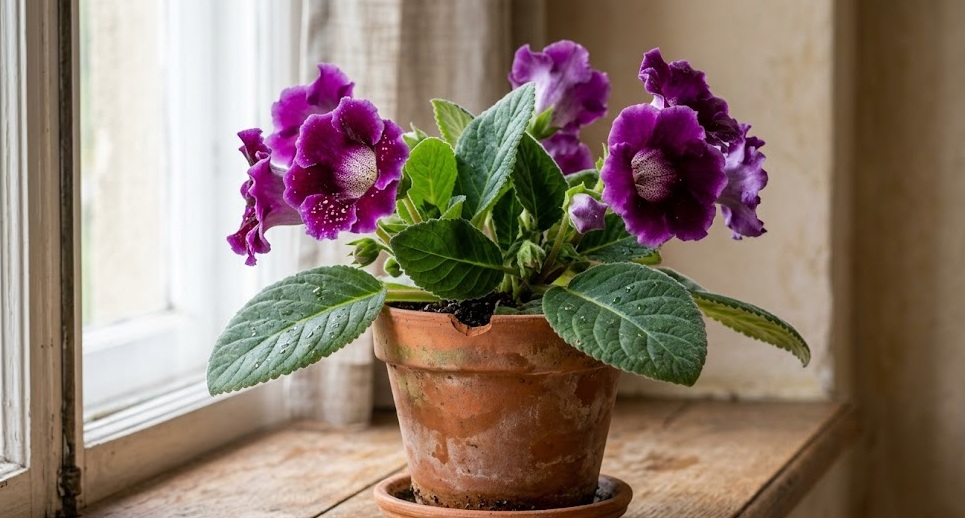
When planting a dormant tuber, the orientation and depth are critical for a successful start. The tuber usually has a slightly concave side, which should always face upward when placed in the soil. It should be buried so that the top of the tuber is just level with or slightly below the soil surface. Planting too deep can lead to rot, while leaving it too exposed can cause the emerging shoots to dry out.
The choice of container should reflect the size of the tuber to ensure proper moisture management. A pot that is about two centimeters wider than the tuber is generally considered the professional standard. Using a container with ample drainage holes is essential to prevent water from stagnating around the base. This initial setup provides the stable foundation necessary for the plant to establish its root system.
Before planting, it is wise to inspect the tuber for any signs of physical damage or disease. A healthy tuber should feel firm to the touch and be free from any mold or soft spots. If the tuber appears excessively dry, it can be placed on a damp surface for a few hours to initiate hydration. Starting with a high-quality, healthy tuber is the most important factor in achieving a spectacular bloom.
After the tuber is positioned in the pot, the soil should be lightly pressed down to remove large air pockets. The first watering should be thorough but gentle, ensuring that the entire root zone is moistened. Place the pot in a warm location with bright, indirect light to encourage the first signs of growth. Patience is required during this phase, as it may take several weeks for the first green shoots to appear.
More articles on this topic
Leaf cutting propagation methods
Propagation via leaf cuttings is one of the most popular and effective ways to create new gloxinia plants. A healthy, fully expanded leaf should be selected from a vigorous mother plant for the best results. The petiole is usually cut to a length of about three centimeters before being inserted into a light propagation medium. This method relies on the plant’s ability to form adventitious roots and eventually a new tuber at the base of the leaf.
For more advanced growers, the leaf blade itself can be used to produce multiple new plantlets. By making shallow incisions across the main veins on the underside of the leaf, you can stimulate growth at several points. The leaf is then laid flat on top of moist soil and held in place with small pins or pebbles. Under high humidity, small tubers will eventually form at each of the wounded sites along the veins.
Maintaining high humidity is essential during the rooting process to prevent the leaf from wilting. Many professionals use a clear plastic dome or a simple plastic bag to create a mini-greenhouse environment. The temperature should remain consistently warm, ideally around 22 to 24 degrees Celsius, to speed up the development of roots. Light should be bright but never direct, as the intense sun could cook the leaf under the plastic.
Once the new plantlets have developed several leaves and a small tuber, they can be carefully separated and potted individually. This transition period requires careful handling to avoid damaging the delicate new root systems. The young plants should be kept in a protected environment until they are strong enough to handle normal household conditions. Propagation by leaf cuttings is a rewarding way to share favorite varieties with other enthusiasts.
More articles on this topic
Tuber division and separation
Large, older tubers can sometimes be divided into multiple sections to create new plants and rejuvenate the original specimen. This process is best performed in the spring just as the tuber is beginning to wake up from its winter rest. Each section must contain at least one healthy eye or growing point to ensure it can produce a new plant. Using a sterile, sharp knife is critical to minimize tissue damage and prevent the introduction of pathogens.
After cutting the tuber, the exposed surfaces should be allowed to callus over for a day or two before planting. Some growers apply a light dusting of fungicidal powder to the cut areas to provide extra protection against rot. This healing phase is vital for the long-term survival of the new tuber sections. Once the wounds are dry, the pieces can be planted following the standard tuber planting guidelines.
Dividing a tuber is a more advanced technique that requires confidence and a steady hand. It is often used when a plant has become too large for its container or when the center of the tuber shows signs of aging. This method results in larger plants more quickly than starting from leaf cuttings or seeds. However, the risk of losing the entire tuber is higher, so it should be approached with caution.
The care for a divided tuber section is identical to that of a full tuber, though growth may be slightly slower initially. It is important not to overwater these sections during the first few weeks as they are more vulnerable to decay. Once the roots are established, the plant will usually grow with the same vigor as its parent. Successful division allows for the preservation of specific genetic traits across multiple generations.
Seed sowing and seedling care
Growing gloxinia from seed is the most challenging propagation method but also the most rewarding for those interested in hybridizing. The seeds are extremely fine, almost like dust, and must be handled with great care to avoid loss. They should be sown on the surface of a sterile, finely textured seed-starting mix without being covered by soil. Light is actually required for the germination process, so the seeds must remain exposed.
A consistent temperature of about 24 degrees Celsius and high humidity are necessary for successful germination. The seed tray should be covered with glass or plastic and placed in a bright location but away from direct sun. Germination usually occurs within 14 to 21 days, though it can be irregular depending on the freshness of the seeds. Constant monitoring is required to ensure the surface of the soil never dries out during this critical time.
Once the seedlings have produced their first pair of true leaves, they can be carefully thinned to prevent overcrowding. They are extremely delicate at this stage and should only be handled by their leaves, never by their stems. Providing a weak liquid fertilizer once a week will help support their rapid growth and development. The young plants need plenty of light to prevent them from becoming leggy and weak.
As the seedlings grow larger, they can be moved into individual small pots to continue their development. It usually takes about six to seven months for a plant grown from seed to reach its first flowering stage. This process allows for the discovery of new color variations and flower forms that may not be available commercially. Growing from seed is a test of patience and skill that marks a true expert in the field.

