The successful establishment of a bluebeard shrub begins with careful site selection and a thorough understanding of the plant’s reproductive methods. This species is relatively easy to integrate into a variety of garden styles, provided its basic needs for light and drainage are met from the very first day. Whether you are starting with a nursery-bought specimen or trying to grow your own from cuttings, the initial steps are crucial for long-term success. A professional approach to planting ensures that the shrub develops a robust root system capable of supporting its vibrant late-season floral display.
Selecting the ideal site for planting
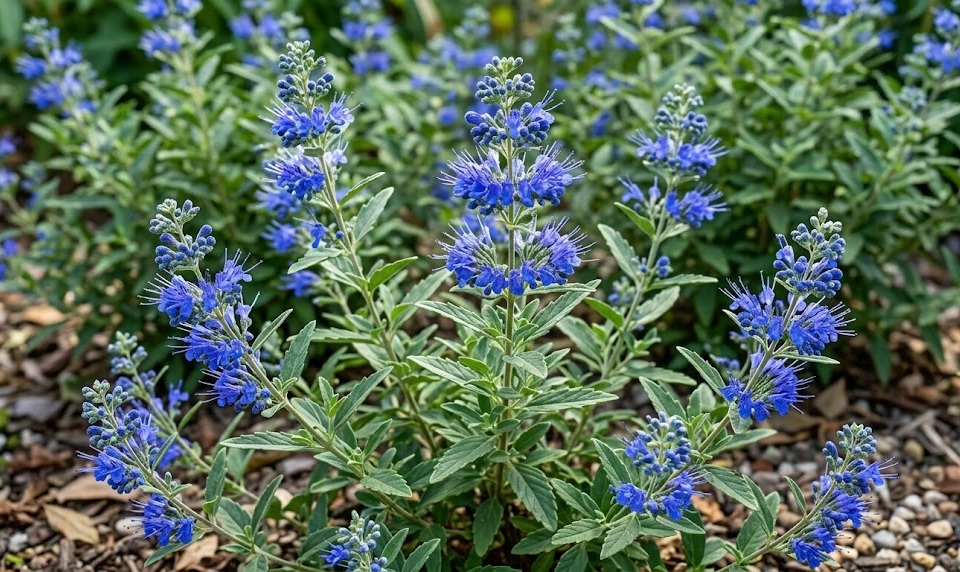
Before you even dig a hole, you must evaluate your garden to find a spot that offers maximum sunlight exposure. The bluebeard is a sun-loving species that requires at least six to eight hours of direct light to thrive and produce its signature flowers. Areas that are partially shaded by large trees or buildings will result in a leggy plant with sparse foliage and muted colors. Observing your garden’s light patterns throughout a full day will help you identify the most suitable locations for this shrub.
Soil drainage is the second non-negotiable factor when choosing a site for your bluebeard. You should avoid any areas where water tends to collect after a rainstorm or where the soil remains muddy for long periods. This plant is highly susceptible to root rot, so a well-drained, sandy, or gravelly soil is much better than heavy clay. If your soil is naturally heavy, consider planting on a slope or creating a small mound to facilitate faster water runoff.
The local microclimate also plays a role, especially in regions that experience harsh winter winds. While the shrub is hardy, an extremely exposed site can lead to excessive die-back during the coldest months of the year. Positioning the plant near a south-facing wall or a protective hedge can provide the extra warmth and shelter it needs to thrive. You should also consider the proximity to other plants, ensuring there is enough room for air to circulate freely around the mature shrub.
Finally, think about the visual impact of the plant within your overall landscape design. The bluebeard is at its best in late summer, so it works well when paired with other autumn-blooming perennials or ornamental grasses. You should place it where its aromatic foliage can be appreciated, perhaps near a walkway or a seating area. Planning the layout before planting ensures that the shrub has enough room to reach its full size without crowding its neighbors.
More articles on this topic
Step-by-step planting procedure for success
Once you have chosen the site, the actual planting process should be done with care to minimize transplant shock. Start by digging a hole that is twice as wide as the root ball but no deeper than the container the plant is currently in. Wide holes allow the roots to spread out into loosened soil more easily, which is essential for quick establishment. You should avoid adding too much rich fertilizer to the hole, as the bluebeard prefers moderate soil conditions over highly fertile ones.
Carefully remove the plant from its container and check the root system for any signs of being pot-bound. If the roots are circling the base, gently tease them outward to encourage them to grow into the surrounding soil. Place the shrub in the center of the hole, ensuring that the top of the root ball is level with the surrounding ground surface. Planting it too deep can lead to stem rot, while planting it too high can cause the roots to dry out prematurely.
Fill the hole with the original soil you removed, tamping it down lightly as you go to remove any large air pockets. You can mix in a small amount of compost if your soil is particularly poor, but avoid heavy amendments that change the soil texture too drastically. Once the hole is filled, create a small basin of soil around the base to help hold water during the initial watering sessions. This simple step ensures that the moisture reaches the roots directly rather than running off the surface.
Immediately after planting, give the shrub a thorough watering to settle the soil around the roots. This first deep soak is critical, even for a drought-tolerant plant like the bluebeard, as it helps the plant recover from the stress of being moved. You should monitor the moisture levels daily for the first few weeks, watering whenever the top inch of soil feels dry. Applying a thin layer of organic mulch will help retain this moisture and keep the developing roots cool.
More articles on this topic
Propagation through softwood cuttings in summer
Softwood propagation is one of the most effective ways to create new bluebeard plants that are identical to the parent. The best time to take these cuttings is in late spring or early summer, when the new growth is still flexible but has some substance. You should look for healthy stems that do not have any flower buds yet, as the plant’s energy should be focused on root production. Using a clean, sharp pair of snips, take a cutting about ten to fifteen centimeters long from the tip of a branch.
Remove the leaves from the lower half of the cutting to expose the nodes where the new roots will eventually emerge. To increase the success rate, you can dip the base of the cutting into a rooting hormone powder, although this is not strictly necessary for this species. Plant the prepared cutting into a pot filled with a well-draining medium, such as a mix of peat and perlite or coarse sand. Multiple cuttings can be placed in the same pot, provided they are not touching each other.
To maintain high humidity around the cuttings, you can cover the pot with a clear plastic bag or place it in a specialized propagation chamber. Keep the pot in a bright spot but out of direct sunlight, which could overheat the tender stems and cause them to wilt. You should check the moisture of the medium regularly, keeping it damp but never waterlogged. Most bluebeard cuttings will begin to develop roots within three to five weeks under these conditions.
Once the cuttings have a firm root system, you can gradually acclimate them to the outdoor environment by removing the plastic cover for longer periods each day. This hardening-off process is vital to prevent the young plants from suffering a shock when they are eventually moved to the garden. After a few weeks of acclimation, the new shrubs can be transplanted into larger pots or their permanent positions in the soil. This method is a cost-effective way to expand your collection or share plants with other gardeners.
Hardwood cuttings and layering techniques
Hardwood propagation is another option, typically performed in the late autumn or winter when the plant is dormant. This method involves taking cuttings from the mature, woody stems that were produced during the previous growing season. The cuttings should be slightly longer than softwood ones, usually around twenty centimeters, and taken from the base of the plant. These stems are more resilient but take longer to root than the soft, green growth found in the summer.
You can plant these hardwood cuttings directly into a sheltered nursery bed or into deep pots filled with a sandy soil mix. It is important to insert the cuttings deep enough so that only about one-third of the stem is visible above the soil line. Over the winter, the cuttings will slowly develop a callus at the base, from which roots will emerge in the spring. This “set and forget” method is popular among professional growers who need to produce large quantities of plants with minimal daily maintenance.
Layering is a more natural propagation technique that can be used if you have a shrub with low-hanging, flexible branches. This involves bending a healthy branch down to the ground and burying a small section of it under the soil while it is still attached to the parent plant. You can wound the buried section slightly or apply rooting hormone to speed up the process. A heavy stone or a landscape staple can be used to keep the branch firmly in contact with the earth.
After several months, the buried section of the branch will develop its own root system, sustained by the parent plant in the meantime. Once the roots are well-established, you can simply snip the branch away from the main shrub and transplant the new individual to a new location. This method has a very high success rate because the young plant is not stressed by a lack of water or nutrients during the rooting phase. Layering is an excellent choice for home gardeners who want a few extra plants without the need for specialized equipment.

Propagation from softwood cuttings in early summer is incredibly effective for Caryopteris. I usually take my cuttings in June when the new growth is still flexible but starting to firm up slightly. Using a well-draining rooting medium, like a mix of perlite and peat, I can usually see root development within three to four weeks. This is a great way to expand a mass planting without the expense of buying new nursery stock. Just make sure to keep the cuttings in a humid environment but away from direct afternoon sun until they are established.
Do you find that using a rooting hormone is necessary for Caryopteris cuttings, or do they root well enough on their own? I’ve had mixed results with other woody shrubs and I’m curious about your specific success rate. I’m planning on trying this technique this coming summer to fill in a large area of my sunny border. Also, at what stage do you typically pot them up into larger containers? Thank you for the detailed walkthrough of the process!
When selecting a site, don’t underestimate the importance of air circulation. While the article focuses on light and drainage, I’ve found that bluebeards planted in stagnant corners are much more prone to leaf spotting. In our professional installations, we always try to place them where there is a gentle breeze to keep the foliage dry. This is especially important in the late summer when humidity levels can rise. It’s a small detail that can prevent a lot of aesthetic issues later on.
To answer Sarah’s question, while Caryopteris is a vigorous rooter, I still use a mild IBA rooting hormone to ensure a more uniform root system. I typically pot them up about six weeks after taking the cuttings once I see roots emerging from the drainage holes of the starting tray. And James is absolutely right about the airflow; it’s a critical component of the “habitat” we try to create for these plants. We often pair them with ornamental grasses which helps create that open, airy environment they love.
For those starting with nursery-bought specimens, pay close attention to the state of the roots before planting. These plants can sometimes become root-bound in their pots if they’ve been sitting at the garden center for too long. If you see roots circling the bottom, make sure to gently loosen them or even make a few vertical scores to encourage outward growth. I’ve seen Caryopteris struggle for years simply because they couldn’t break out of their original nursery-pot shape. A little extra care at the planting stage pays huge dividends in the long run.
Does anyone have experience with autumn planting for bluebeard? I usually prefer spring to give them a full season to establish, but sometimes project timelines force us into the autumn. I’m always a bit nervous about the winter survival of late-planted shrubs that haven’t fully anchored their root systems. In my experience, if you do plant in autumn, you must be extra diligent with the mulching. It really helps prevent the frost heaving that we discussed in other threads.