Successful establishment of a new garden specimen begins with a deep understanding of the planting process and the biological needs of the species. When you decide to introduce perennial honesty into your landscape, timing and site preparation are the most critical factors to consider. This plant is a long-lived resident of the garden, meaning the effort you put into the initial planting phase will pay dividends for many years to come. By following professional techniques, you can ensure a high survival rate and a vigorous start for your new plants.
The best time to plant or propagate this species is usually during the cooler months of autumn or early spring. Planting in the autumn allows the root system to establish itself in the relatively warm soil before the winter dormancy begins. Alternatively, early spring planting takes advantage of the natural increase in moisture and the rising temperatures that stimulate new growth. You should avoid the extreme heat of mid-summer, as the young plants will struggle to cope with the high evaporation rates.
Site selection must be done with precision to match the natural woodland heritage of the plant. You should look for a location that provides consistent moisture and protection from the drying effects of direct afternoon sunlight. The soil should be well-drained but capable of holding enough water to prevent the roots from drying out completely. If your garden soil is particularly heavy, you might need to incorporate some organic amendments to improve its overall structure and drainage.
Before you put the plants in the ground, you should clear the area of any perennial weeds that might compete for nutrients and water. Digging a hole that is twice as wide as the root ball will allow the roots to spread out easily into the surrounding soil. You can mix some high-quality compost into the excavated soil to give the plant an initial boost of organic matter. Ensuring the plant is set at the same depth it was growing in its previous container is vital for preventing stem rot.
Propagation from seeds
Growing this species from seed is one of the most rewarding and cost-effective ways to fill a large area of your garden. You should ideally sow the seeds in the late summer or early autumn, which mimics the natural dispersal time of the plant. These seeds often require a period of cold stratification to break their dormancy and trigger germination in the following spring. You can sow them directly into a prepared seedbed or use trays kept in a cold frame to protect them from extreme weather.
More articles on this topic
If you choose to sow directly into the garden, you should lightly cover the seeds with a fine layer of soil or compost. Keeping the area consistently moist is essential until the seedlings have emerged and developed their first set of true leaves. You may need to thin out the young plants if they germinate too thickly, as overcrowding can lead to weak growth and disease. Labeling the area clearly will prevent you from accidentally weeding out the young seedlings before they are recognizable.
Indoor sowing is also an option if you want more control over the germination environment during the early stages. You should use a free-draining seed compost and maintain a steady, moderate temperature to encourage even growth. Once the seedlings are large enough to handle, you can prick them out into individual pots to continue their development. Gradually hardening off the young plants before moving them to their permanent garden home will reduce the risk of transplant shock.
Saving your own seeds is a traditional practice that ensures you have a continuous supply of new plants for the future. You should wait until the seed pods have turned completely dry and translucent before harvesting them. The seeds can be easily removed by gently rubbing the outer layers of the pod between your fingers. Storing the cleaned seeds in a cool, dry place until you are ready to sow them will maintain their viability for a longer period.
Vegetative propagation and division
While seeds are the most common method, you can also propagate this plant through the division of established clumps. This process is best performed in early spring just as the new shoots are beginning to emerge from the ground. You should carefully lift the entire plant using a garden fork to minimize damage to the root system. Using a sharp knife or a spade, you can then divide the crown into several smaller sections, each with its own roots and shoots.
More articles on this topic
Dividing your plants every few years can actually help maintain their vigor and prevent the center of the clump from becoming woody and unproductive. You should immediately replant the new divisions into freshly prepared soil to keep the roots from drying out. Watering them thoroughly after planting will help settle the soil around the roots and encourage quick establishment. This method is particularly useful if you want to create identical copies of a particularly healthy or attractive specimen.
Root cuttings are another professional technique that can be used to increase your stock of this perennial. You can take these cuttings in late winter when the plant is still dormant by selecting healthy, thick roots. Cutting the roots into sections and planting them vertically in a sandy compost mix can stimulate the growth of new buds. This method requires a bit more patience and care but can be very successful under the right conditions.
Providing consistent aftercare for your new divisions or cuttings is the final step in successful vegetative propagation. You should keep them in a sheltered spot away from direct sun and ensure they never run out of water during their first growing season. Once they have developed a strong root system, they can be treated like any other mature plant in your garden collection. Watching a small division grow into a full-sized blooming specimen is a testament to the gardener’s skill and patience.
Establishing the plants in the landscape
Once your plants are in their permanent positions, the first few months are critical for long-term success. You should maintain a regular watering schedule to ensure the soil remains moist but not waterlogged. Adding a layer of organic mulch around the base of the plants will help stabilize soil temperatures and keep the moisture in. Monitoring for any signs of transplant stress, such as wilting or leaf drop, will allow you to take corrective action quickly.
Companion planting can help your new additions feel at home and thrive in their new environment. You might consider planting them alongside other woodland lovers like ferns, hostas, or hellebores. These neighbors will provide similar cultural requirements and create a cohesive, naturalistic look in your garden beds. The varying textures and colors of these companion plants will also highlight the unique features of the perennial honesty.
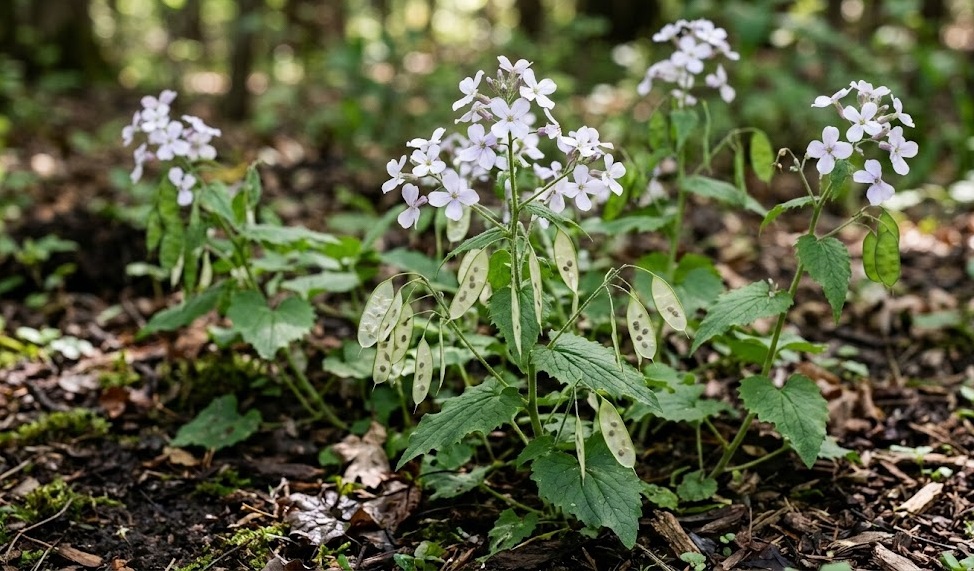
As the plants mature, you will notice them taking on their characteristic upright form and developing their broad, heart-shaped leaves. You should avoid disturbing the soil around established plants, as they generally prefer to be left alone once they are settled. If you need to work in the area, be mindful of the shallow roots and try not to step too close to the base of the plants. A stable, undisturbed environment is exactly what these woodland residents need to truly flourish.
Finally, keep in mind that this species may take a year or two to reach its full flowering potential. Your patience during this establishment phase will be rewarded with a spectacular display of lilac-scented blooms and silvery seed pods. By providing the right start through professional planting and propagation techniques, you are ensuring the beauty of your garden for the future. Every successful plant starts with a single well-placed seed or division and a gardener who knows how to nurture it.