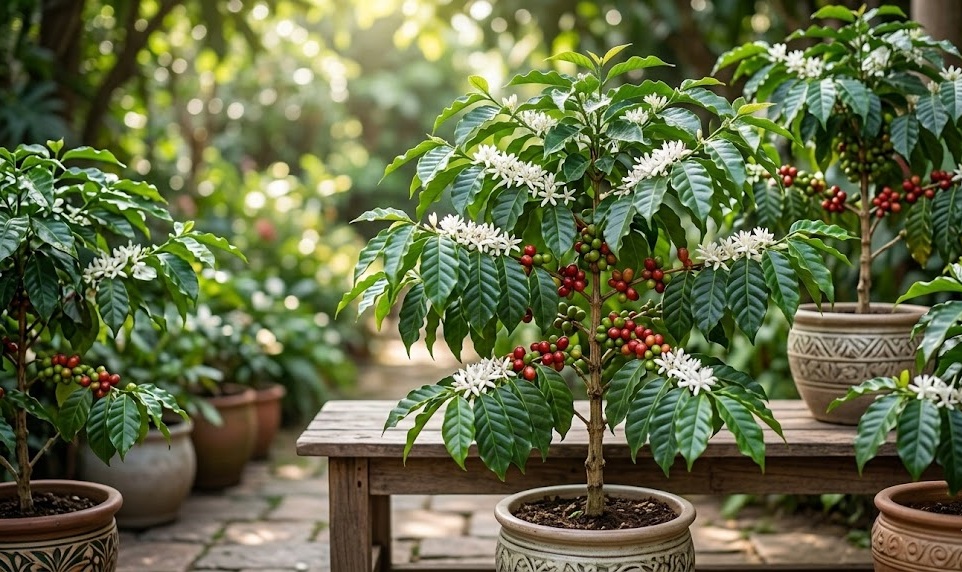
The successful establishment of a coffee plant begins with precise planting techniques and a deep knowledge of the various propagation methods available. Whether you are starting from seed or using vegetative cuttings, the early stages of life are the most critical for determining future health. Professionals understand that the transition from a seed or a cutting to a self-sufficient seedling requires a highly controlled environment. This article explores the technical requirements for creating new life from an existing specimen or a fresh harvest of beans.
Seed germination techniques
Starting a coffee plant from seed is a rewarding process that requires the use of fresh, unroasted green coffee beans. These seeds have a relatively short viability period, so it is essential to obtain them from a reliable source as soon as possible after harvest. You should soak the seeds in room temperature water for twenty-four hours to soften the parchment-like outer layer and trigger the germination process. Discarding any seeds that float is a common professional practice, as these are often hollow or non-viable.
The germination medium should be light, sterile, and capable of holding moisture without becoming compacted around the emerging sprout. A mixture of fine vermiculite or a dedicated seed-starting compost works best for providing the necessary support for the young roots. You should sow the seeds about one centimeter deep and keep the medium consistently warm, ideally between twenty-five and twenty-eight degrees Celsius. Patience is required during this phase, as coffee seeds can take anywhere from four to eight weeks to show signs of growth.
Maintaining high humidity is crucial during the initial stages to prevent the delicate embryonic tissues from drying out as they break the surface. Many growers use a clear plastic dome or a simple plastic bag to create a mini-greenhouse effect over the planting tray. You should provide bright, indirect light as soon as the first “soldier” hooks emerge from the soil to prevent the seedlings from becoming leggy. Ventilation must be introduced gradually to harden the young plants to the lower humidity of the open room.
Once the seedlings have developed their first pair of true leaves, they can be carefully moved into individual small pots. You must handle the young plants by the leaves rather than the stems to avoid crushing the sensitive vascular tissues that are still developing. Use a high-quality potting mix that is slightly more substantial than the germination medium to provide better nutrient support. Consistent monitoring of moisture levels remains a top priority during this first year of independent growth.
More articles on this topic
Cutting propagation methods
Vegetative propagation through cuttings is a popular method because it allows you to create an exact genetic clone of a high-performing parent plant. You should select healthy, semi-hardwood stems that are approximately ten to fifteen centimeters long and have at least two leaf nodes. Making a clean, diagonal cut just below a node increases the surface area for potential root development and improves success rates. It is best to perform this task in the spring when the parent plant is entering its most active phase of growth.
Removing the lower leaves from the cutting prevents them from rotting in the moist substrate and directs the plant’s energy toward root formation. You can dip the base of the cutting into a rooting hormone powder or gel to speed up the process and protect the open wound from pathogens. The cutting should then be placed in a mix of perlite and peat moss that provides excellent aeration for the new roots. Ensuring that at least one node is buried beneath the surface is essential for the development of the root system.
Just like seeds, cuttings require a very high humidity environment to survive until they can draw water through their own roots. You should keep the cuttings in a warm, brightly lit area but strictly away from direct sunlight which could quickly dehydrate them. Checking for root development can be done by giving the cutting a very gentle tug after about six weeks to feel for resistance. Once a strong root system is established, the plant can be transitioned to a standard potting mix and a regular care routine.
Success in cutting propagation depends heavily on the health and vigor of the parent plant from which you take the material. You should avoid taking cuttings from plants that are showing signs of stress, disease, or pest infestation. Keeping your tools sterilized with alcohol between cuts prevents the spread of bacteria and fungi that could kill the vulnerable cutting. A professional approach to cloning ensures that the best characteristics of your favorite coffee plant are preserved in the next generation.
More articles on this topic
Transplanting young seedlings
The first major transition for a young coffee plant occurs when it outgrows its nursery pot and requires more space for its expanding root network. You will know it is time to transplant when you see roots beginning to emerge from the drainage holes or the growth of the canopy slows down significantly. It is important to choose a new container that is deep enough to accommodate the taproot, which is a characteristic feature of the coffee plant’s anatomy. A professional avoids jumping to a massive pot, as excess soil that isn’t reached by roots can become sour and anaerobic.
Before moving the plant, you should water it thoroughly to ensure the root ball stays intact and the tissues are fully hydrated. Gently sliding the plant out of its old container allows you to inspect the roots for any circling or overcrowding. If the roots are tightly bound, you can lightly tease them outward to encourage them to grow into the fresh substrate. Place the plant in the new pot at the same depth it was previously growing to avoid stem rot or root exposure.
After the move, the plant may experience a brief period of transplant shock where growth seems to stall for a few days. You should keep the plant in a slightly shadier spot and maintain high humidity during this recovery phase to minimize stress. Avoid fertilizing for at least two weeks to allow the roots to settle into the new medium without the risk of chemical irritation. Once you see new leaf development, you can gradually return the plant to its original location and regular feeding schedule.
Transplanting is also the ideal time to ensure the long-term drainage capacity of your setup by adding a layer of coarse material at the bottom. The fresh soil will provide a significant boost in available nutrients, giving the young plant the energy it needs for a growth spurt. You should monitor the moisture levels closely after a transplant, as the larger volume of soil will dry out at a different rate than the old pot. With careful handling, your young coffee plant will quickly establish itself in its new home.
Long-term establishment
Building a strong foundation during the first two years of a coffee plant’s life is essential for its future as a productive specimen. This period is when the main structural branches are formed and the plant develops its primary defense against environmental stressors. You should focus on providing consistent conditions rather than chasing rapid growth through excessive fertilization. A slow, steady development results in denser wood and more resilient foliage that can withstand the challenges of indoor life.
Encouraging the plant to develop a thick, sturdy central leader is a priority during the early establishment phase. You can use a small bamboo stake to support the main stem if it appears to be leaning or struggling under the weight of its leaves. As the plant grows taller, you may need to pinch out the growing tips to encourage the lateral branching that gives the coffee plant its classic look. This early training ensures that the mature plant will have a balanced and aesthetically pleasing form.
Observation of the plant’s seasonal rhythms becomes easier once it has been established in your environment for a full cycle. You will learn to anticipate the spring growth flush and the winter slowdown, adjusting your care inputs accordingly to match the plant’s needs. Maintaining a clean environment free of fallen leaves and debris prevents the establishment of pests that could derail the plant’s progress. A well-established coffee plant is a testament to the patience and skill of the grower who nurtured it from its earliest days.
The transition from a young sapling to a mature shrub is marked by a noticeable increase in the thickness of the leaves and the sturdiness of the bark. At this stage, the plant is much more capable of handling minor fluctuations in humidity or temperature than it was as a seedling. However, you must not become complacent, as the larger size means that any issues can be harder to treat if they are allowed to spread. Continuous learning and adaptation are the hallmarks of a professional who successfully manages the long-term life of an arabian coffee plant.