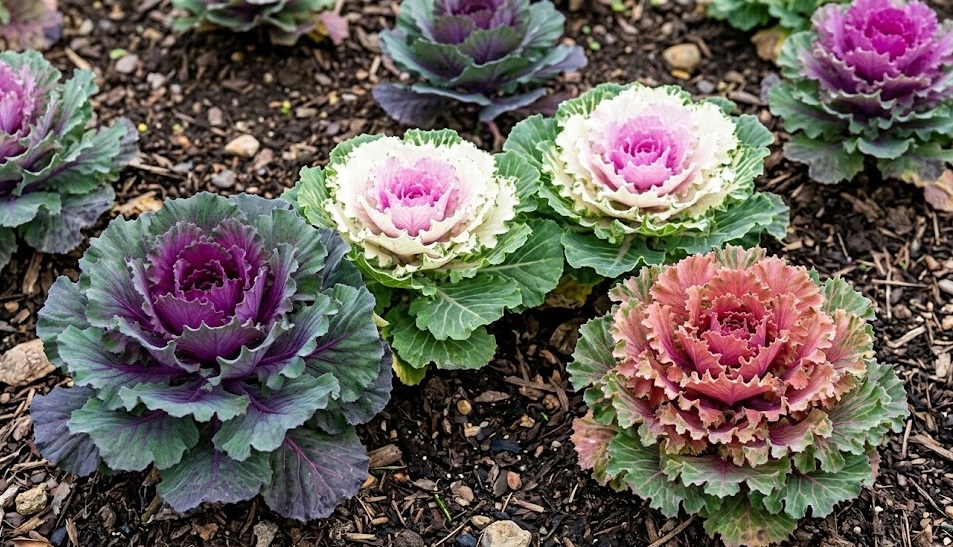
Establishing a successful display of ornamental cabbage begins with the correct timing and technique for planting. These plants are unique because they are often started during the heat of summer to be ready for the cool autumn weather. Whether you are starting from seeds or transplanting established seedlings, the environment must be carefully managed to ensure healthy development. This article will guide you through the professional steps required to propagate and plant these colorful garden favorites.
Starting seeds in the nursery
Propagation usually begins in mid to late summer, depending on your local climate and desired display time. You should use a high-quality seed starting mix that is sterile and provides excellent drainage for the delicate roots. Sowing the seeds thinly on the surface of the soil is recommended, as they require a bit of light to germinate effectively. A light dusting of fine vermiculite can help retain moisture without blocking out the necessary sunlight.
Consistency in temperature is the most critical factor during the initial germination phase of the seeds. Ideally, the environment should be kept between eighteen and twenty-two degrees Celsius to encourage rapid sprouting. You can use a heat mat if the ambient temperature is too low, but be careful not to overheat the delicate trays. Once the first green shoots appear, which usually takes about a week, the temperature can be slightly lowered to promote sturdier growth.
Proper hydration is essential, but overwatering can lead to “damping off,” a common fungal disease that kills young seedlings. Using a fine mist spray bottle allows you to moisten the soil surface without disturbing the tiny seeds or burying them too deep. As the seedlings grow, you can transition to bottom-watering by placing the trays in a shallow pan of water. This encourages the roots to grow downward, creating a more robust and resilient root system for future transplanting.
Light levels must be monitored closely once the seedlings have emerged from the soil. If you are growing them indoors, using high-intensity fluorescent or LED grow lights will prevent the plants from becoming leggy. Position the lights just a few inches above the tops of the plants and move them upward as the cabbage grows. Providing twelve to fourteen hours of light per day mimics the long summer days and supports vigorous vegetative development.
More articles on this topic
Seedling care and thinning
Once the seedlings have developed their first set of true leaves, it is time to evaluate their spacing. Thinning is a necessary step to ensure that the strongest plants have enough room to expand without competition. You should remove the smaller or weaker-looking seedlings, leaving about five to eight centimeters between the remaining ones. This reduces the risk of disease by improving airflow and ensures that each plant receives its full share of nutrients.
During this stage, the plants benefit from a very diluted application of a balanced liquid fertilizer. A quarter-strength solution provided every two weeks is sufficient to support steady growth without causing salt buildup in the small containers. Avoid high-nitrogen fertilizers at this point, as you want to encourage balanced development rather than rapid, soft growth. The goal is to produce a compact, sturdy plant that can withstand the eventual move to the outdoor garden.
Ventilation in the growing area helps to strengthen the stems of the young ornamental cabbage. A small fan placed nearby can simulate a gentle breeze, which triggers the plant to produce more lignin and become structurally stronger. This mechanical stimulation is a common professional technique used to prevent seedlings from becoming too brittle. Good airflow also keeps the foliage dry, which is the best way to prevent the development of powdery mildew or other leaf spots.
As the plants fill out their initial trays, you may need to “pot them up” into slightly larger containers. This prevents the roots from becoming cramped or “root-bound,” which can stunt the plant’s growth permanently. Use a standard potting soil for this transition and handle the root balls with extreme care to avoid damage. A smooth transition between container sizes ensures that the plant continues to grow at a steady pace without any setbacks.
More articles on this topic
Transplanting to the garden
The best time to move your ornamental cabbage into the garden is when the evening temperatures begin to cool down. You must “harden off” the plants by exposing them to outdoor conditions for a few hours each day over the course of a week. This process allows the leaf cuticle to thicken and helps the plant adjust to the intensity of direct sunlight. Skipping this step often leads to sunscald or wilting, which can ruin the appearance of the foliage.
Prepare the planting site by digging a hole that is slightly larger than the current root ball of the seedling. Adding a handful of compost to the bottom of the hole provides a slow-release source of nutrients for the establishing plant. Space the plants approximately thirty to forty-five centimeters apart to allow for their full adult width. If you plant them too close together, they will compete for light and the lower leaves may begin to rot due to poor airflow.
When placing the plant in the hole, ensure that it is set at the same depth it was growing in the container. Deep planting can lead to stem rot, while shallow planting can cause the roots to dry out too quickly. Firm the soil gently around the base of the plant to remove any large air pockets that could trap moisture or kill roots. Water the area thoroughly immediately after planting to help the soil settle and reduce the stress of the move.
If you are planting in groups, consider a staggered or triangular pattern for a more natural and professional look. This arrangement fills the space more effectively and creates a dense carpet of color once the plants reach maturity. You might also want to mulch the area immediately to keep the soil cool and moist while the roots are establishing. A well-planned transplanting process sets the stage for a spectacular autumn and winter garden display.
Successional planting and timing
To extend the period of beauty in your garden, you can practice successional planting with your ornamental cabbage. By sowing seeds at two-week intervals throughout the summer, you will have plants at different stages of maturity. This allows you to replace any early-season plants that might have faded with fresh, vibrant specimens. A continuous supply of healthy plants ensures that your landscape remains colorful from September through January.
Timing is particularly important if you are planning to use ornamental cabbage for specific events or holidays. Most varieties take about eleven to fourteen weeks from seed to reach their peak color and size. You should count backward from your target date to determine exactly when the seeds need to be started. Keeping a detailed calendar of your sowing and planting dates will help you refine this timing for future years.
In warmer climates, you may need to delay planting until the extreme heat of summer has truly passed. If the soil is too hot, the plants may bolt or fail to develop their characteristic cold-induced pigments. Using shade cloth over newly planted seedlings can help protect them from the midday sun during the first few weeks. Monitoring the local soil temperature can provide a better guide than simply following the calendar.
Finally, consider the interaction between your cabbage and other seasonal plants in the landscape. Propagation and planting should be coordinated with the removal of summer annuals to ensure a seamless transition. By having your cabbage ready to go as the summer flowers fade, you maintain the visual interest of your property without any gaps. Professional garden management is all about this kind of forward-thinking and careful scheduling.