Understanding your local winter hardiness zone is key to deciding how to manage these plants. In warm climates, these perennials can survive the winter outdoors in the ground with minimal protection. However, in colder regions, the freezing temperatures will completely destroy the tender underground tuberous roots. Knowing your climate zone allows you to choose the correct overwintering strategy for success.
In zones eight and warmer, the plants generally survive winter with just a thick layer of mulch. The frost may kill the top foliage, but the roots remain safe and insulated underground. New shoots will emerge from the soil when warm spring temperatures return next year. This low-maintenance option is wonderful for gardeners living in southern geographic regions.
In zones seven and colder, the intense freezing weather penetrates deep into the soil profile. This deep freeze turns the fleshy tubers into mush, killing the plant entirely before spring. Gardeners in these colder areas must treat the plants as annuals or lift the tubers. Lifting and storing the roots indoors is the best way to preserve favorite plants.
Monitoring autumn weather forecasts helps you time your overwintering tasks perfectly before freezing arrives. You want to allow the plant to grow as long as possible to maximize root energy. However, waiting too long can result in damaged roots if the ground freezes solid. Finding the right balance ensures a successful transition from autumn to winter storage.
Digging and lifting tubers
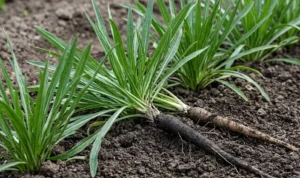
Digging and lifting the tubers is a straightforward process that begins after the first frost. The initial light frost will typically blacken the foliage, signaling that the plant is entering dormancy. Cut the dead stems back to a few inches above the ground surface using pruners. This leaves a convenient handle that helps you locate and manage the roots easily.
More articles on this topic
Use a garden fork or spade to carefully loosen the soil around the plant base. Dig several inches away from the main stem to avoid slicing the large tuberous roots. Gently pry the root mass upward out of the ground from multiple sides. Take your time during this step to avoid breaking the delicate, fleshy structures.
Gently shake off the loose excess soil adhering to the harvested root clump. Avoid washing them with water, as excess moisture can encourage rot during winter storage. Let the lifted tubers sit in a warm, dry, shaded area for a few days. This curing process allows the outer skin to toughen up and dry out completely.
Inspect the cured tubers carefully for any signs of damage, rot, or insect pests. Discard any sections that feel soft, mushy, or show obvious signs of disease infections. Only store healthy, firm tubers to ensure they survive the long winter months indoors. Labeling the tubers by color at this stage helps you plan next spring’s garden.
Storing tubers through winter
Storing the cured tubers correctly preserves their vitality until planting time arrives next spring. Choose a storage container like a cardboard box, paper bag, or plastic crate with ventilation holes. Line the bottom with a layer of dry peat moss, vermiculite, or clean sawdust. These materials absorb excess humidity while preventing the roots from drying out completely.
More articles on this topic
Place the tubers in the container in a single layer without letting them touch. Cover them completely with more of the chosen dry packing material to insulate them. Storing them loosely allows air to circulate, which minimizes the risk of fungal rot development. Secure the container to protect the contents from curious mice or other household pests.
Move the packed container to a cool, dark, and dry location for the winter. An unheated basement, root cellar, or insulated garage is usually the perfect storage environment. The ideal temperature should remain consistently between forty and fifty degrees Fahrenheit throughout winter. Avoid locations where temperatures drop below freezing or rise high enough to stimulate growth.
Check on your stored tubers once a month to monitor their overall condition. If you notice any roots turning soft or rotting, remove them immediately to save others. If the packing material feels bone dry and tubers look shriveled, mist them lightly. This minimal maintenance ensures your plants remain healthy and ready for a triumphant spring return.
Replanting in the spring
Replanting your overwintered tubers in spring brings your garden back to life with familiar colors. Wait until the danger of spring frost has completely passed and soil temperatures have warmed. Select a sunny location with well-draining soil to give the returning plants the best start. Preparing the bed with fresh compost provides immediate nutrition for the awakening roots.
Dig a hole deep enough to accommodate the entire tuberous root system comfortably. Place the tuber into the hole with the growth buds or old stem remnants facing upward. Cover the root with soil, pressing down gently to eliminate any large air pockets. Water the area thoroughly to settle the earth and stimulate the growth process.
You can also wake the tubers up early by planting them indoors in pots. This technique gives you larger plants and earlier blooms when moved outside later in May. Place the pots in a warm, sunny window and water them sparingly at first. Once green shoots appear, increase watering to support the rapid new foliage development.
Transition the potted plants outdoors gradually using the standard hardening off process described before. Soon, these saved plants will grow into large, beautiful bushes covered in vibrant flowers. Overwintering allows you to enjoy the exact same plants year after year with great success. It is a rewarding practice that connects you deeply to the cycles of your garden.