The process of planting and propagating the bloody cranesbill is an rewarding journey that allows you to expand your garden’s beauty with minimal financial investment. Successful planting begins with a deep respect for the plant’s natural requirements and a careful preparation of the site where it will reside for years to come. Propagation offers a way to share your favorite plants with friends or simply fill in the empty spaces in your own borders with reliable, home-grown specimens. By following a few simple professional techniques, you can ensure that every new plant gets the best possible start in its new environment.
Site selection is the first and most critical step in the planting process, as the right location will determine the plant’s lifelong health. You should look for a spot that receives a good amount of sunlight but can also offer some relief during the hottest part of a summer afternoon. The soil in this chosen area should be cleared of any aggressive perennial weeds and enriched with a bit of organic matter before you begin. Taking the time to observe how the light and water move across your garden will help you make an informed decision on the perfect placement.
When you are ready to put your plant in the ground, you should dig a hole that is twice as wide as the root ball but no deeper than the original pot. This allows the roots to spread out easily into the surrounding soil without the risk of the plant sinking too deep and rotting at the crown. Gently teasing the roots out if they are circling the pot will encourage them to grow outward into their new home more quickly. After filling the hole back in with soil, a firm but gentle press with your hands will remove any large air pockets that could dry out the roots.
Watering immediately after planting is essential to settle the soil around the roots and reduce the initial transplant shock. You should provide enough water to soak the entire root zone, but be careful not to create a muddy swamp that might suffocate the young plant. Monitoring the new arrival daily for the first two weeks will help you catch any signs of stress before they become serious problems. Once you see new green growth appearing at the center of the plant, you will know that it has successfully established its roots in the new soil.
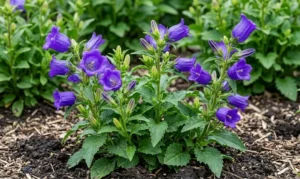
Selecting the perfect spot
A professional approach to landscaping involves matching the specific needs of a plant to the unique characteristics of your garden’s layout. This cranesbill is incredibly versatile, but it will truly flourish in a position where it can soak up at least six hours of sunlight each day. You should consider how the shadows move throughout the day, as a spot that is sunny in the morning might be in deep shade by midday. Proper lighting is the primary factor that influences how many flowers the plant will produce and how compact its growth will remain.
More articles on this topic
Soil drainage is the second most important factor to consider when choosing a location for your new perennial. You can test the drainage of a potential spot by digging a small hole, filling it with water, and seeing how quickly it disappears into the ground. If the water sits for several hours, you might need to amend the soil with grit or organic matter to improve the internal structure. This plant does not like “wet feet,” so avoiding low-lying areas where water naturally collects during rainstorms is a wise strategy.
The proximity of other plants should also play a role in your decision-making process for the ideal planting site. You should give your cranesbill enough room to reach its mature width of about fifteen to twenty inches without being smothered by larger neighbors. Providing this space ensures that every plant has access to the nutrients and water it needs to thrive without excessive competition. A well-spaced garden not only looks more organized but is also much healthier because air can circulate freely between the individual plants.
Finally, think about the aesthetic goals of your garden and how the plant will look from your favorite viewing spots. This species makes an excellent edging plant for walkways or a beautiful foreground for taller flowering shrubs and perennials. Because of its reliable growth habit and attractive foliage, it acts as a great “weaver” plant that ties different elements of the garden together. Choosing a spot where you can enjoy the transition of the leaves from green to red will maximize your enjoyment of this garden favorite.
Planting techniques for success
The actual act of planting is a physical connection between the gardener and the land, and doing it correctly sets the stage for success. You should always aim to plant during a cool or cloudy day to minimize the stress on the plant’s delicate foliage and root system. If you must plant during a sunny spell, doing the work in the late afternoon gives the plant a full night of cool temperatures to recover. Having all your tools and amendments ready before you start will make the process go smoothly and quickly.
More articles on this topic
Before placing the plant in the hole, you can add a small handful of bone meal or a balanced organic starter fertilizer to the bottom. This provides a gentle source of phosphorus which is essential for strong root development in the early stages of the plant’s life. Make sure to mix the fertilizer with a bit of soil so it doesn’t come into direct contact with the sensitive root tips. This small extra step can lead to a much faster establishment and a more vigorous plant in the long run.
Positioning the plant at the correct depth is perhaps the most frequent mistake made by beginner gardeners, but it is easy to get right. You should aim for the top of the root ball to be level with the surface of the surrounding garden soil. If you plant too deep, the crown of the plant may rot, and if you plant too shallow, the roots may dry out or be damaged by frost. Using a straight stick or your shovel handle laid across the hole can help you verify the depth before you start backfilling.
Once the plant is in place and the soil has been firmed, applying a light mulch of compost or shredded bark is the final touch. This mulch layer should not touch the stems of the plant directly but should cover the soil over the entire root zone. It serves to keep the soil temperature stable and prevents the surface from drying out too quickly in the wind. A well-planted perennial will reward your initial effort with years of low-maintenance beauty and reliable performance in your landscape.
Division methods for propagation
Dividing established plants is one of the most efficient and satisfying ways to propagate the bloody cranesbill for your garden. This process is best performed in the early spring just as the new growth starts to peek through the soil surface. You should start by watering the plant thoroughly the day before you plan to divide it to ensure the roots are fully hydrated. Using a sharp spade, you can lift the entire clump out of the ground, taking care to keep as much of the root system intact as possible.
Once the clump is on the surface, you will see how it is composed of several smaller individual crowns that are joined together at the base. You can often pull these apart by hand, but for older, tougher plants, you might need to use two garden forks or a sharp knife. Each new division should have a healthy section of roots and at least one or two visible buds or shoots on the top. Discard any old, woody pieces from the center of the original clump to ensure you are only replanting the most vigorous sections.
Replanting the new divisions as quickly as possible is the key to minimizing transplant shock and ensuring they take hold in their new spots. You should treat each division just like a new plant from the nursery, following the same planting and watering guidelines you used before. Because these are established pieces of a mature plant, they will often grow very quickly and may even bloom in their first year. This method is a great way to maintain the health of your original plants while simultaneously expanding your collection.
Professional growers use division not just for more plants, but also to keep their garden borders looking fresh and rejuvenated. If a particular area of your garden is looking overcrowded, thin out the plants and use the extras to fill in gaps elsewhere. You can also pot up some of the smaller divisions to give away to neighbors or friends who are looking to start their own gardens. Sharing plants is a time-honored tradition among gardeners that builds community and spreads the joy of horticulture far and wide.
Seed starting and early growth
While division is the most common way to propagate this species, growing it from seed can be a fascinating and educational experience for any gardener. You can collect the seeds from your own plants in late summer once the seed heads have turned brown and are ready to burst open. These seeds often benefit from a period of cold treatment, known as stratification, to mimic the natural winter they would experience outdoors. You can achieve this by placing the seeds in a damp paper towel inside a sealed bag in your refrigerator for several weeks.
Sowing the seeds in a high-quality seed-starting mix during the late winter or early spring will give the young plants a head start. You should barely cover the seeds with soil, as they often need a bit of light to trigger the germination process successfully. Keeping the soil consistently moist but not soaking wet is the most challenging part of caring for young seedlings. A bright windowsill or a dedicated grow light will provide the energy the tiny plants need to grow their first set of true leaves.
As the seedlings grow, they will eventually need more space and should be moved into individual small pots once they have two or three sets of leaves. This transition allows the root system to develop independently without being crowded by other young plants in the seed tray. You should begin a very diluted feeding schedule with a balanced liquid fertilizer to support this stage of rapid vegetative growth. Hardening off the plants by gradually exposing them to outdoor conditions is a vital step before they are moved permanently into the garden.
Early care in the garden for these home-grown plants involves being extra vigilant about watering and protection from extreme weather. These young specimens are more delicate than divisions from mature plants and will take a bit longer to reach their full flowering potential. However, the sense of pride you feel when seeing a plant you started from a tiny seed finally bloom in your garden is incomparable. Growing from seed also allows you to observe the natural variation that can occur within the species, adding a unique touch to your landscape.