Establishing a new specimen in your landscape begins with the careful selection of an appropriate site that meets its biological needs. You should consider the local microclimate and soil conditions before you even bring the plant home from the nursery. Success in planting is often determined by the preparation work you do in the weeks leading up to the actual installation. A well-placed and properly planted shrub will require much less maintenance and thrive for many years to come.
Site selection and environmental factors
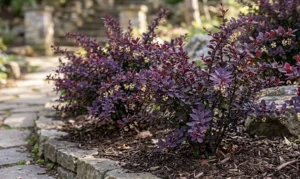
The location you choose for your new shrub will have a lasting impact on its growth rate and overall health. You should look for a spot that offers a balance of sunlight and protection from the most intense afternoon heat. In many regions, a location with morning sun and dappled afternoon shade provides the perfect conditions for leaf color development. Avoid areas that are prone to standing water or where cold air tends to settle during the winter months.
Wind protection is another important factor to consider when you are deciding where to place your Chinese fringe flower. While the plant is sturdy, constant exposure to strong winds can dry out the foliage and damage the delicate blooms in the spring. You can use fences, walls, or other larger shrubs to create a sheltered microclimate that encourages healthy growth. Observing how the wind moves through your property during a storm will help you identify the most protected areas.
Soil quality varies significantly from one part of a garden to another, so you should test the earth at your chosen site. This species thrives in soil that is rich in organic matter and has a naturally acidic reaction for optimal growth. If the soil at your preferred location is very sandy or heavy clay, you will need to plan for significant amendments. Taking the time to improve the soil before planting is much easier than trying to fix it once the plant is established.
Consider the ultimate size of the shrub and how it will interact with nearby structures and other plants in your garden. You should provide enough room for the branches to spread out naturally without needing constant heavy pruning to keep it in bounds. Planting too close to a house or a walkway can lead to problems with airflow and accessibility as the specimen matures. A little bit of foresight regarding space will prevent many common landscaping headaches in the future, ensuring a harmonious design.
More articles on this topic
Proper planting techniques for success
The best time to plant this species is during the mild weather of spring or autumn when the soil is warm but the air is cool. You should dig a hole that is twice as wide as the root ball but no deeper than the container the plant came in. This extra width allows the young roots to penetrate the surrounding soil more easily as they begin to expand outward. Ensuring the depth is correct is vital because planting too deep can suffocate the roots and lead to stem rot.
Once the hole is prepared, you should carefully remove the plant from its nursery pot and inspect the root system for any issues. If the roots are circling the ball, gently tease them outward to encourage them to grow into the new soil. Place the plant in the center of the hole and check that the top of the root ball is level with the ground surface. You can use a shovel handle laid across the hole to verify that the height is perfectly aligned with the surrounding grade.
Backfill the hole with a mixture of the native soil you removed and some high-quality organic compost or peat moss. You should press the soil down firmly with your hands as you go to remove any large air pockets that could dry out the roots. Avoid using your feet to tamp the soil, as this can lead to over-compaction and reduce the amount of oxygen available to the plant. Filling the hole halfway and then watering it thoroughly helps to settle the soil around the lower roots naturally.
After you have finished filling the hole and leveling the surface, you should create a small ring of soil around the edge of the planting area. This “saucer” helps to direct water toward the root zone during the critical first few months of the establishment phase. Apply a generous layer of mulch over the entire area, keeping it a few inches away from the main trunk to prevent decay. Water the new planting immediately and continue to monitor the moisture levels closely for the first several weeks of growth.
More articles on this topic
Propagation through softwood cuttings
Growing new plants from cuttings is a rewarding way to expand your garden collection or share your favorite varieties with friends. You should take softwood cuttings in the late spring or early summer when the new growth is still flexible but starting to mature. Choose healthy shoots that are free from pests and diseases to ensure the best chance of successful rooting for the clones. A cutting that is about four to six inches long is usually the ideal size for most propagation projects.
You should remove the leaves from the bottom half of the cutting to expose the nodes where the new roots will eventually emerge. Dipping the cut end into a rooting hormone powder or gel can significantly speed up the process and improve the success rate. Insert the cutting into a well-draining potting mix that consists of perlite, peat, or coarse sand for aeration. It is important to keep the medium consistently moist but never waterlogged, as this could cause the delicate stems to rot.
Creating a humid environment is essential for keeping the cuttings hydrated while they are waiting to develop their own root systems. You can cover the pots with a clear plastic bag or place them in a specialized propagation chamber to maintain high moisture levels. Keep the cuttings in a bright location but out of direct sunlight, which could quickly overheat and kill the young plant tissue. Check the cuttings regularly and mist them with water if the humidity levels start to drop inside the container.
Rooting typically takes several weeks to a few months, depending on the environmental conditions and the specific health of the mother plant. You can test for progress by gently tugging on the cuttings; if you feel resistance, it means that roots have started to form. Once the root system is well-established, you can gradually acclimate the young plants to lower humidity levels before potting them up individually. These new shrubs will be genetically identical to the parent plant, preserving the colors and habits you admire.
Propagation by seed and layering
Propagating from seed is a slower process than using cuttings, but it can yield interesting variations and a large number of new plants. You should collect the small seed capsules in the autumn when they turn brown and begin to split open naturally on the shrub. The seeds may require a period of cold stratification to break their dormancy and prepare them for germination in the spring. Sowing them in a light, sterile seed-starting mix will provide the best environment for the young seedlings to emerge and grow.
Keep the seed trays in a warm and bright location, ensuring that the soil remains consistently damp throughout the germination period. It is common for seeds to have a variable germination rate, so patience is necessary when you are waiting for the first green shoots. Once the seedlings have developed their first set of true leaves, you can begin to feed them with a very dilute liquid fertilizer. Be careful not to overwater the young plants, as they are very susceptible to damping-off fungi during the early stages of life.
Layering is another reliable method of propagation that involves rooting a branch while it is still attached to the parent plant. You should choose a long, flexible branch that can be easily bent down to reach the surface of the ground. Scrape away a small piece of bark on the underside of the branch where it touches the soil to encourage root formation. Secure the branch to the ground using a landscape staple and cover the wounded area with a few inches of moist soil.
This method takes advantage of the parent plant’s established root system to provide water and nutrients to the developing clone. You should check the area periodically to ensure it remains moist and that the branch has not been dislodged by animals or weather. After a year or so, the branch should have developed enough roots to survive on its own as an independent specimen. You can then sever the connection to the parent and carefully transplant your new shrub to its permanent home in the garden.