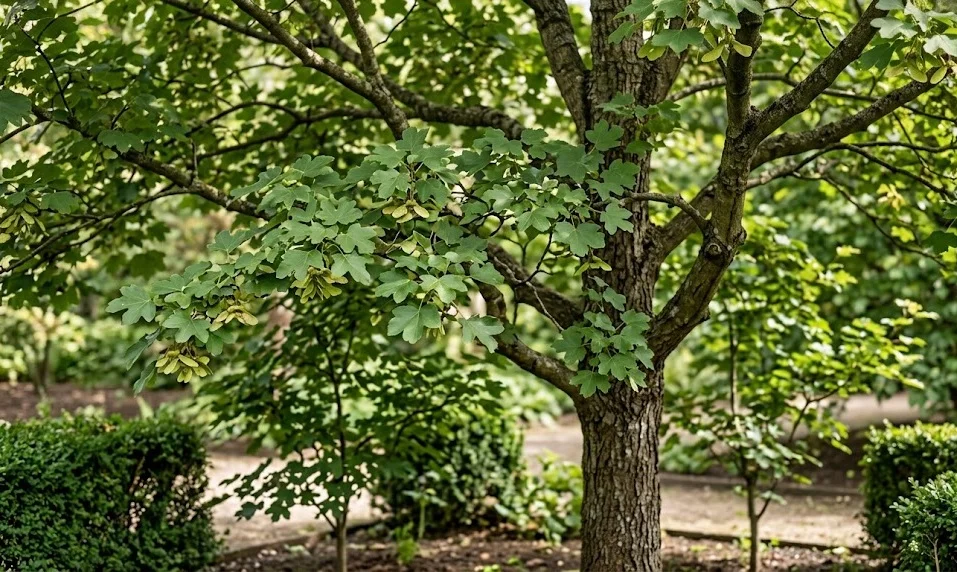
The success of planting a field maple begins long before the tree actually touches the soil, starting with careful site selection. You must consider the eventual size of the mature tree to ensure it has enough room to expand without interference. While this species is adaptable, it thrives best when given a location that mimics its natural woodland edge habitat. Taking the time to evaluate sunlight, wind patterns, and soil quality will pay dividends for decades to come.
Sunlight is a primary factor in determining the growth rate and the vibrancy of the autumn foliage display. Ideally, you should choose a spot that receives full sun or at least partial shade for the majority of the day. Trees planted in deep shade may become leggy and lose the dense, rounded habit that is so characteristic of the species. Proper light levels also help the tree resist certain fungal diseases that thrive in damp, dark environments.
Soil drainage is perhaps the most critical physical requirement to check before you start digging the planting hole. While the field maple can handle some temporary wetness, it will not survive in soil that remains saturated for extended periods. You can perform a simple drainage test by digging a small hole and filling it with water to see how quickly it disappears. If the water lingers for more than a day, you may need to consider mounding the soil or choosing a different location.
Proximity to structures and underground utilities is a practical consideration that many homeowners often overlook during the excitement of planting. The root system of a field maple is generally non-invasive, but it still requires space to grow without hitting foundations or pipes. You should maintain a safe distance from walls and fences to allow the canopy to spread symmetrically and naturally. Checking local regulations regarding tree placement near public pathways or power lines is also a very wise step.
The professional planting process
Once you have selected the perfect site, the actual planting process should be carried out with precision and care. The best time to plant a field maple is during the dormant season, typically from late autumn to early spring. This allows the roots to settle in and begin establishing themselves before the demands of spring growth begin. You should prepare a hole that is at least twice as wide as the root ball but no deeper than its height.
More articles on this topic
Handling the root ball carefully is essential to avoid damaging the fine feeder roots that are responsible for water uptake. If the tree is container-grown, check for circling roots and gently loosen them to encourage outward growth into the surrounding soil. For bare-root specimens, ensure the roots are kept moist until the very moment they are placed in the ground. Positioning the tree at the correct depth is vital, as planting too deep can suffocate the roots and lead to trunk rot.
Backfilling the hole should be done using the native soil, perhaps enriched with a small amount of organic compost if the soil is very poor. You should firm the soil gently with your hands or feet as you go to remove large air pockets without compacting it too tightly. Watering the tree thoroughly immediately after planting helps settle the soil around the roots and provides essential hydration. A layer of organic mulch around the base will help retain this moisture and regulate soil temperature during the first critical year.
Staking may be necessary for taller saplings or for trees planted in particularly windy or exposed locations. Use flexible ties that allow for some natural movement, as this actually helps the tree develop a stronger and more resilient trunk. The stakes should be removed after the first or second growing season once the root system is sufficiently established. Regular monitoring during the first year is the best way to ensure your new field maple gets off to a healthy start.
Propagation from seeds
Propagating the field maple from seeds is a rewarding process that requires patience and an understanding of natural cycles. The winged seeds, or samaras, should be collected in late summer or early autumn when they have turned from green to brown. It is often best to harvest them directly from the tree just before they are ready to fall naturally. Testing the seeds in water can help identify which ones are viable, as the healthy ones will usually sink to the bottom.
More articles on this topic
Cold stratification is a necessary step because the seeds have a natural dormancy that must be broken by a period of cold. You can mimic winter conditions by placing the seeds in a bag with moist sand or peat moss and keeping them in a refrigerator. This process usually takes between three to four months, depending on the specific batch and environmental conditions. Once the seeds start to show signs of germination, they are ready to be moved to a more permanent growing medium.
Sowing should take place in a well-draining seed compost, placing the seeds just below the surface of the soil. Maintain a consistent moisture level without making the soil soggy, as this can cause the delicate young seedlings to rot. Providing a warm, bright environment will encourage steady growth, but avoid direct, scorching sunlight for the first few weeks. As the seedlings develop their first true leaves, you can begin to introduce them to the outdoors gradually.
Pricking out and potting on is the next stage once the seedlings are large enough to handle without causing damage. Each young tree should have its own pot to ensure it has enough space and nutrients to develop a strong root system. You may need to move them to larger containers several times before they are ready to be planted in their final positions. Growing your own trees from seed is a slow but deeply satisfying way to expand your garden or woodland.
Propagation from cuttings and grafting
Propagation from cuttings is a faster alternative to seeds and ensures that the new tree will be genetically identical to the parent. Softwood cuttings are typically taken in early summer when the new growth is still flexible but starting to firm up. You should select healthy, vigorous shoots and cut them into sections about four to six inches in length. Removing the lower leaves and dipping the base in rooting hormone can significantly increase your chances of success.
The environment for rooting cuttings needs to be humid and consistently warm to prevent the shoots from drying out before they grow roots. Placing the cuttings in a mix of perlite and peat moss under a plastic cover or in a propagator works very well. You should mist the foliage regularly and keep the medium moist but never saturated with excess water. Root development usually takes several weeks, after which the plants can be gradually hardened off to lower humidity.
Hardwood cuttings are another option and are taken during the dormant season, usually in late autumn or mid-winter. These cuttings are more robust and can often be placed directly into a specialized nursery bed outdoors. The process is slower than softwood propagation, but it requires less intensive monitoring and specialized equipment. By the following autumn, many of the hardwood cuttings will have developed enough roots to be moved to their first pots.
Grafting is a more advanced technique often used to propagate specific ornamental cultivars of the field maple. This involves joining a shoot from the desired variety onto a hardy rootstock of the standard species. While it requires more skill and precision, grafting allows you to combine the best traits of two different plants. For most home gardeners, however, seeds and cuttings remain the most accessible and successful methods for propagating this wonderful tree.