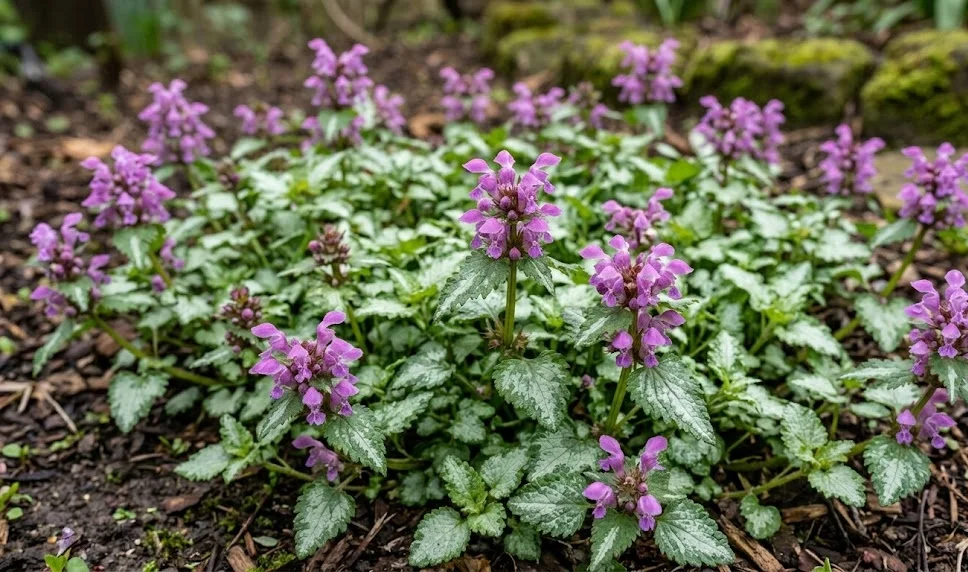
Establishing a new colony of spotted dead-nettle begins with careful site selection and proper soil preparation to ensure rapid root development. This perennial groundcover is prized for its ease of establishment, making it an ideal choice for both novice and experienced gardeners. Whether starting from nursery-bought containers or propagating from existing plants, the process requires attention to detail regarding depth and spacing. By following these professional planting guidelines, one can achieve a dense and uniform carpet of silver-streaked foliage in a relatively short timeframe.
Site selection and preparation
Choosing the right location is the first and most critical step in the planting process for this species. While it is adaptable, the plant performs best in locations that offer partial to full shade, away from the harsh afternoon sun. The soil in the chosen area should be cleared of any aggressive weeds or grass that might compete for nutrients and space. Testing the drainage of the site by digging a small hole and filling it with water can prevent future issues with root rot.
The soil should be loosened to a depth of at least six to eight inches to facilitate easy root penetration. Incorporating a generous amount of organic matter, such as compost or aged leaf mold, will improve the soil’s structure and nutrient content. If the soil is particularly heavy or sandy, these amendments are even more vital for creating a balanced growing medium. A smooth, level surface will ensure that the plants can spread evenly across the designated area.
Before planting, it is often helpful to visualize the final layout by placing the pots on the ground in their intended positions. Spacing is generally recommended at twelve to eighteen inches apart, depending on how quickly a full cover is desired. Closer spacing will result in a faster “fill-in,” but may require more frequent thinning in the future to maintain air circulation. Once the layout is finalized, the actual planting can begin with a clear plan in mind.
Consideration should also be given to the proximity of other plants in the garden design. Spotted dead-nettle works beautifully as an underplanting for taller shrubs or around the base of large trees. However, it should be placed where it will not be smothered by heavy leaf fall in the autumn. Planning for these environmental interactions during the site preparation phase saves significant labor in the long run.
More articles on this topic
Execution of the planting process
The best time to plant is typically in the early spring or early autumn when temperatures are mild and natural rainfall is more frequent. When removing the plant from its container, it is important to handle the root ball gently to avoid excessive damage to the fine roots. If the plant is root-bound, lightly teasing the roots outward will encourage them to grow into the surrounding soil. The hole should be twice as wide as the root ball but no deeper than the original pot.
Placing the plant at the correct depth is essential for preventing crown rot and ensuring stability. The top of the root ball should be level with the surrounding soil surface, as planting too deep can suffocate the stems. Once the plant is in place, the hole should be backfilled with the amended soil and gently firmed down with the hands. This eliminates large air pockets while still maintaining a porous structure for water and air movement.
Immediately after planting, a thorough watering is necessary to help settle the soil around the roots. This initial hydration provides the plant with the resources it needs to overcome transplant shock and begin establishing itself. A light application of a balanced, liquid seaweed fertilizer can also give the new transplants a gentle boost. Monitoring the moisture levels daily for the first two weeks is crucial for the survival of the young plants.
Applying a thin layer of mulch around the new plants will help retain moisture and suppress weed growth during the establishment phase. The mulch should not touch the stems of the plants to avoid trapping moisture against the sensitive crown area. As the plants begin to grow and spread, they will naturally provide their own “living mulch” by shading the soil surface. This transition from a newly planted bed to an established groundcover is a satisfying process for any gardener.
More articles on this topic
Propagation through division
Division is one of the most effective and straightforward methods for expanding a collection of spotted dead-nettle. This process is best performed in the spring or autumn when the plant is not under stress from extreme heat. An established clump is carefully lifted from the ground using a garden fork, ensuring that a significant portion of the root system is kept intact. The plant can then be separated into smaller sections, each with its own set of roots and healthy stems.
Using a sharp, clean knife or a spade can help make clean cuts through the dense root mass. It is important to ensure that each division has enough foliage to support itself during the re-establishment period. These new sections should be replanted immediately to prevent the roots from drying out in the air. Following the same planting techniques used for nursery stock will ensure the success of these home-grown divisions.
Propagating through division also serves as a rejuvenation technique for older, tired-looking mats of dead-nettle. Over time, the center of a large colony can become woody or sparse, and dividing helps stimulate fresh, vigorous growth. This practice allows a gardener to maintain the health of the original planting while creating new ones for other parts of the landscape. It is a cost-effective way to fill large areas with beautiful, consistent foliage.
After replanting the divisions, they should be treated with the same care as brand-new transplants. Regular watering and protection from extreme conditions will help them anchor themselves firmly in their new home. Most divisions will begin to show signs of new growth within a few weeks, signaling that the process was successful. This cyclical method of propagation ensures a continuous supply of healthy plants for years to come.
Propagation via stem cuttings
Another reliable way to propagate this species is through the use of stem cuttings, which can be done throughout much of the growing season. Healthy, non-flowering stems are the best candidates for this method, as they possess the highest concentration of growth hormones. A cutting of about four to six inches in length should be taken just below a leaf node using sterilized shears. Removing the lower leaves will reduce moisture loss and expose the nodes where new roots will eventually form.
The cuttings can be placed directly into a moist, well-draining propagation mix or even into a glass of water. If using a soil-based medium, a rooting hormone can be applied to the cut end to accelerate the development of roots. Keeping the cuttings in a humid environment with indirect light will prevent them from wilting before they can establish a root system. A clear plastic cover or a misting system can help maintain the necessary humidity levels.
Roots typically begin to form within two to three weeks, at which point the cuttings can be transitioned to individual pots. It is important to gradually acclimate the new plants to the outdoor environment through a process known as hardening off. This involves exposing them to increasing amounts of light and air over the course of several days. Once they have developed a robust root system and multiple sets of leaves, they are ready to be planted in their permanent garden location.
Stem cuttings are particularly useful for sharing specific cultivars with friends or for filling in small gaps in an existing bed. This method allows for the production of many new plants from a single parent specimen without disturbing its root system. It is a fascinating way to observe the regenerative powers of nature up close. With a little patience and care, even a single stem can grow into a lush, sprawling carpet of silver and green.