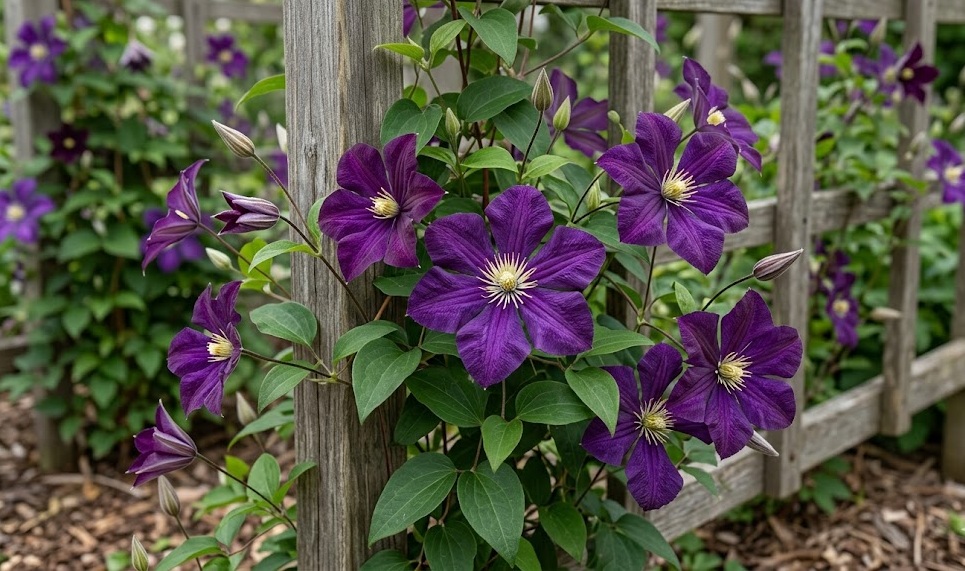
Establishing a new clematis in your garden is an exciting project that begins with careful planning and a deep understanding of the plant’s unique biology. Success in this endeavor depends largely on the initial steps you take to prepare the site and the care you provide during the transition period. Whether you are starting with a nursery-bought specimen or trying to create new plants yourself, precision is key to ensuring vigor. This article will guide you through the professional techniques for both planting and propagation to expand your floral collection.
Choosing the perfect location
The first rule of successful cultivation is finding a spot where the environmental conditions match the specific needs of the vine. You should look for an area that receives at least six hours of direct sunlight to ensure a high volume of flower production. However, it is equally important that the ground at the base of the plant remains shielded from the most intense heat. A location near a fence or wall that runs east to west can often provide the perfect light balance throughout the day.
Soil quality at the chosen site must be evaluated and improved before you even think about digging the planting hole. These plants thrive in loamy, fertile soil that allows water to pass through without becoming stagnant around the delicate roots. If your garden has heavy clay or very sandy soil, you must incorporate large amounts of organic matter to improve the texture. Conduct a drainage test by filling a hole with water and timing how long it takes to empty to ensure it is suitable.
Consider the long-term structural needs of the plant when you are picking its permanent home in the garden landscape. Since this variety is a vigorous climber, it will need a strong trellis, archway, or fence to support its weight as it matures. Moving a well-established clematis is a difficult and risky process that often results in significant transplant shock or even death. Therefore, it is much better to choose a site where the plant can remain and expand for many years to come.
Accessibility is another practical factor that should influence your decision on where to plant your new climbing specimen. You will need to reach the plant regularly for watering, fertilizing, and the annual pruning that keeps it healthy and productive. If you plant it in the very back of a deep border, you might find it difficult to provide the necessary care without stepping on other plants. Ensure there is a clear path or enough space around the base to perform these essential gardening tasks comfortably.
More articles on this topic
The professional planting process
When you are ready to plant, start by digging a hole that is significantly wider and deeper than the current root ball of the plant. A hole that is roughly twice the width of the pot will allow the new roots to spread easily into the loosened surrounding soil. This is also the time to mix in a handful of bone meal or a specialized starter fertilizer to encourage rapid root establishment. Proper preparation of the planting site is the best insurance policy against the plant failing to take hold in its new environment.
One of the most important professional tips for planting this variety is to set it deeper in the ground than it was in its original pot. You should aim to have the first two sets of leaf nodes buried beneath the surface of the professional soil mix. This technique encourages the development of multiple stems from below the ground, which makes the plant bushier and more resilient. If the top of the plant is damaged by wilt or weather, the buried nodes can send up fresh new shoots to save it.
Once the plant is in the hole, fill it back in with a mixture of the original garden soil and high-quality compost or peat substitute. Firm the soil down gently with your hands to remove any large air pockets, but avoid packing it so tightly that you crush the fragile roots. Watering the plant thoroughly immediately after planting is essential to settle the soil and ensure good contact with the root system. This initial deep soak helps the plant recover from the stress of being moved and starts the hydration process.
Finish the planting process by applying a thick layer of mulch around the base, being careful not to let it touch the main stems directly. This mulch serves the dual purpose of keeping the roots cool and suppressing any weeds that might compete for moisture and nutrients. You might also want to install a temporary support or a small cage to protect the young, brittle stems from being broken. Providing this extra level of care in the first few weeks will give your clematis the best possible start in its new home.
More articles on this topic
Propagation through softwood cuttings
If you want to create more plants from your existing clematis, taking softwood cuttings in the late spring or early summer is a very effective method. You should look for healthy, non-flowering shoots that are firm but still flexible and have a vibrant green color. Each cutting should be about four to six inches long and contain at least two sets of leaves for the best chance of success. Using a very sharp, sterilized knife or shears will ensure a clean cut that heals quickly and reduces the risk of infection.
Prepare the cuttings by removing the lower set of leaves and dipping the cut end into a high-quality rooting hormone powder or gel. Insert the cuttings into a pot filled with a sterile, well-draining medium such as a mix of perlite and peat moss. It is vital to keep the humidity high around the cuttings, so placing the pot inside a clear plastic bag or a specialized propagator is recommended. Keep the cuttings in a bright spot but out of direct sunlight, as too much heat will cause them to wilt and die.
Monitoring the moisture levels in the propagation medium is the most delicate part of the entire process for the home gardener. You want the soil to be consistently damp but never soaking wet, which could cause the stems to rot before they can grow roots. Mist the leaves occasionally to provide extra hydration, but ensure there is some airflow to prevent fungal growth on the foliage. In about four to six weeks, you can gently tug on the cuttings to see if they have developed a stable root system.
Once the cuttings have established roots, they need to be gradually hardened off to the lower humidity and varying temperatures of the outside world. Start by opening the bag or propagator for a few hours each day, slowly increasing the time over several weeks. Pot them up into individual containers with regular potting soil and continue to grow them in a sheltered spot for their first year. This patience ensures that the young plants are strong enough to survive the transition to the garden when the time finally comes.
Layering and division techniques
Ground layering is perhaps the simplest and most reliable way for a beginner to propagate a climbing clematis without specialized equipment. In the spring, choose a long, flexible stem and gently bend it down until a section of it can be buried in the soil. Make a small, shallow nick in the underside of the stem where it will touch the ground to stimulate the growth of new roots. Use a U-shaped wire or a heavy stone to keep the stem firmly in contact with the moist earth throughout the growing season.
By the following spring, the buried section of the stem should have developed its own independent root system and be ready for separation. You can check for root growth by carefully brushing away some of the soil to see if the connection is strong and healthy. If roots are present, simply cut the stem from the parent plant and carefully dig up the new, smaller specimen. This method is highly successful because the young plant remains connected to the mother plant’s resources while it is developing its own.
Division of the root mass is another possibility, though it is generally more stressful for the plant than layering or taking cuttings. This should only be attempted with very large, mature plants that have multiple stems emerging from the ground over a wide area. In early spring, before the growth starts, you can use a sharp spade to lift the entire plant and cut the root ball into sections. Each piece must have several healthy buds and a substantial amount of roots to have a chance of surviving the procedure.
Immediately replant the divided sections into prepared holes and treat them with the same care as you would a newly purchased nursery plant. They will likely need extra water and some shade for the first season as they recover from the trauma of being split apart. While division provides an instant large plant, it can sometimes set back the flowering of the original specimen for a year or two. Weigh the benefits of having more plants against the temporary loss of a massive floral display before proceeding with this method.