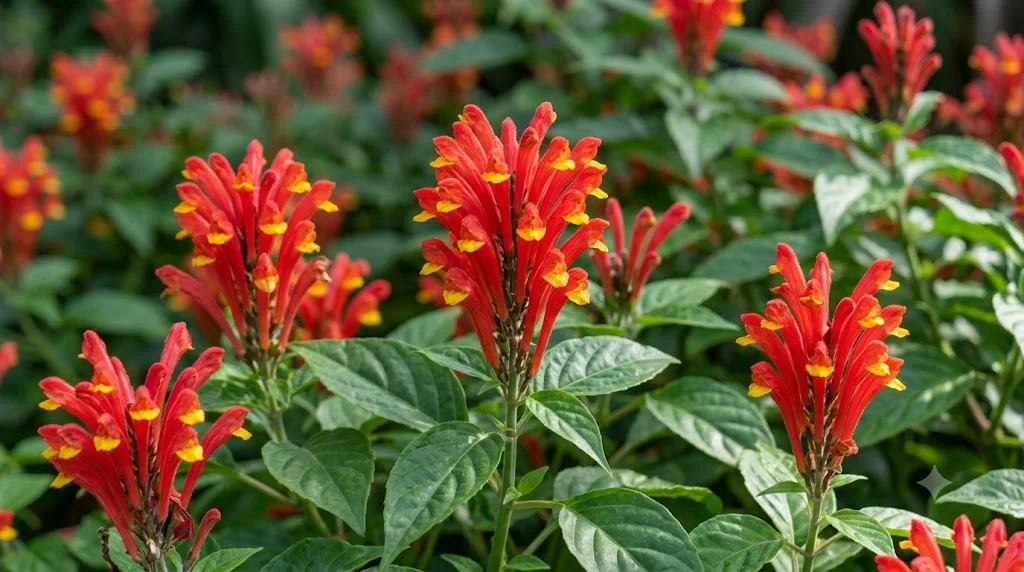

Costa Rican skullcap is a tropical ornamental plant valued for its glossy foliage and striking clusters of red to orange tubular flowers. It performs best when warmth, filtered light, steady moisture, and good air circulation are kept in balance. Although the plant can look delicate, it grows vigorously when its basic environmental needs are understood. Successful care depends less on complicated techniques than on providing stable conditions throughout the year.
Understanding its tropical growth habit
Costa Rican skullcap naturally develops as a leafy, branching shrub rather than as a compact seasonal bedding plant. Its stems become semi-woody with age, while younger shoots remain flexible and carry most of the fresh foliage and flowers. In favorable conditions, the plant can grow quickly and may need regular shaping to remain balanced. Recognizing this vigorous growth habit helps you choose an appropriately spacious location from the beginning.
The leaves are arranged in pairs along the stems and usually have a soft, slightly textured appearance. Healthy foliage should remain evenly green without widespread yellowing, dry margins, or pale mottling. New leaves may initially appear softer and lighter before deepening in color as they mature. Sudden changes in leaf appearance often indicate an environmental problem rather than a natural phase of growth.
Flower clusters usually form near the ends of actively growing shoots. This means that healthy branching has a direct influence on the number of flowering points the plant can produce. A weak, stretched plant may develop long stems with relatively few blooms. A well-branched specimen, by contrast, can carry a much fuller and more attractive floral display.
Growth is strongest when temperatures remain warm and relatively stable. The plant does not appreciate cold drafts, sharply fluctuating indoor temperatures, or repeated movement between very different environments. Even when cold does not kill it, prolonged chilling can slow root activity and interrupt flowering. A protected position therefore supports both ornamental quality and long-term health.
More articles on this topic
Choosing the best growing position
A bright position with protection from harsh midday sun is usually ideal. Near an east-facing window, the plant can receive gentle morning light without being exposed to the most intense afternoon heat. A filtered south- or west-facing position can also work when a sheer curtain softens direct sunlight. The goal is to provide enough light for compact growth without scorching the foliage.
Outdoors, the plant benefits from partial shade or dappled light beneath taller plants. Morning sun followed by light afternoon shade often creates an excellent balance. Deep shade should be avoided because it encourages weak stems, sparse flowering, and slow drying of the potting medium. The site should also be sheltered from strong winds that can damage soft shoots.
Indoor plants should not be pushed into dark corners simply because their foliage remains green for a time. Costa Rican skullcap can survive in moderate light, but survival is not the same as strong ornamental performance. Insufficient light gradually reduces flower production and causes the plant to lean toward the nearest window. Rotating the container regularly helps maintain a more even shape.
Heat from radiators, fireplaces, and hot ventilation outlets can be just as damaging as cold drafts. These sources dry the surrounding air and may cause rapid moisture loss from both leaves and soil. A location with warm but gentle ambient temperatures is more suitable than one exposed to concentrated heat. Stable conditions allow the plant to regulate water use more efficiently.
More articles on this topic
Maintaining suitable temperature and humidity
Costa Rican skullcap prefers warm conditions similar to those found in tropical and subtropical environments. Daytime temperatures between approximately 20 and 27 degrees Celsius generally support active growth. Slightly cooler nights are acceptable, provided temperatures do not fall sharply. Extended exposure below about 12 to 15 degrees Celsius may cause stress, leaf drop, and stalled development.
Humidity is particularly important when the plant is grown indoors. Dry air can lead to curled leaf margins, premature flower loss, and increased spider mite activity. Grouping tropical plants together can modestly improve the humidity immediately around their foliage. A room humidifier is more effective when indoor air becomes persistently dry during the heating season.
Misting can provide a brief increase in surface moisture, but it does not replace stable atmospheric humidity. Frequent misting in poorly ventilated conditions may also encourage fungal spotting on leaves and flowers. It is better to improve overall humidity while maintaining gentle air movement. Wet foliage should not remain cool and damp for long periods.
A humidity tray can be useful when the container stands above, rather than directly in, the water. The evaporating moisture may slightly improve the immediate microclimate around a smaller plant. However, the tray must never allow the potting medium to stay waterlogged through constant contact with water. Root health remains more important than creating an excessively humid environment.
Providing the right soil and container
The growing medium should retain moderate moisture while allowing excess water to drain rapidly. A high-quality houseplant mix can be improved with perlite, fine bark, or another coarse material that increases air space. Heavy garden soil is unsuitable for containers because it compacts and holds water around the roots. A loose, organic, well-structured medium supports both moisture availability and oxygen supply.
The container must have effective drainage holes at its base. Decorative pots without drainage can be used only as outer covers for an inner nursery pot. Any water that collects in the outer container should be emptied promptly after irrigation. Constantly wet roots are highly vulnerable to decay and cannot function normally.
Repotting is usually necessary when roots circle densely around the inside of the pot or emerge through the drainage holes. A new container should be only slightly larger than the old one. Moving a small root system into a very large volume of wet soil increases the risk of overwatering. Gradual increases in pot size are safer and encourage more even root colonization.
Spring is generally the best time for repotting because the plant is beginning a period of stronger growth. Handle the root ball carefully and remove only clearly dead, blackened, or rotten roots. Healthy roots should be firm and pale rather than soft and dark. After repotting, keep the plant evenly moist but avoid heavy feeding until fresh growth confirms recovery.
Supporting abundant flowering
Strong flowering begins with sufficient light and active, healthy shoots. The plant should receive bright conditions for much of the day without suffering heat stress or leaf scorch. When light levels are too low, it may produce foliage while postponing flower formation. Moving it gradually to a brighter position can restore a more productive growth pattern.
Balanced nutrition also contributes to flowering, although excessive fertilizer can have the opposite effect. Too much nitrogen encourages lush, soft foliage and may reduce the proportion of flowering growth. A balanced or slightly bloom-supporting fertilizer used at moderate strength is generally appropriate. Feeding should always be coordinated with temperature, light, and the plant’s actual rate of growth.
Regular pinching helps create more branch tips, which can later carry flower clusters. This technique is especially useful on young plants that are becoming tall and narrow. Only the soft growing point needs to be removed to encourage side shoots. Repeated heavy cutting during bud development, however, will delay flowering.
Spent flower clusters can be removed when they become unattractive. Deadheading keeps the plant tidy and may redirect energy toward fresh shoots. Cuts should be made just above a healthy pair of leaves or a visible side shoot. Clean tools reduce the chance of transferring disease between stems.
Monitoring routine health signals
The plant communicates stress quickly through changes in its leaves. Yellowing lower leaves may result from overwatering, poor drainage, root congestion, or natural ageing. Yellow leaves throughout the canopy suggest a broader problem with roots, nutrition, temperature, or light. The watering pattern and soil condition should always be checked before fertilizer is applied.
Brown, crisp leaf edges often indicate dry air, inconsistent watering, salt accumulation, or excessive heat. If only the sun-facing side is damaged, direct sunlight may be too intense. Leaves affected by concentrated fertilizer salts may develop scorched tips even when the soil appears moist. Flushing the potting medium with clean water can help remove accumulated residues.
Wilting does not always mean the plant needs more water. A dry plant wilts because roots cannot access moisture, while a waterlogged plant may wilt because damaged roots cannot absorb it. Feeling the growing medium and checking drainage provides more reliable information than judging the leaves alone. Automatic watering without inspection can make the underlying problem worse.
Pale, stretched shoots generally indicate insufficient light. Very compact growth with bleached or scorched patches may point to excessive sun exposure. Distorted new leaves should be examined closely for sap-feeding insects. Frequent observation allows small problems to be corrected before they affect the whole plant.
Adapting care through the seasons
During spring, increasing daylight usually stimulates fresh stems and leaves. This is a suitable time to repot, begin moderate feeding, and carry out structural pruning. Water demand rises gradually as the canopy expands. Care should be increased in response to actual growth rather than according to a fixed calendar date.
Summer growth can be rapid, particularly outdoors in a warm, sheltered position. Containers may dry faster, but they should still be checked before every watering. Intense heat can cause temporary midday wilting even when the root zone remains moist. Providing afternoon shade is often more helpful than repeatedly saturating the soil.
In autumn, growth begins to slow as light levels decrease. Fertilizer should be reduced gradually rather than continued at full summer strength. Outdoor plants need to be moved under protection before cold nights arrive. Inspecting them for insects before bringing them indoors prevents pests from spreading to other houseplants.
Winter care should focus on stability rather than forcing rapid growth. The plant usually needs less water because evaporation and photosynthesis are reduced. Feeding can be paused or used only sparingly when active growth continues under strong supplemental lighting. Warm roots, adequate brightness, and protection from dry heating air help preserve healthy foliage until spring.