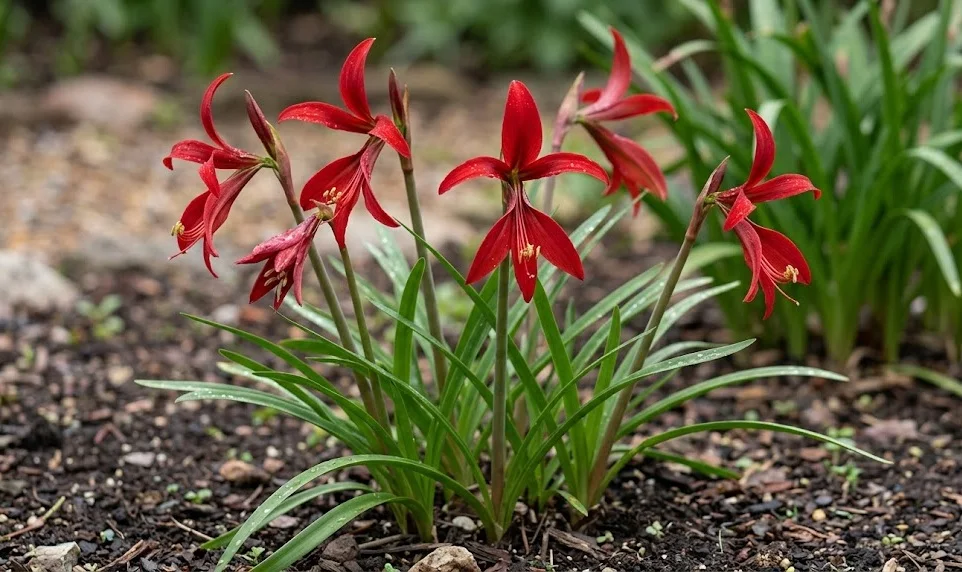
The aztec lily is a stunning bulbous plant that brings a touch of dramatic elegance to any garden setting with its unique velvet-red flowers. This plant requires a specific approach to maintenance to ensure it thrives throughout the growing season and produces its characteristic blooms reliably. Understanding the basic biological needs of the species is the first step toward achieving professional-looking results in your personal horticultural space. By following expert guidelines, you can maintain the health and vigor of this exotic specimen for many years to come.
Optimal soil composition for healthy growth
The selection of the growing medium is one of the most critical factors when preparing for the arrival of your new bulbs. You should aim for a well-draining soil mix that prevents water from stagnating around the delicate root system and the bulb itself. Incorporating organic matter like aged compost can provide a steady supply of nutrients while improving the overall structure of the earth. Always ensure that the pot or garden bed has sufficient drainage holes to allow excess moisture to escape quickly after irrigation.
A sandy loam texture is often considered the gold standard for these types of exotic bulbs. This specific consistency allows for easy root penetration and prevents the compaction that often leads to physiological stress. You can create your own mix by combining standard potting soil with coarse sand or perlite in a specific ratio. Such a balance helps maintain the necessary air pockets within the substrate, which are vital for the metabolic processes of the root system.
Testing the acidity of the soil can also provide valuable insights into how well the plant will absorb available nutrients. The aztec lily tends to prefer a neutral to slightly acidic environment where the chemical balance supports active mineral uptake. If the soil is too alkaline, you may notice a yellowing of the leaves, which indicates a deficiency in essential elements. Adding a small amount of peat moss or elemental sulfur can help adjust the pH levels to a more suitable range for these plants.
Regularly refreshing the top layer of the soil can provide a boost of energy during the peak growing months. This practice helps to replace nutrients that have been washed away by frequent watering or absorbed by the plant. It also provides an opportunity to inspect the upper part of the bulb for any signs of physical damage or disease. Maintaining a clean and nutrient-rich environment is the foundation of a successful long-term care strategy for any bulbous species.
More articles on this topic
Managing temperature and climate conditions
Monitoring the ambient temperature is another essential aspect of care because this plant is native to warmer regions and does not tolerate frost. During the active growth phase, it prefers consistent warmth and protection from cold drafts that might stunt its development or damage the foliage. If you are growing it in a container, you have the advantage of moving it indoors if a late spring frost is predicted in your area. Providing a stable environment will help the plant focus its energy on flower production rather than surviving thermal stress.
The ideal daytime temperature for these lilies usually falls between twenty and twenty-five degrees Celsius. While they can handle higher temperatures if provided with adequate moisture, extreme heat can sometimes cause the blooms to fade more quickly than usual. Providing a bit of afternoon shade during the hottest parts of the summer can help preserve the intensity of the red petals. A stable climate allows the plant to follow its natural growth cycle without the interruption of sudden environmental shifts.
Nighttime temperatures should ideally not drop below fifteen degrees Celsius to ensure the plant remains in an active state of growth. If the nights are consistently cooler, the plant might prematurely enter a state of semi-dormancy, which reduces its overall ornamental value. Gardeners in cooler climates often treat these bulbs as annuals or move them to a greenhouse to maintain the necessary warmth. Heat mats can also be used for potted specimens to keep the root zone at a comfortable and productive temperature.
Humidity is a secondary but important factor to consider when managing the local climate for your exotic lilies. While they are relatively adaptable, they appreciate a moderate level of atmospheric moisture that mimics their natural habitat. In very dry indoor environments, placing a tray of water and pebbles near the pots can help increase the local humidity levels through evaporation. Avoiding stagnant air is also crucial, so ensure there is gentle air circulation to prevent the development of opportunistic fungal pathogens.
More articles on this topic
Understanding the seasonal growth cycle
The life cycle of this plant is marked by distinct phases of activity and rest that must be respected for long-term success. In the early spring, the bulb awakens from its winter slumber and begins to push out its first green shoots. This is the period when the plant requires the most attention in terms of light, water, and nutrient support. Recognizing the transition between these stages allows you to adjust your care routine to match the current physiological needs of the specimen.
Flowering typically occurs in late spring or early summer, providing a spectacular but relatively brief display of color. After the blossoms have faded, the plant enters a critical phase where it focuses on replenishing the energy stores within the bulb. During this time, the foliage remains active and green, performing photosynthesis to produce the carbohydrates needed for the next year. You should never cut back the leaves until they have completely yellowed and withered naturally on their own.
As autumn approaches, the growth slows down and the plant prepares itself for the mandatory period of winter dormancy. This transition is usually triggered by shorter days and a gradual decrease in average daily temperatures. You will notice the leaves starting to change color, which is a signal to reduce watering and stop all fertilization efforts. Respecting this natural decline is essential because the bulb needs a period of total rest to reset its internal biological clock.
During the winter months, the bulb remains completely inactive and should be kept in a cool and dry environment. This rest period is not a sign of failure but a necessary survival strategy that allows the plant to endure unfavorable conditions. If the dormancy is interrupted by excessive warmth or moisture, the bulb may fail to bloom or could even rot before spring. Successful gardeners view the dormant phase as an investment in the health and beauty of the following year’s floral display.
Cultivation in containers versus garden beds
Growing these lilies in pots offers a high degree of flexibility and control over the immediate environment of the plant. Containers allow you to move the specimen to catch the best light or to protect it from unexpected weather events. You can also customize the soil mix more precisely in a pot than you could in a large garden bed. This method is particularly recommended for those living in regions with heavy clay soils or unpredictable spring weather patterns.
When choosing a pot, ensure it is deep enough to accommodate the bulb and its future root system comfortably. Terracotta or ceramic pots are often preferred because they are porous and allow for better gas exchange through the walls. Plastic pots can also be used, but they tend to retain moisture for longer, which requires more careful monitoring of the irrigation schedule. Always select a container with multiple drainage holes to ensure the safety of the bulb during heavy rain or watering.
Planting in garden beds creates a more natural look and allows the plants to establish larger colonies over several years. If the local soil is naturally well-draining, the lilies can reach a larger size and produce more offsets than they would in a confined pot. You should choose a location that is slightly elevated to prevent water from pooling around the base of the plants during the rainy season. Grouping several bulbs together in a bed creates a high-impact visual display when they all come into bloom at once.
One drawback of garden planting in cooler zones is the necessity of lifting the bulbs every autumn to prevent frost damage. This process requires more physical labor than simply moving a pot into a garage or cellar for the winter. However, the reward of seeing a mass of red flowers in a natural landscape setting often outweighs the extra effort required. Regardless of the method chosen, the fundamental principles of drainage and light remain the same for both cultivation styles.
The importance of potting and repotting techniques
Repotting is a task that should be performed every two to three years to ensure the plant has enough room and fresh nutrients. Over time, the soil in a container becomes depleted of its structure and mineral content, which can lead to a decline in plant health. You will know it is time to repot when the roots start to emerge from the drainage holes or the bulb feels cramped. Early spring, just as the first signs of growth appear, is the optimal window for this procedure.
When moving the bulb to a new container, handle it with extreme care to avoid damaging the outer scales or the emerging roots. You should gently shake off the old soil and inspect the bulb for any soft spots or signs of pests. If you find any baby bulbs, known as offsets, this is an excellent time to separate them and start new individual plants. Use a pot that is only one or two sizes larger than the previous one to avoid the issues associated with excessive soil volume.
During the potting process, the position of the bulb in the soil is a key factor for successful flowering. The neck of the bulb should ideally remain slightly above the soil line to prevent moisture from entering the crown and causing rot. Firm the soil gently around the base to provide stability, but avoid packing it so tightly that air is excluded from the root zone. A light watering after repotting will help settle the soil and encourage the roots to begin exploring their new environment.
After the procedure is complete, keep the plant in a slightly shaded and protected area for a few days to recover from the stress. Sudden exposure to intense direct sunlight or high winds can cause the plant to wilt before it has had a chance to establish itself. Once you see active new growth, you can gradually move it back to its permanent sunny location. Regular repotting keeps the root system young and efficient, leading to more consistent and impressive floral displays over time.
Enhancing and maintaining the floral display
The unique shape of the flower is what makes this species a favorite among enthusiasts of rare and exotic plants. To maximize the beauty of the blooms, ensure the plant receives plenty of bright light as the flower stalk begins to emerge. If the light levels are too low, the stem may become elongated and weak, causing the heavy flower to floop over. Providing a small bamboo stake for support can be a practical solution if the plant is growing in a particularly breezy location.
You can prolong the life of the individual flowers by keeping the plant in a slightly cooler spot once the buds have opened. While the plant loves heat during its growth phase, cooler air helps the delicate petals remain firm and vibrant for a longer period. Avoid getting water directly on the petals during irrigation, as this can cause unsightly spotting or premature decay. Observing the intricate details of the flower structure is one of the greatest pleasures of caring for this specific lily species.
Once the primary bloom has finished, the plant may occasionally produce a second flower stalk if it is particularly healthy and well-fed. You should encourage this by maintaining a consistent care routine and ensuring the plant is not under any unnecessary stress. Removing the spent flowers before they can form seeds will also help redirect the plant’s energy toward further growth. Each flowering event is a testament to the quality of the care and the suitability of the environment you have provided.
The color intensity of the flowers can sometimes be influenced by the mineral content of the soil and the intensity of the light. Plants grown in very bright, filtered light often exhibit a deeper, more velvety red than those grown in partial shade. Using a fertilizer with a balanced ratio of potassium and phosphorus during the budding stage can also support the development of strong colors. Paying attention to these fine details allows a dedicated gardener to elevate their plant care from basic maintenance to expert level.
Post-bloom care and leaf maintenance
After the spectacular flowering stage is over, the plant transitions into a phase of vegetative growth that is just as important. Many gardeners make the mistake of neglecting the plant once the flowers are gone, but this is actually when the bulb prepares for next year. You must continue to provide regular water and fertilizer to support the large, strap-like leaves as they work to store energy. The health of the foliage during the summer months directly determines the quality of the flowers you will see the following spring.
The leaves should be kept as healthy as possible and protected from mechanical damage or pest attacks. If any leaves become yellow or diseased during the summer, they can be carefully removed, but the healthy ones must remain. This green tissue is the biological factory of the plant, converting sunlight into the chemical energy stored in the bulb’s core. Think of the summer growth period as a long-term investment that pays dividends in the form of future blossoms.
As the season progresses into late summer, you will notice the growth rate naturally beginning to slow down. This is the signal to start tapering off the amount of water you provide and to stop adding any more fertilizer. The goal is to allow the plant to naturally use up its remaining resources and begin the hardening process for dormancy. Forcing the plant to stay green for too long with excessive watering can actually interfere with its natural rest cycle and weaken the bulb.
Finally, when the leaves have turned completely yellow and dry, they can be gently pulled away from the bulb or cut with clean shears. At this point, the bulb has successfully withdrawn all the nutrients it needs from the foliage and is ready for its winter sleep. Storing the bulbs properly after this stage ensures that they remain viable and ready to sprout again when the warmth of spring returns. Consistent post-bloom care is the secret to keeping your lilies productive and healthy for many growing seasons.