Pruning a black jewel orchid is an essential maintenance task that helps keep the plant healthy, attractive, and manageable within its container. Because this species has a creeping growth habit, it can eventually become leggy or outgrow its designated space if left entirely to its own devices. Proper cutting back encourages the rhizomes to branch out, resulting in a fuller and more robust specimen over time. While the idea of cutting such a beautiful plant can be daunting for beginners, it is a vital skill that every serious jewel orchid collector should master.
The best time to perform any significant pruning is during the spring or early summer, when the plant is entering its most vigorous growth phase. This ensures that the orchid has plenty of energy to heal the wounds and produce new shoots from the nodes below the cuts. You should always use sharp, sterilized tools—such as a specialized pruning shear or a simple razor blade—to make clean cuts without crushing the fleshy stems. Hygiene is paramount, as the soft tissues of the orchid are susceptible to infections if bacteria are introduced during the process.
Before you make your first cut, take a moment to evaluate the overall shape of the plant and decide what you want to achieve. Are you trying to reduce the length of a specific stem, or are you hoping to stimulate more growth from the base of the plant? Understanding the structure of the rhizome and identifying the nodes is key to a successful pruning session. Each node has the potential to produce a new stem or a set of roots, so making your cuts just above a node is the professional way to proceed.
After pruning, the plant may benefit from a short period of slightly reduced watering to allow the cut ends to callus over properly. Some growers like to dab a tiny bit of cinnamon powder or activated charcoal on the fresh cuts to act as a natural sealant and fungicide. Within a few weeks, you should see new growth emerging from the nodes, leading to a bushier and more aesthetically pleasing plant. Regular pruning not only keeps the plant looking its best but also provides you with plenty of material for propagation.
Removing spent flower spikes and dead foliage
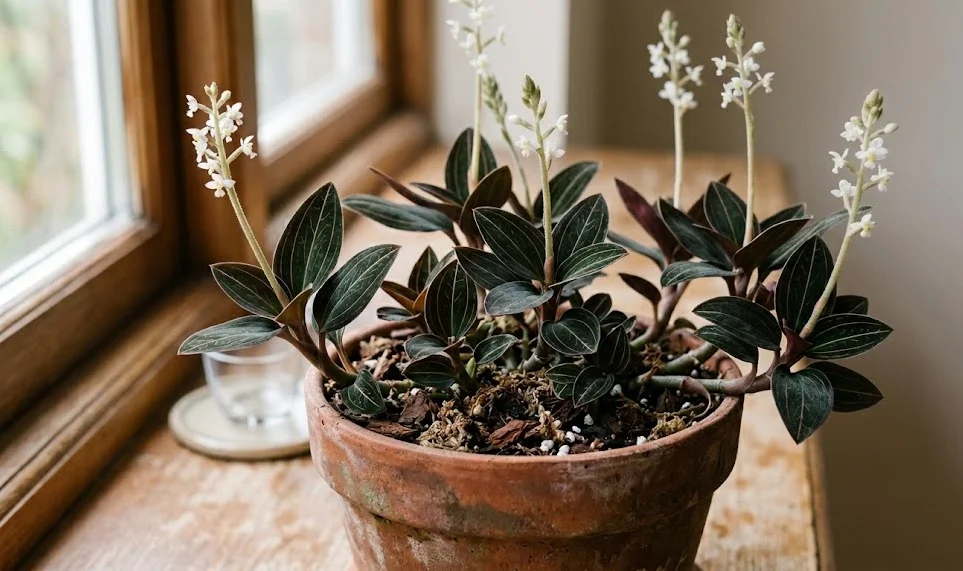
The most common pruning task for this orchid is the removal of the flower spikes once the winter blooming season has come to an end. Once the individual white flowers have faded and the spike begins to turn brown or yellow, it is no longer providing any benefit to the plant. By cutting the spike off near the base, you prevent the orchid from wasting energy on seed production, which it is unlikely to complete successfully in a home environment. This redirected energy will instead go toward producing the next flush of beautiful, velvety leaves.
More articles on this topic
In addition to the flower spikes, you should periodically remove any leaves that have turned yellow or brown due to old age. It is a natural part of the plant’s life cycle for the oldest leaves at the base of the stems to eventually wither and die. Removing these manually keeps the plant looking tidy and eliminates potential hiding spots for pests like mealybugs or spider mites. Gently tugging on a completely dried leaf is often enough to remove it, but if it resists, use your sterilized scissors to avoid tearing the stem.
If you notice any stems that have become soft, mushy, or discolored, these should be removed immediately to prevent the spread of rot. This type of “emergency pruning” can save the rest of the plant if you act quickly and cut back into healthy, firm tissue. Always clean your tools with alcohol between cuts when dealing with potentially diseased material to avoid spreading the problem. Maintaining a clean and debris-free plant is one of the simplest ways to ensure long-term health and vitality.
Regular grooming also involves checking the underside of the leaves and the crevices of the rhizomes for any signs of trouble. While not strictly “pruning,” this process of cleaning and inspecting is part of the same maintenance routine that keeps the orchid in peak condition. A well-maintained black jewel orchid is a testament to the grower’s attention to detail and commitment to the plant’s well-being. By staying on top of these small tasks, you ensure that your orchid remains a stunning focal point in your collection.
Managing growth and encouraging bushiness
When a jewel orchid becomes too long and leggy, it can start to look sparse and lose its visual impact in a pot. You can correct this by cutting back the longest stems by about a third or even a half of their total length. This “pinching back” technique forces the plant to activate the dormant buds at the nodes further down the rhizome, leading to multiple new branches. Over time, this results in a much denser mat of foliage that fills the container beautifully and showcases the shimmering leaves to their best advantage.
More articles on this topic
If the center of the pot has become empty while the stems trail over the edges, you can use U-shaped pins to secure the creeping rhizomes back onto the soil surface. Before pinning them down, you might make a very shallow, tiny nick on the underside of a node to encourage it to produce roots. This method, combined with strategic pruning, allows you to “train” the plant to grow exactly where you want it. This proactive management is what separates a professional-looking specimen from one that is merely surviving.
The cuttings you remove during the pruning process don’t have to go to waste, as they are the perfect starting material for new plants. Any stem section with at least two nodes can be placed in moist sphagnum moss or a light potting mix to start a new individual. This means that every time you prune to improve the shape of your parent plant, you are also expanding your collection. Sharing these rooted cuttings with friends and fellow enthusiasts is one of the great joys of growing this particular species.
Consistency is key when it comes to managing the growth of your black jewel orchid throughout its life. Instead of waiting for the plant to become completely overgrown, try to perform light pruning and grooming every few months. This “little and often” approach is less stressful for the plant and allows you to maintain its appearance with minimal effort. Your orchid will reward this care with a steady supply of exquisite, velvety leaves that look like they belong in a royal garden.