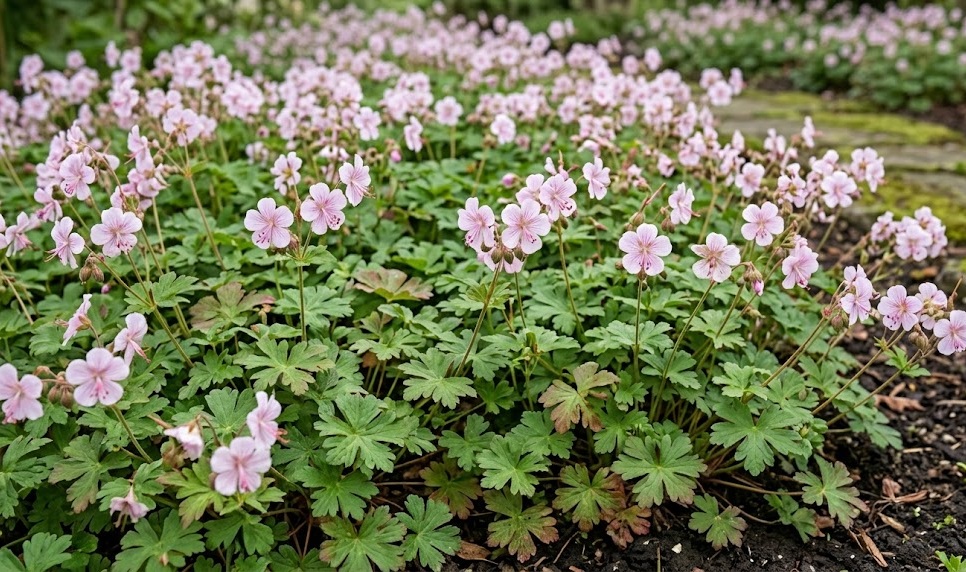
The successful establishment of Cambridge cranesbill begins with careful planning and a clear understanding of the plant’s initial needs. While this perennial is known for its hardiness, the way it is introduced to the garden will determine how quickly it forms a dense cover. Choosing the right time of year and the proper environmental conditions is the first step toward a thriving colony. A well-planted geranium will require far less maintenance in the future than one that was rushed into the ground.
Early spring and early autumn are generally considered the best windows for planting this versatile ground cover. During these periods, the temperatures are mild, and the soil typically contains enough natural moisture to support new root development. Planting in the heat of summer is possible but requires a much more rigorous watering schedule to prevent the young plants from wilting. Conversely, winter planting is usually avoided because the frozen ground makes it impossible for roots to settle.
Before you begin digging, it is helpful to visualize the final layout of the plants to ensure they have enough room to expand. Most experts recommend a staggered planting pattern to achieve a more natural look and faster coverage of the bare soil. This arrangement allows each plant to grow in all directions without immediately competing with its neighbors for light and nutrients. Taking the time to measure out the spacing will lead to a more professional and uniform appearance once the plants mature.
Preparing the site involves more than just digging a hole; it requires creating a welcoming environment for the delicate new roots. Clear the area of any perennial weeds or large stones that might obstruct the growth of the geranium’s underground runners. If the soil is particularly compacted, loosening it to a depth of several inches will facilitate faster establishment and better drainage. Starting with a clean and well-prepared slate is the best way to ensure the long-term success of your planting project.
Techniques for successful manual planting
When you are ready to put the plants in the ground, start by digging a hole that is slightly larger than the root ball. This extra space allows you to backfill with loose, high-quality soil that the young roots can easily penetrate as they grow. If the plant is coming from a nursery pot, gently tease the roots if they have begun to circle the bottom of the container. This simple action encourages them to grow outward into the surrounding garden soil rather than continuing in a tight spiral.
More articles on this topic
Position the plant in the hole so that the crown—the point where the stems meet the roots—is level with the soil surface. Planting too deep can lead to crown rot, while planting too shallow can cause the roots to dry out or suffer from temperature extremes. Once the plant is in place, firm the soil around it with your hands to remove any large air pockets that could trap moisture. This ensures good contact between the roots and the earth, which is vital for the absorption of water and minerals.
Immediately after planting, give the area a thorough soaking to help settle the soil and provide the plant with much-needed hydration. Even if the soil is already damp, this initial watering is a critical step in the transition process from the pot to the garden. You might also consider applying a thin layer of mulch around the base of the plant to help retain moisture. Be careful not to let the mulch touch the stems directly, as this can trap too much moisture against the plant’s base.
Over the first few weeks, monitor the new additions closely to ensure they are adapting well to their new home. You may see some minor wilting or yellowing of the older leaves as the plant focuses its energy on root growth, which is perfectly normal. Avoid the temptation to apply heavy fertilizers during this initial phase, as the focus should be on establishment rather than rapid top growth. Once you see new green shoots appearing in the center of the plant, you will know it has successfully taken root.
Propagation by division for garden expansion
One of the most rewarding aspects of growing Cambridge cranesbill is the ease with which it can be propagated through division. This process involves taking an established, healthy clump and splitting it into several smaller sections, each with its own roots and shoots. Division is not only a way to get more plants for free but also a vital maintenance task for older colonies. It rejuvenates the original plant by giving it more space and resources to thrive in its existing location.
More articles on this topic
The best time for division is either in early spring as growth begins or in late summer after the flowering period has ended. Dig up the entire mother plant with a sharp spade, taking care to preserve as much of the root mass as possible. Once the plant is out of the ground, you can usually see natural points where the clump can be easily separated. You can use your hands, a garden knife, or even two garden forks back-to-back to pull the sections apart.
Each new division should have a healthy portion of roots and at least a few green stems or buds to ensure survival. Replant these sections as soon as possible to prevent the delicate roots from drying out in the air and sun. If you cannot plant them immediately, keep them in a shady spot and cover them with a damp cloth or some moist soil. Treating these new divisions with the same care as a nursery-bought plant will ensure they establish themselves quickly and vigorously.
Using division is a fantastic way to create a consistent look across different parts of your garden without spending a fortune. Because the new plants are genetically identical to the parent, you can be sure they will have the same flower color and growth habit. It also allows you to share your favorite plants with friends and neighbors, fostering a sense of community among local gardeners. This traditional method of propagation remains one of the most effective and satisfying skills in the horticultural toolkit.
Using root cuttings and alternative methods
While division is the most common method, Cambridge cranesbill can also be propagated through root cuttings with great success. This technique involves taking small sections of the thick, fleshy roots and encouraging them to produce new shoots in a controlled environment. This is often done in late winter or early spring when the plant is still dormant but about to enter its active phase. It is a more technical approach that can yield a large number of plants from a single parent specimen.
To take root cuttings, carefully uncover a portion of the root system and select a few healthy, vigorous roots to remove. Cut these into sections about two to three inches long, making sure to keep track of which end was closest to the plant’s crown. Place these sections in a tray of sandy compost, either horizontally or vertically depending on your preferred method, and cover them lightly. Keep the tray in a cool but frost-free environment and ensure the soil remains consistently moist but never waterlogged.
Within a few weeks or months, you should begin to see small green shoots emerging from the soil surface, signaling that the cuttings have taken. Once these young plants have developed a strong enough root system, they can be potted up individually and grown on until they are ready for the garden. This method requires more patience than division but is an excellent way to mass-produce ground cover for a large project. It is a skill that many professional growers use to maintain their stocks of specific cultivars.
Regardless of the method you choose, propagation allows you to take an active role in the lifecycle and spread of your garden plants. It provides a deeper understanding of how the cranesbill grows and what it needs to thrive at every stage of its development. Experimenting with different techniques can be a fun and educational way to expand your gardening knowledge while beautifying your outdoor space. The resilience of this species makes it a forgiving subject for those who are new to the art of plant propagation.
Propagation by division is so easy with Cambridge cranesbill that I’ve never even bothered with seeds. You can take a small clump with just a bit of root in the spring, and it will be fully established by the end of the summer. I like to space them about 30 centimeters apart to give them room to fill in without crowding each other too quickly. If you are planting a large area, using “plugs” is much more cost-effective than buying 2-liter pots. Make sure to keep the new plants well-watered for the first few weeks, even if the weather is cool. It is one of the most reliable perennials I have ever worked with in thirty years of gardening.