Establishing a new colony of these vibrant perennials requires careful planning and a thorough understanding of their initial needs. The planting phase is perhaps the most critical moment in the plant’s life as it determines how well the roots will integrate with the native soil. You must select a location that offers the right balance of light and drainage to support rapid establishment. A successful start ensures that the plant will have the strength to survive its first winter and bloom profusely the following year.
Preparation of the site should begin well before the actual plants arrive from the nursery or the seed trays. You should clear away all existing vegetation and loosen the soil to a depth of at least twelve inches. Incorporating a small amount of organic compost can help improve the tilth and provide initial nutrients for the young roots. Testing the soil during this phase allows you to make any necessary adjustments to the pH levels before the plants are in the ground.
Timing the planting correctly is another essential factor that influences the success rate of the new installation. In most regions, early spring or early autumn provides the most favorable conditions for root development without the stress of extreme heat. If you plant in the spring, the goal is to give the roots enough time to anchor themselves before the summer sun intensifies. Autumn planting allows the plant to focus on underground growth while the top remains dormant during the cooler months.
The physical process of putting the plant into the earth should be done with care to avoid damaging the delicate root hairs. Dig a hole that is twice as wide as the root ball but no deeper than the container the plant came in. Gently loosen the roots if they have become pot-bound to encourage them to spread outward into the surrounding soil. Firm the earth around the base of the plant to remove any large air pockets that could cause the roots to dry out.
Strategic site selection for optimal vigor
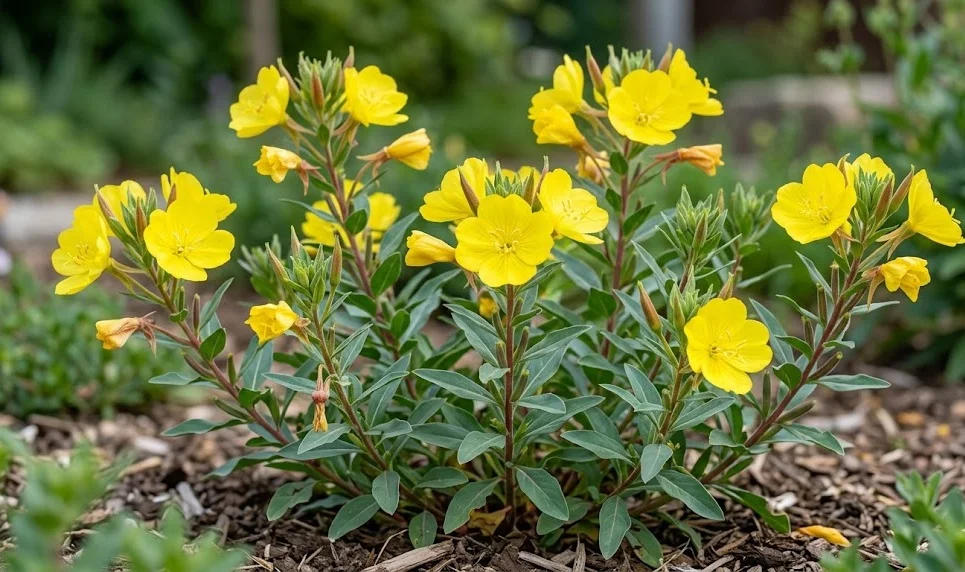
Choosing the right spot in your garden is the first step toward a thriving display of these golden flowers. They perform best in areas that receive at least six to eight hours of direct sunlight each day. While they can tolerate some light shade, you will find that the stems are sturdier and the blooms more numerous in full sun. Observe the movement of shadows across your landscape throughout the day to find the most luminous locations.
More articles on this topic
Drainage is the second most important consideration when evaluating a potential planting site for this species. These plants are susceptible to root rot if they are forced to stand in water-logged soil for even a few days. Avoid low spots in the garden where water tends to collect after a heavy rain or snowmelt. If your soil is naturally heavy clay, you might consider building a raised bed to improve the vertical drainage capacity.
Air circulation is often overlooked but is crucial for preventing foliage diseases in many perennial species. Avoid planting them in tight corners or directly against solid fences where the air can become stagnant. A location that receives a gentle breeze will help dry the leaves quickly after a rain shower or morning dew. Good airflow creates a healthier environment and reduces the need for chemical fungicides later in the season.
Finally, consider the long-term space requirements of the plant as it matures and begins to spread. It will eventually form a dense clump that can reach up to eighteen inches in width over a few seasons. Ensure that you leave enough room between it and its neighbors to allow for this natural expansion without overcrowding. Proper spacing at the start prevents the need for frequent transplanting or thinning in the future.
Success with seeds and germination
Propagating from seed is a cost-effective way to produce a large number of plants for a meadow or a naturalized area. You can start the seeds indoors about six to eight weeks before the last expected frost date in your region. Use a light, sterile seed-starting mix and barely cover the seeds with a fine layer of vermiculite or soil. They require light to germinate, so placing them under a grow light or in a very bright window is essential.
More articles on this topic
Maintaining a consistent temperature is the key to achieving a high germination rate with this subspecies. Ideally, the soil temperature should remain between sixty-five and seventy degrees Fahrenheit during the day. You can use a heat mat designed for seed starting to provide bottom heat if your workspace is naturally cool. Keep the soil surface moist but not saturated by using a fine misting bottle to avoid disturbing the tiny seeds.
Once the seedlings have developed their first set of true leaves, they will need a bit more space to grow. You should thin them out or transplant them into individual pots to prevent the roots from becoming tangled. Gradually introduce the young plants to outdoor conditions over a period of ten days to harden them off before the final planting. This transition period helps the plants adapt to the wind, direct sun, and temperature fluctuations of the garden.
Direct sowing is also an option if you prefer a more natural and less labor-intensive approach to propagation. You can scatter the seeds on a prepared soil surface in late autumn or very early spring. Nature will provide the necessary cold stratification and moisture needed for the seeds to wake up at the right time. This method often results in very hardy plants that are perfectly adapted to their specific location from the very beginning.
Vegetative propagation and division
Division is the most reliable way to maintain the health of an existing colony while creating new plants at the same time. You should plan to divide your clumps every three to four years to prevent the center from becoming woody and unproductive. The best time for this procedure is in the early spring just as the first new shoots begin to appear. Use a sharp spade to lift the entire clump out of the ground, being careful to keep the root mass intact.
Once the plant is out of the soil, you can see the natural points where the crown can be separated. Gently pull the sections apart or use a clean knife to cut the roots into smaller, healthy pieces. Each new division should have at least three strong shoots and a generous portion of the root system attached. Discard any old, dead material from the center of the original clump and keep only the vigorous outer sections.
Replant the new divisions immediately to prevent the roots from drying out in the air. Follow the same planting procedures as you would for nursery-bought specimens, ensuring that the crown is level with the soil surface. Water the area thoroughly to help settle the earth and provide immediate hydration for the transplant. Most divisions will recover quickly and may even produce a few flowers during their first season in a new location.
Softwood cuttings are another vegetative method that can be used if you need to produce more plants during the summer. Take three-inch cuttings from the tips of non-flowering stems and remove the lower leaves. Dip the cut end into a rooting hormone and place it in a pot filled with a moist, sandy potting mix. Keep the cuttings in a humid environment with indirect light until they develop a strong enough root system to be moved.