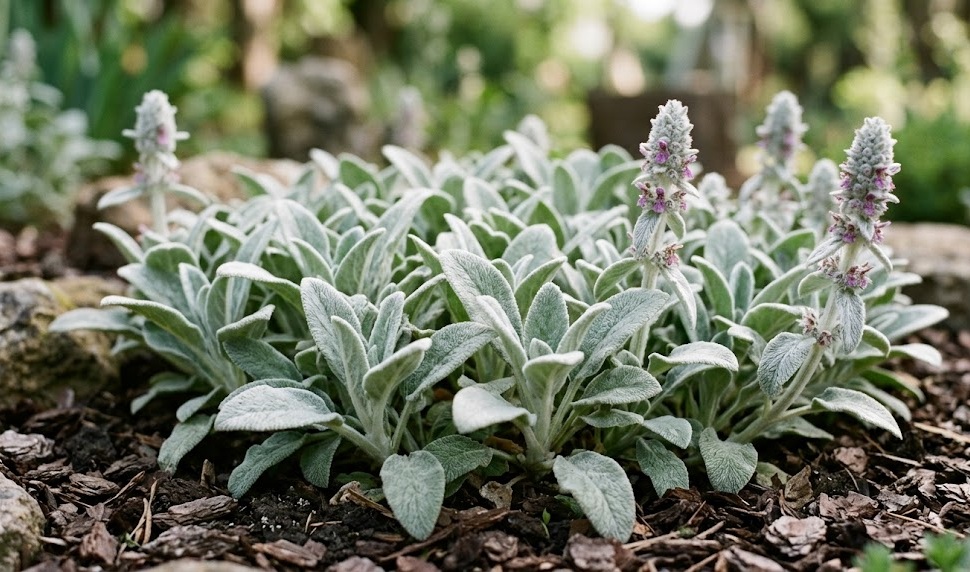
Establishing a successful patch of lamb’s ear begins with a clear understanding of the plant’s environmental preferences and growth mechanics. This hardy perennial is favored by many for its ability to quickly cover ground and provide a unique visual texture. Whether you are starting with nursery-bought plants or using pieces from a friend’s garden, the initial planting phase is critical for long-term health. By following a professional approach to site selection and installation, you can ensure your plants take root quickly and begin their spread.
Selecting the right site and timing
The success of your planting effort depends heavily on choosing a location that mimics the natural habitat of this species. Lamb’s ear thrives in areas that receive full sun, which helps keep the foliage dry and maintains the vibrant silver color. If you plant it in a spot that is too shady, the leaves may become greener and more prone to fungal issues. Aim for a site that gets at least six hours of direct sunlight each day for the most robust growth.
Timing is another crucial factor when introducing these plants to your landscape or garden beds. Early spring is generally considered the best time for planting, as it allows the roots to establish before the intense heat of summer. You can also plant in early autumn, giving the roots enough time to settle before the ground freezes for the winter. Avoid planting during the peak of summer, as the high temperatures can place unnecessary stress on the young, unestablished root systems.
Drainage is the final and perhaps most important component of site selection for this particular perennial. The plant is extremely sensitive to “wet feet,” meaning that stagnant water around the roots will quickly lead to rot. If your garden has heavy soil or areas where water tends to collect after rain, you must address this before planting. Consider using raised beds or amending the planting area with grit to ensure that excess water can move away from the crown easily.
Before you begin digging, observe how the sun and wind move through your chosen area throughout the day. A spot with good air circulation will naturally assist in keeping the velvet leaves dry, which is essential for their health. You should also consider the proximity to paths, as the soft texture of the leaves makes them a popular choice for sensory garden sections. Once you have identified the perfect spot, you are ready to move on to the actual planting process.
More articles on this topic
Executing the planting process
When you are ready to plant, start by preparing the soil to ensure it is loose and free of large debris or aggressive weeds. Dig a hole that is slightly wider than the root ball of your plant but no deeper than the container it came in. It is essential to keep the crown of the plant—where the leaves meet the roots—at or slightly above the soil surface. Planting too deep can trap moisture against the base of the foliage and cause the plant to decay prematurely.
Space your plants approximately twelve to eighteen inches apart to allow for their natural spreading habit. While the area might look a bit sparse initially, these gaps will be filled quickly as the plants send out runners. This spacing ensures that each individual plant has enough room to receive adequate light and air from the very beginning. If you are looking for a faster groundcover effect, you can plant them slightly closer, but be prepared for earlier maintenance to prevent overcrowding.
After placing the plant in the hole, backfill with the original soil and press down gently with your hands to remove any large air pockets. You should avoid stepping on the soil directly around the plant, as this can compress the ground too much and hinder root growth. A light watering immediately after planting will help settle the soil around the roots and provide the necessary hydration for recovery. Be careful not to saturate the foliage during this initial watering, focusing instead on the base of the plant.
If your soil is particularly poor, you might consider adding a small amount of compost to the planting hole, but do not overdo it. High levels of nitrogen can cause the lamb’s ear to grow too quickly, resulting in weak stems and less attractive foliage. The goal is to provide a stable foundation that encourages steady, healthy development rather than an artificial growth spurt. Once the plants are in the ground, they will require minimal attention as they begin to adapt to their new home.
More articles on this topic
Propagating through division
One of the easiest and most effective ways to multiply your stock of lamb’s ear is through the process of division. As the plants grow, they naturally form large clumps that can be easily separated into several smaller units. This not only gives you more plants for other parts of the garden but also helps rejuvenate the original colony. Division is best performed every three years to prevent the center of the patch from becoming woody or dying out.
To divide your plants, use a sharp spade to lift a mature clump out of the ground, making sure to get as much of the root system as possible. Once the clump is out, you can often pull it apart by hand or use a knife to slice it into sections. Each new section should have a healthy set of leaves and a substantial portion of roots attached to it. Discard any old, leafless, or diseased parts of the center to ensure only the most vigorous growth is replanted.
Replanting the divisions follows the same principles as planting new nursery stock, with an emphasis on crown depth and spacing. You should get the new sections back into the ground as quickly as possible to prevent the roots from drying out. If you cannot replant them immediately, keep them in a shaded spot and cover the roots with a damp cloth or some loose soil. Divisions usually take hold very quickly and will often show new growth within just a few weeks of being moved.
This method of propagation is highly reliable and allows you to maintain the specific characteristics of your favorite cultivars. Since lamb’s ear is a resilient plant, it handles the stress of division much better than many other garden perennials. You will find that sharing these divisions with neighbors is a great way to spread the beauty of this silver foliage throughout your community. Regular division is a hallmark of a well-maintained and productive garden environment.
Alternative propagation methods
While division is the most common method, lamb’s ear can also be propagated through seeds or stem cuttings. If you allow your plants to flower and go to seed, you may find small volunteer seedlings appearing around the base of the parent plant. These can be carefully dug up and moved to a new location once they have developed a few sets of true leaves. Keep in mind that seeds may not always produce plants that are identical to the parent, especially if you are growing a specific cultivar.
If you prefer a more controlled approach, you can collect the seeds from the dried flower heads in late summer. Sow them in a well-draining seed-starting mix in early spring, either indoors or in a protected cold frame. The seeds require a bit of light to germinate, so press them gently into the surface of the soil rather than burying them deep. Maintain a consistent but moderate level of moisture until the seedlings are strong enough to be transplanted into the garden.
Stem cuttings are another option, though they are less commonly used for this species because division is so simple. To take a cutting, select a healthy, non-flowering shoot and remove it with a bit of the base attached. Place the cutting in a pot with a sandy soil mix and keep it in a bright, humid environment until roots begin to form. This method can be useful if you want to create a large number of plants from a single parent without digging up the whole clump.
Regardless of the method you choose, the key to successful propagation is providing the young plants with the right environmental conditions. Consistency in light and a careful hand with watering will help the new generation of lamb’s ear establish itself. As you gain experience with these techniques, you will find it easy to expand your silver garden borders. Propagation is a rewarding part of gardening that allows you to truly understand the life cycle of your plants.