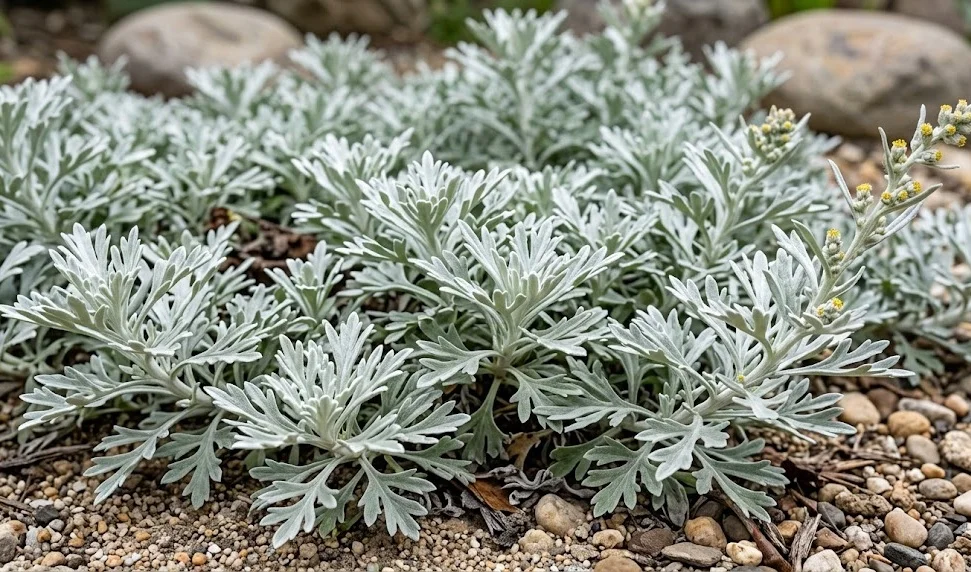
Planting and propagation of dusty miller is a rewarding process for any gardener looking to expand their collection of silver-toned perennials. This plant is known for its resilience and its ability to adapt to various garden settings if the initial planting is handled correctly. Whether you are starting from nursery-bought containers or taking your own cuttings, the goal is to establish a strong root system quickly. A professional approach to these early stages ensures that the plant develops the characteristic dense, felt-like foliage it is famous for.
Before you begin the planting process, it is essential to prepare the site by ensuring the soil structure is appropriate for a coastal native. You should clear the area of all weeds and large stones that could interfere with the delicate root development of a young plant. Incorporating a small amount of organic matter can help with initial establishment, but over-fertilizing at this stage is a common mistake. The plant thrives best when it has to work a little for its nutrients in a well-drained environment.
Propagation offers a cost-effective way to fill large areas of your garden with consistent silver textures. You can choose between several methods, including softwood cuttings and plant division, depending on the time of year and your experience level. Each method requires a slightly different set of tools and environmental controls to be successful. Understanding the biology of how the plant roots and spreads will give you the confidence to multiply your stock with ease.
Timing is one of the most important factors when it comes to both planting and propagation efforts in the garden. You should aim for periods of mild weather when the plant is not under extreme heat or cold stress. Early spring and early autumn are generally the windows of opportunity for these tasks, as the soil temperatures are conducive to root growth. By following professional guidelines for these procedures, you can ensure a high success rate and a beautiful, silver-themed landscape.
Site selection and soil preparation
Choosing the right location is the most important decision you will make when adding this plant to your landscape. You should look for a spot that receives full sun for the majority of the day to ensure the best leaf color and compact growth. Low-lying areas where water tends to collect after a storm should be strictly avoided to prevent root rot. A site with good natural air movement will also help keep the foliage dry and healthy throughout the year.
More articles on this topic
Soil preparation should focus on achieving the perfect balance between moisture retention and rapid drainage. You can test the drainage of your chosen site by digging a small hole and filling it with water to see how quickly it disappears. If the water lingers for more than an hour, you must amend the soil with coarse sand, fine gravel, or expanded shale. The objective is to create a gritty, porous medium that allows roots to breathe while still providing a stable anchor.
The nutritional profile of the soil should be relatively lean to prevent the plant from becoming overly lush and floppy. If your soil is naturally very rich or heavy, you might consider building a raised bed or a small berm to improve the conditions. This elevation naturally enhances drainage and allows you to control the soil composition more precisely. Professional gardeners often use this technique to create ideal microclimates for silver-foliage plants that demand “dry feet.”
Finally, consider the long-term impact of the surrounding vegetation on your newly prepared site. You should ensure that there are no nearby trees that will grow to cast deep shade over the area in a few years. Competitive root systems from large shrubs can also draw away the limited moisture that young plants need to get established. Preparing the site with a long-term vision ensures that your dusty miller remains a healthy and vibrant part of the garden for its entire lifespan.
Planting procedures and initial establishment
When you are ready to put your plants in the ground, handle the root balls with extreme care to avoid unnecessary stress. You should dig a hole that is twice as wide as the root ball but no deeper than the container it came in. Setting the plant too deep in the soil can lead to crown rot, which is a common cause of death for this species. The top of the root ball should be level with or slightly above the surrounding soil surface.
More articles on this topic
After placing the plant in the hole, backfill with the amended soil and firm it gently with your hands to remove any large air pockets. You should avoid tamping the soil down too hard with your feet, as this can compress the delicate roots and limit oxygen access. Once the plant is in place, give it a thorough watering to help settle the soil around the root system. This initial watering is one of the few times the plant will appreciate a significant amount of moisture.
Mulching around the base of the plant can be beneficial, but you must choose the right material and apply it correctly. Use a thin layer of inorganic mulch, such as pea gravel or crushed stone, rather than wood chips or bark. Inorganic mulches do not hold moisture against the stems and help keep the lower leaves clean and dry. Make sure the mulch does not touch the crown of the plant directly, as this creates a humid environment that invites fungal issues.
During the first few weeks after planting, monitor the moisture levels closely to ensure the roots don’t dry out completely. While mature plants are very drought-tolerant, young specimens need a bit of help until their roots have explored the surrounding soil. You should water deeply but infrequently, allowing the top inch of soil to dry out between applications. This encourages the roots to grow deeper into the ground, creating a more resilient plant for the future.
Propagation by softwood cuttings
Taking softwood cuttings is a highly effective way to create new plants that are identical to the parent specimen. You should select healthy, non-flowering stems during the active growing season, ideally in late spring or early summer. Use a sharp, sterilized pair of snips to take a four to six-inch cutting from the tip of a vigorous branch. Removing the lower leaves from the cutting will reduce moisture loss and expose the nodes where new roots will eventually form.
To increase your success rate, you can dip the cut end of the stem into a rooting hormone powder before planting. Place the cuttings into a well-draining propagation mix, such as a combination of peat moss and perlite or coarse sand. It is important to keep the medium consistently moist but never soggy during the rooting process. Placing the cuttings in a bright area out of direct sunlight will prevent them from wilting before they have a chance to develop roots.
High humidity is helpful for the first week or two, which can be achieved by placing a clear plastic cover over the cuttings. However, you must provide some ventilation to prevent mold and mildew from developing on the silver leaves. You will know that the cuttings have successfully rooted when you see new growth emerging or when you feel resistance if you tug gently on the stem. This process usually takes about three to five weeks depending on the temperature and humidity.
Once the roots are well-established, you should gradually acclimate the young plants to the outdoor environment. This process, known as “hardening off,” involves moving the plants outside for increasing periods each day. After about a week of acclimation, the new plants are ready to be moved to their permanent locations in the garden. Propagating your own dusty miller allows you to maintain a consistent look across your landscape at no additional cost.
Division and transplanting techniques
Dividing mature plants is another excellent way to manage their size while generating new stock for other areas. You should perform divisions in the early spring just as the first signs of new growth appear on the stems. Use a sharp spade to lift the entire clump out of the ground, being careful to keep the root system as intact as possible. Most large mounds can be easily separated into two or three smaller sections using your hands or a garden knife.
Each new division must have a healthy section of roots and at least a few green shoots to ensure it survives the transition. You should replant these sections immediately into prepared soil to prevent the roots from drying out in the air. Treat the new divisions just like newly purchased plants by following the standard planting and watering procedures. Division not only gives you more plants but also rejuvenates older specimens that may have become woody in the center.
Transplanting established plants requires a bit more care because they do not always appreciate having their root systems disturbed. If you must move a plant, try to take as much of the surrounding soil as possible to minimize root shock. The best time for transplanting is during a period of cool, cloudy weather when the plant won’t be stressed by the sun. Watering the plant thoroughly a day before the move will ensure it is fully hydrated and ready for the change.
After transplanting or dividing, it is normal for the plant to look a bit wilted or stressed for a few days. You should provide a small amount of temporary shade if the weather is particularly bright or windy. Avoid the temptation to fertilize the plant during this recovery phase, as the roots need time to re-establish before they can handle extra nutrients. With a little patience and careful monitoring, your divided or moved plants will soon return to their full silver glory.