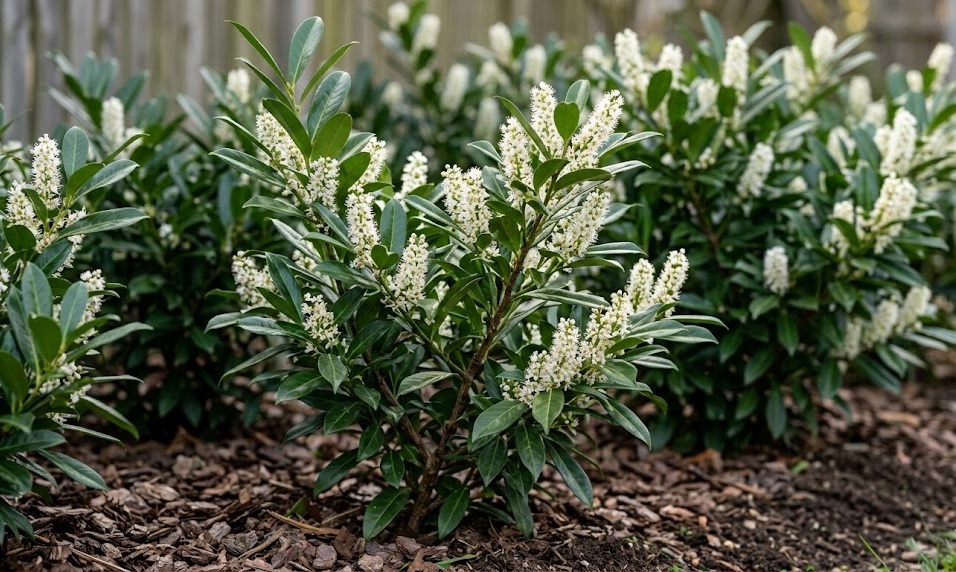
The successful establishment of cherry laurel begins with a precise planting technique that respects the biological needs of the root system. You must choose a time of year when the weather is mild, such as early spring or mid-autumn, to minimize transplant shock. Preparing the site with high-quality organic matter ensures that the young plant has immediate access to the nutrients it needs. A professional start is the most important factor in determining the eventual size and density of your evergreen hedge.
Selecting the optimal location requires an understanding of how light and soil moisture interact in your specific garden environment. You should look for a spot that offers well-drained soil and protection from the most intense afternoon sun during the summer. Avoid areas where water tends to pool, as constant saturation can lead to root rot in young laurel specimens. Taking the time to evaluate the site before digging will save you a considerable amount of effort in the long run.
The planting hole should be at least twice as wide as the root ball to allow for easy expansion of the new roots. You should loosen the soil at the bottom and sides of the hole to prevent the roots from becoming encircle or trapped in heavy clay. Mixing a small amount of slow-release fertilizer into the backfill can provide a steady supply of energy for the first growing season. A professional gardener pays close attention to these structural details to ensure the long-term stability of the plant.
After placing the cherry laurel in the hole, you must ensure that the top of the root ball is level with the surrounding ground. Planting too deep can suffocate the stem, while planting too shallow can cause the roots to dry out prematurely. Firm the soil gently around the base to remove air pockets, but avoid over-compacting the earth which can hinder water penetration. Thorough watering immediately after planting is essential to settle the soil and hydrate the plant during its initial transition.
Propagation from semi-hardwood cuttings
Propagating cherry laurel from cuttings is a cost-effective and rewarding way to expand your garden or create a long hedge. You should select healthy, current-season growth that has started to become slightly firm at the base during the late summer. Using a sharp, sterilized knife, take cuttings that are approximately fifteen centimeters in length to ensure they have enough energy to develop roots. A professional approach to propagation requires cleanliness and precision to prevent the spread of pathogens to the new clones.
More articles on this topic
Remove the leaves from the lower half of the cutting to reduce moisture loss and prevent decay when placed in the rooting medium. You should dip the base of each cutting into a rooting hormone powder or gel to stimulate the development of a strong root system. Placing the prepared stems into a mixture of peat and perlite provides the perfect balance of moisture and aeration for new growth. Expert gardeners often use a propagator or a simple plastic cover to maintain high humidity around the cuttings.
Keep the propagation trays in a bright location but away from direct sunlight, which can quickly overheat the delicate stems. You must check the moisture levels daily and mist the leaves periodically to prevent them from wilting before roots have formed. It usually takes several weeks for the first roots to appear, so patience is a necessary virtue in the propagation process. Once the roots are well-established, you can gradually acclimate the young plants to drier air before transplanting them into individual pots.
Monitoring the progress of your cuttings allows you to identify which varieties and conditions yield the best results for your specific location. You should look for new leaf growth as a sign that the root system is functional and ready to support the plant. Avoid the temptation to move the young laurels too quickly, as they need time to develop a sturdy structure. A professional nurseryman knows that the quality of the young plant is a direct reflection of the care taken during the initial propagation phase.
Growing cherry laurel from seeds
While less common than cuttings, growing cherry laurel from seeds can be a fascinating way to observe the entire lifecycle of the plant. You should collect the ripe black berries in the autumn and remove the fleshy pulp to reveal the hard seeds inside. It is important to wear gloves during this process as the berries and seeds contain substances that should not be ingested. Preparing the seeds immediately after harvest ensures the highest possible germination rate for your professional gardening project.
More articles on this topic
The seeds of cherry laurel often require a period of cold stratification to break their natural dormancy and trigger growth. You can achieve this by placing the seeds in a moist medium and storing them in a refrigerator for several months. This process mimics the natural winter conditions that the seeds would experience in the wild before sprouting in the spring. A professional understanding of seed biology allows you to manipulate these environmental cues for consistent results.
Sow the stratified seeds in a well-draining seed-starting mix at a depth of about two centimeters during the early spring months. You should maintain a consistent temperature and keep the soil moist but not waterlogged to encourage successful germination. When the first seedlings appear, provide them with plenty of light to prevent them from becoming thin and weak. Growing from seed requires a significant time commitment, but it offers a unique perspective on the genetic diversity of the species.
As the seedlings grow, you must transplant them into larger containers to allow for continued root and shoot development. You should provide a weak liquid fertilizer once the second set of true leaves has fully expanded to support their growth. Gradually hardening off the young plants by exposing them to outdoor conditions prepares them for their final placement in the landscape. A professional gardener enjoys the challenge of nurturing a plant from its very beginning as a tiny seed.
Final transplanting and establishment care
The final step in the planting process is moving your home-grown or nursery-bought laurels into their permanent positions. You should space the plants according to their mature size and the specific purpose they will serve in the garden design. For a dense hedge, a spacing of approximately sixty to ninety centimeters between plants is often recommended by professional landscapers. Ensuring that each plant has enough room to breathe reduces the risk of future disease and competition for resources.
Watering remains the most critical task during the first two years of establishment for a new cherry laurel planting. You must ensure that the water reaches deep into the soil to encourage the roots to grow downward rather than staying near the surface. Applying a thick layer of organic mulch around the base helps to maintain these deep moisture reserves and protects the young roots. A professional establishment period is defined by regular monitoring and a commitment to meeting the changing needs of the growing shrubs.
You should also keep the area around the new plants free from competing weeds and grass that can steal valuable nutrients. Hand-weeding is often the safest method during the early stages to avoid damaging the sensitive root systems of the young laurels. As the plants become more established, they will naturally shade out much of the competition with their dense foliage. Expert care during these initial years sets the stage for a lifetime of healthy growth and minimal maintenance.
Finally, observing the overall form and health of the newly planted laurels allows you to make minor adjustments to their environment if necessary. You might notice that certain plants need additional support or protection from the wind as they gain height. Responding quickly to these early needs ensures that your investment in planting and propagation pays off with a beautiful landscape. A professional approach to gardening is always focused on the successful integration of new life into the existing ecosystem.