Caring for the cornflower
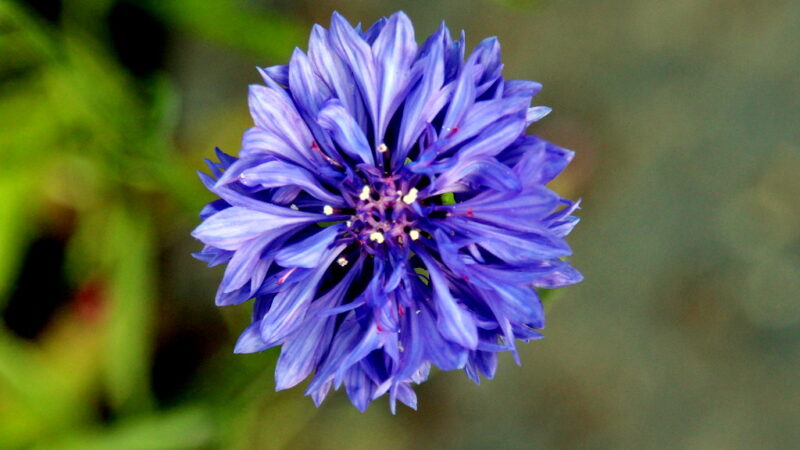
The successful cultivation of the cornflower, a classic and beloved garden annual, hinges on understanding its fundamental requirements and life cycle. This resilient species, known for its striking blue blossoms, is remarkably easy to grow, making it a favorite among both novice and experienced gardeners. Proper care involves a holistic approach, considering everything from initial site selection to ongoing maintenance throughout its growing season. By providing the right conditions, one can ensure a long-lasting display of vibrant flowers that attract a host of beneficial pollinators to the garden ecosystem.
The foundation of cornflower care begins with selecting an appropriate planting location. These plants thrive in conditions that mimic their native habitats, which are typically open fields and meadows. Therefore, a position that receives full sun for at least six to eight hours per day is paramount for vigorous growth and prolific flowering. Insufficient sunlight will result in leggy, weak stems and a significant reduction in the quantity and quality of blooms, so careful consideration of the site’s light exposure is a critical first step for any grower.
Soil composition is another crucial factor in the long-term health of cornflowers. While they are notably adaptable and can tolerate a range of soil types, they perform best in well-drained soil. Poorly drained or heavy clay soils can lead to root rot and other fungal diseases, which can quickly prove fatal to the plants. Amending heavy soils with organic matter like compost or sand before planting will improve drainage and aeration, creating a much more hospitable environment for the root system to develop properly.
Furthermore, cornflowers exhibit a preference for soil with a neutral to slightly alkaline pH. Conducting a simple soil test can provide valuable insight into the existing pH level, allowing for any necessary adjustments. If the soil is too acidic, amending it with garden lime can help raise the pH to a more suitable range for Centaurea cyanus. This preparation ensures that essential nutrients are readily available to the plant, supporting robust growth from the seedling stage through to maturity and flowering.
Understanding the growth cycle
The life cycle of the cornflower is that of a hardy annual, meaning it completes its entire life cycle, from germination to seed production, within a single growing season. Typically, seeds are sown in early spring after the last frost has passed, or in autumn in milder climates for earlier blooms the following year. This annual nature dictates the care strategy, as the plant’s energy is focused entirely on producing flowers and, subsequently, seeds for the next generation. This fast-paced cycle requires consistent support from the gardener to maximize its potential.
More articles on this topic
Germination usually occurs within one to two weeks of sowing when soil temperatures are appropriate. The young seedlings are relatively tough but benefit from protection against pests like slugs and snails during their initial, vulnerable stage. As the seedlings develop, they form a basal rosette of leaves close to the ground before sending up the taller, characteristic flowering stems. Understanding this progression helps in identifying key stages where intervention, such as thinning or support, might be beneficial for the plant’s development.
The plant enters its peak flowering period during the summer months, producing a continuous supply of blooms if properly maintained. This is the most rewarding phase for the gardener and the most critical for the plant’s reproductive success. The duration of this flowering season can be significantly extended through regular deadheading, a practice that prevents the plant from setting seed prematurely. This encourages the plant to redirect its energy into producing more flowers rather than maturing its existing ones into seed heads.
As late summer and early autumn approach, the plant’s life cycle naturally draws to a close. If some flowers are left to mature, they will develop into seed heads containing the next generation of seeds. These can be harvested for future planting or left to self-sow, often resulting in a new patch of cornflowers the following spring. Recognizing this final stage is important for seed saving and planning the garden for the subsequent year, completing the annual cycle.
Providing adequate support
As cornflowers grow, their stems can reach heights of up to 90 centimeters, and while they are relatively sturdy, they can be prone to bending or breaking. This is particularly true for taller cultivars or in gardens exposed to strong winds and heavy rain. Providing some form of physical support is a key aspect of care that ensures the plants remain upright, preventing stem damage and maintaining the aesthetic appeal of the flower display. This support is best installed early in the growing season.
More articles on this topic
One effective method of support is using pea sticks or thin bamboo canes inserted into the ground around the plant clump. Twine can then be laced between the supports to create a supportive mesh for the stems to grow through. This approach offers a natural look and provides discreet yet effective reinforcement for the tall, slender stems. It is crucial to put these supports in place while the plants are still relatively small to avoid damaging the root system or the developing foliage.
Another popular technique, especially for larger drifts or rows of cornflowers, is to use netting. A wide-mesh plastic or jute netting can be stretched horizontally over the planting area and secured to stakes at a height of about 30-40 centimeters. The cornflower stems will grow up through the holes in the netting, receiving support along their entire length. This method is highly effective for dense plantings and ensures that the entire patch remains upright and orderly throughout the flowering season.
For individual plants or smaller groups, single-stem supports or grow-through grid supports can also be utilized. These are placed over the young plant, which then grows up through the center of the support ring. The key to any support strategy is anticipation; implementing the support system before the plants reach their full height prevents the need to retroactively stake bent or damaged stems. Proper support not only protects the plant but also improves air circulation, which can help in preventing fungal diseases.
Weed and pest management
Effective weed management is essential for the health of cornflower plantings, as weeds compete directly for vital resources such as water, nutrients, and sunlight. During the early stages of growth, cornflower seedlings can be easily overwhelmed by more aggressive weed species. Regular and careful hand-weeding around the base of the plants is the most effective method, as it avoids disturbing the delicate root systems. Applying a layer of organic mulch can also significantly suppress weed growth.
A two-to-three-inch layer of mulch, such as straw, shredded bark, or compost, spread around the base of the cornflower plants offers multiple benefits. It acts as a physical barrier to prevent weed seeds from germinating and also helps to retain soil moisture, reducing the need for frequent watering. As the organic mulch breaks down, it enriches the soil with valuable nutrients. It is important to leave a small, clear circle around the immediate stem of each plant to prevent moisture buildup that could lead to stem rot.
While cornflowers are relatively pest-resistant, they can occasionally be susceptible to certain insects, most notably aphids. Aphids are small, sap-sucking insects that tend to congregate on new growth and flower buds, potentially causing distorted growth and weakening the plant. An infestation can often be managed by spraying the affected areas with a strong jet of water from a hose to dislodge the pests. This simple physical removal is often sufficient for minor issues.
For more persistent aphid problems, insecticidal soap or neem oil applications can be an effective and environmentally friendly solution. These treatments work by disrupting the insects’ life cycle without harming beneficial pollinators like bees and butterflies, which are frequent visitors to cornflower blossoms. Regular monitoring of the plants allows for early detection of any pest issues, making them much easier to control before they escalate into a significant problem that could compromise the health of the plants.
Disease prevention strategies
Preventing disease is a far more effective strategy than treating it, and good cultural practices are the cornerstone of disease prevention for cornflowers. The most common diseases to affect these plants are fungal in nature, such as powdery mildew and rust. These pathogens thrive in damp, humid conditions with poor air circulation. Therefore, one of the most critical preventative measures is to ensure proper spacing between plants at the time of planting to promote airflow.
Proper spacing allows air to circulate freely around the foliage of each plant, which helps the leaves to dry quickly after rain or watering. This reduces the likelihood of fungal spores finding the moist conditions they need to germinate and infect the plant tissues. When thinning seedlings, it is important to adhere to the recommended spacing for the specific cultivar being grown. Overcrowding creates a microclimate of high humidity that is an open invitation for fungal diseases to take hold.
Watering practices also play a significant role in disease prevention. It is always best to water cornflowers at the base of the plant, directly onto the soil, rather than overhead. Wet foliage, especially when it remains wet overnight, provides an ideal environment for fungal pathogens like powdery mildew to develop. Using a soaker hose or drip irrigation system is an excellent way to deliver water directly to the root zone while keeping the leaves and flowers completely dry.
Should signs of a fungal disease like powdery mildew appear, which presents as a white, dusty coating on the leaves, prompt action is required to prevent its spread. Infected leaves should be removed and disposed of immediately, not composted. In more advanced cases, a fungicide may be necessary, but organic options such as a potassium bicarbonate solution or neem oil spray are often effective. Regular inspection of the plants allows for early intervention, which is key to successfully managing and containing any disease outbreak.
Extending the blooming season
One of the primary goals for many gardeners cultivating cornflowers is to enjoy their vibrant blooms for as long as possible. The single most effective technique for extending the flowering season is a practice known as deadheading. This involves the regular removal of spent or faded flowers before they have the chance to develop seeds. This process tricks the plant into producing more blooms in its effort to complete its reproductive cycle.
The process of deadheading is simple but requires consistency. Once a flower begins to wilt and lose its color, it should be snipped off using clean secateurs or scissors. The cut should be made down the stem, just above a set of healthy leaves or a side shoot. This not only removes the dying flower but also encourages the plant to branch out and produce new flowering stems, resulting in a bushier plant with a greater overall flower yield throughout the season.
To ensure a continuous display of flowers from early summer until the first frosts, a succession planting strategy can be employed. This involves sowing cornflower seeds in batches every two to three weeks, starting from the last frost date in spring. By staggering the planting times, you ensure that as one batch of plants begins to fade, a new batch is just starting to reach its peak blooming period. This provides a constant and overlapping supply of fresh flowers.
In addition to deadheading and succession sowing, providing optimal growing conditions throughout the season will also contribute to prolonged flowering. Consistent watering during dry spells and ensuring the plants receive adequate sunlight are crucial. A mid-season application of a balanced liquid fertilizer can also provide a boost of energy for continued flower production. By combining these proactive care techniques, the blooming period of cornflowers can be significantly and satisfyingly extended.
Seed saving and collection
As the growing season concludes in late summer and autumn, the focus of care shifts from promoting flowers to harvesting seeds for the following year. Allowing some of the healthiest and most vibrant blooms to remain on the plant after they fade is the first step in the seed collection process. These selected flowers will cease to be aesthetically pleasing as they dry and develop into seed heads, but they are essential for ensuring a future supply of plants.
The seed heads should be allowed to mature and dry on the plant. A seed head is ready for harvest when the petals have withered away and the base has turned a brittle, brownish color. It is important to collect the seeds during a period of dry weather to prevent them from becoming damp and potentially moldy. The heads can be snipped off the plant with a good length of stem attached and placed upside down in a paper bag.
Once collected, the paper bags containing the seed heads should be stored in a cool, dry, and well-ventilated location for a few weeks to allow them to dry out completely. As they dry, the seeds will naturally loosen and fall to the bottom of the bag. Shaking the bag gently can help to dislodge any remaining seeds from the dried flower heads. Afterward, the seeds can be separated from the chaff, which consists of the dried petals and other plant debris.
For long-term storage, the cleaned seeds must be kept in a dry and dark environment. A paper envelope or a small, sealed glass jar is an ideal container. It is crucial to label the container clearly with the plant name and the year of collection. Stored correctly, cornflower seeds can remain viable for several years, providing a sustainable and cost-free way to continue enjoying these beautiful flowers in the garden for many seasons to come.
Fotó forrása: Flickr / Szerző: yrjö jyske / Licence: CC BY 2.0

