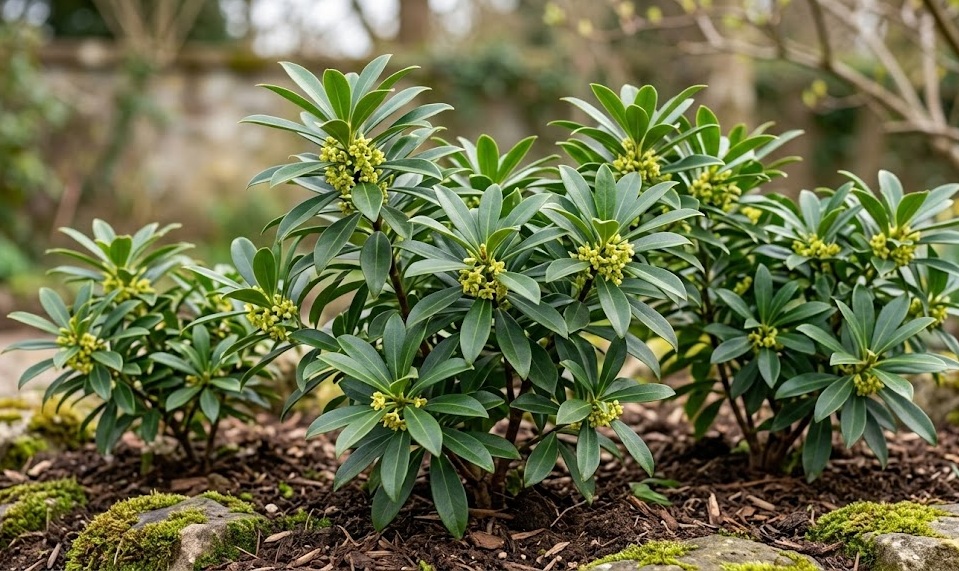
Maintaining the architectural beauty and structural health of an evergreen shrub often requires a thoughtful and measured approach to pruning. For spurge-laurel, the primary goal of cutting back is to preserve its natural form while removing any tissues that could compromise its vitality. Because this species is a slow grower, every cut you make is a long-term decision that will affect the appearance of the plant for several seasons. Professional pruning is not about radical transformation, but rather about the subtle refinement that allows the plant to flourish in a garden setting.
Before you begin any pruning task, it is essential to understand the growth habit and timing of the shrub’s development. This species typically produces its flowers on the wood that grew during the previous year, which means that the timing of your cuts is critical for future blooms. Pruning at the wrong time of year can inadvertently remove the next season’s flower buds, leading to a disappointing display in the spring. A well-informed gardener always looks at the plant’s life cycle before reaching for their tools.
Safety should be your first priority whenever you are working with this particular shrub due to its toxic nature. All parts of the plant, especially the sap, contain compounds that can cause severe skin irritation and other health issues. You must wear long sleeves, sturdy gloves, and protective eyewear to ensure that no sap comes into contact with your skin or eyes. Having a clear plan and a safe workspace is just as important as the technique you use to make the cuts.
Most spurge-laurels require very little pruning throughout their lives if they are sited correctly and allowed enough space to grow. You should focus your efforts on the “three Ds”: removing dead, damaged, or diseased wood whenever you spot it. This proactive maintenance keeps the shrub looking tidy and prevents minor health issues from spreading to the rest of the plant. A light touch and a focus on health are the hallmarks of a professional approach to pruning this elegant evergreen.
Essential tools and timing for success
The quality of your tools directly affects the health of the plant and the speed at which it can heal from the pruning process. You should always use sharp, high-quality bypass pruners that make clean, precise cuts without crushing the delicate stems. Dull tools can leave jagged edges that are more susceptible to fungal infections and take much longer to close over. Sterilizing your blades with rubbing alcohol or a mild bleach solution between plants is a professional habit that prevents the spread of diseases.
More articles on this topic
Timing is the most important factor in determining how the shrub will respond to being cut back. The ideal window for pruning is in the late spring, immediately after the flowering period has finished but before the new growth has fully hardened. This allows the plant to put its energy into producing fresh stems that will carry the flower buds for the following year. Avoid pruning in late autumn or winter, as the fresh cuts can be damaged by frost and may provide an entry point for pathogens while the plant is dormant.
For young shrubs, pruning should be kept to an absolute minimum to allow them to establish a strong root system and a basic structure. You might only need to remove a stray branch that is growing in an awkward direction or touching the ground. As the plant matures, you can be slightly more active in shaping it, but always respect its natural rounded or spreading habit. Forcing a slow-growing shrub into a formal shape often leads to a sparse and unattractive appearance over time.
Observing the weather is also a part of professional timing when it comes to garden maintenance. You should avoid pruning on damp or rainy days, as high humidity and wet surfaces make it much easier for fungal spores to colonize the fresh wounds. A dry, clear day with a light breeze is perfect for pruning, as it helps the cuts dry out and begin the healing process quickly. Matching your activities to the environmental conditions is a key part of successful and sustainable horticulture.
Structural pruning and rejuvenation
Structural pruning involves looking at the internal framework of the shrub and ensuring that it is strong and well-balanced. You should look for branches that are crossing or rubbing against each other, as these can create wounds in the bark that allow pests to enter. By removing one of the competing branches, you can improve the overall airflow through the center of the plant. This increased ventilation is vital for preventing the humid conditions that encourage leaf spot and other fungal diseases.
More articles on this topic
If an older shrub has become excessively leggy or sparse at the base, you might consider a gradual rejuvenation pruning. This involves removing about one-third of the oldest stems right down to the ground each year over a three-year period. This method encourages new, vigorous growth to emerge from the base without shocking the plant into a total decline. It is a much safer and more effective way to refresh an old specimen than cutting the entire plant back at once.
When making a cut, always position your pruners just above a healthy bud that is facing in the direction you want the new growth to go. This “directional pruning” allows you to guide the shape of the shrub and prevent it from becoming too crowded in the center. Avoid leaving long stubs, as these will eventually die back and can become a source of rot that travels into the main stem. A clean cut at a slight angle will shed water away from the bud and promote rapid healing.
Aesthetic pruning should always be a secondary concern to the health of the plant, but it can be used to enhance the shrub’s presence in the landscape. You might want to trim back branches that are overhanging a path or crowding out a smaller companion plant. Always step back frequently during the pruning process to look at the overall shape of the shrub from a distance. This ensures that you maintain a balanced and pleasing form and prevents the common mistake of over-pruning one side.
Post-pruning care and safety
Once you have finished cutting back the shrub, the way you handle the clean-up is just as important as the pruning itself. You should collect all the clippings immediately and dispose of them safely, keeping in mind that they remain toxic even after they have been cut. Never leave trimmings on the ground where pets or wildlife might come into contact with them or ingest them. Proper disposal in a green waste bin or a secure composting area is the only responsible way to handle this material.
Cleaning and maintaining your tools after working with a toxic species is a vital step for your own safety and the longevity of your equipment. Thoroughly wash your pruning shears with soap and water to remove any sticky sap residue that could gum up the mechanism or irritate your skin later. Drying the blades and applying a light coat of oil will prevent rust and keep them ready for the next task. This level of care for your equipment is a sign of a professional and dedicated gardener.
The plant itself may benefit from a little extra attention after a significant pruning session to help it recover from the stress. Providing a deep watering and a fresh layer of mulch can help stabilize the environment and provide the resources needed for new growth. You should avoid fertilizing immediately after pruning, as the plant needs to focus on healing its wounds before it can support a flush of new foliage. Monitoring the shrub for any signs of stress or infection over the next few weeks is a good maintenance habit.
Long-term success with pruning comes from understanding that less is often more when dealing with slow-growing evergreens. By making a few well-placed cuts each year rather than waiting for a major problem to develop, you can keep your spurge-laurel healthy and beautiful with minimal effort. This proactive and gentle approach respects the natural beauty of the shrub while ensuring it remains a functional and safe part of your garden design. Consistency and observation are the most important tools in any gardener’s kit.