Overwintering the clivia
The process of overwintering a clivia is perhaps the most misunderstood, yet most critical, aspect of its annual care cycle, particularly for gardeners who wish to see their plant produce its magnificent display of flowers. This is not simply about keeping the plant alive through the colder months; it is a deliberate and strategic process of providing a period of dormancy that directly mimics the conditions of its native South African habitat. This cool, dry rest period, typically lasting for about three months, is the essential trigger that stimulates the plant to form a flower spike. Without this dedicated overwintering treatment, a perfectly healthy and lush clivia will often refuse to bloom, year after year.
The fundamental goal of overwintering is to signal to the plant that it is time to stop focusing on vegetative growth and shift its energy towards reproduction, which, for a clivia, means producing flowers. In their natural environment, this transition is prompted by the onset of a cooler, drier winter season. To replicate this indoors, the plant needs to be moved to a location that is significantly cooler than its normal growing environment. This change in temperature is a crucial component of the dormancy signal, so finding the right spot is the first and most important step in the overwintering process.
Alongside the drop in temperature, a drastic reduction in watering is equally vital. During this rest period, the plant’s metabolic processes slow down considerably, and its need for water is dramatically reduced. Continuing to water on a regular schedule during this time would not only be unnecessary but would also create a high risk of root rot in the cool conditions. The soil should be allowed to become very dry, with water provided only sparingly and infrequently, just enough to prevent the leaves from becoming completely desiccated. This period of drought stress is a powerful signal to the plant to initiate flowering.
It is important to understand that this dormancy is not a period of complete shutdown. The plant will still need access to light to maintain its basic physiological functions, so a dark closet or basement is not a suitable location. It requires a spot that is both cool and bright, with continued exposure to indirect sunlight. This combination of cool temperatures, reduced water, and continued light creates the perfect set of conditions to trick the clivia into thinking it has gone through a winter, setting the stage for a spectacular floral show as “spring” arrives when you return it to warmer conditions.
The purpose of the dormancy period
The dormancy period is a natural and necessary phase in the life cycle of a clivia, deeply encoded in its genetic makeup. This period of rest is not about survival in the face of harsh conditions, but rather a strategic preparation for the energy-intensive process of flowering and setting seed. During the active growing season of spring and summer, the plant dedicates its resources to producing leaves and strengthening its root system, storing energy in its thick rhizome. The dormancy period is the cue that tells the plant to stop this vegetative growth and reallocate those stored resources towards initiating flower bud development.
More articles on this topic
The primary trigger for this shift is a sustained period of cooler temperatures. Scientific studies have shown that vernalization, the process of inducing flowering by exposure to prolonged cold, is essential for clivias. Without this cold treatment, the hormonal signals that initiate the formation of an inflorescence (the flower stalk) are simply not activated. This is why a clivia kept in a warm, centrally heated living room all year round will produce beautiful leaves but will almost never bloom. The plant never receives the crucial environmental message that it is time to flower.
Reduced water availability during this cool period further reinforces the signal for dormancy. In the wild, the cooler season often coincides with a drier season. By allowing the soil to dry out significantly, you are replicating this natural stressor, which further discourages leaf growth and encourages the plant to enter a state of rest. The combination of cool and dry conditions is a much more powerful trigger than either condition on its own. It effectively puts the plant’s growth on hold, allowing the internal processes of flower formation to take precedence.
Ultimately, successfully guiding your clivia through its dormancy period is the key to unlocking its spectacular blooming potential. It is a testament to the fact that understanding and respecting a plant’s natural life cycle is fundamental to good horticulture. By providing this essential period of rest, you are not neglecting the plant, but rather giving it exactly what it needs to complete its cycle and reward you with the vibrant, trumpet-shaped flowers that make it such a cherished houseplant. It is a process that requires patience and discipline, but the payoff is well worth the effort.
Creating the ideal overwintering environment
Finding the right location to overwinter your clivia is the most important practical step. The ideal environment is one that remains consistently cool, with temperatures staying between 7 and 12 degrees Celsius. It is crucial that the temperature does not drop to freezing, as this can cause permanent damage to the plant’s cells. Suitable locations could include a bright, unheated porch, a garage with a window, a cool basement that receives some natural light, or a spare room where the heating is turned off or set very low. Monitoring the temperature in your chosen spot, especially on very cold nights, is a wise precaution.
More articles on this topic
Light remains an important factor during the dormancy period. While the plant’s growth slows, it still needs to photosynthesize to maintain its health. The location should provide bright, indirect light, similar to what it would receive during its normal growing season. A spot near a north or east-facing window is often perfect. Avoid placing it in direct sunlight, which can still be too intense even in winter, and also avoid complete darkness, as this will weaken the plant significantly and may inhibit flowering.
Air circulation is another consideration. While you want to protect the plant from cold drafts from opening doors, a location with completely stagnant air is not ideal either, as it can encourage fungal issues. A spot with gentle, passive air movement is best. Do not place the plant directly next to a heat source like a radiator or heating vent, as this would counteract the cool temperatures you are trying to achieve and could dry the plant out too quickly.
The transition into and out of the overwintering environment should be gradual if possible. While not as critical as with moving plants outdoors, a sudden, drastic change in temperature can be a shock. If you can, slowly acclimate the plant to the cooler temperatures over a week or so. More importantly, when the dormancy period is over and you see the first sign of a flower stalk emerging, gradually move it back to its warmer growing location to avoid stressing the plant as it prepares to bloom.
Adjusting watering and feeding for winter
The most significant change in care during the overwintering period is the drastic reduction in watering. As the plant’s metabolic rate slows in the cool temperatures, its water uptake decreases to a minimum. The primary goal of watering during this time is simply to prevent the complete desiccation of the roots and leaves. You must allow the potting mix to dry out almost completely and stay that way for extended periods. Watering should be reduced to once every four, six, or even eight weeks, depending on the specific conditions of your overwintering location.
When you do water, do so very sparingly. Provide just enough water to slightly moisten the soil, but not enough to saturate it or to have a significant amount running out of the drainage holes. A small amount of water is all that is needed to keep the fleshy roots from shriveling. Overwatering is the single biggest danger during this period. Cool, damp soil is the perfect recipe for root rot, which can quickly kill a dormant plant. It is always safer to err on the side of keeping the plant too dry rather than too wet during its winter rest.
Fertilization must be completely halted throughout the entire overwintering period. The plant is not in a state of active growth and therefore has no need for supplemental nutrients. Adding fertilizer to the soil at this time would be useless at best and harmful at worst. The unused fertilizer salts would simply accumulate in the soil, potentially burning the roots. Feeding would also send a conflicting signal to the plant, encouraging vegetative growth at a time when you want it to focus all its energy on initiating flower buds. Cease all feeding from early autumn until you resume regular care in the spring.
Monitoring the plant’s condition is key to getting the watering right. The leaves are a good indicator; they should remain firm, but if they begin to show signs of serious wilting or shriveling, you can provide a small amount of water. Don’t panic if the plant doesn’t look as lush and vibrant as it does in the summer; a slight loss of turgor is normal during dormancy. This strict regimen of minimal water and zero fertilizer, combined with the cool temperatures, is the precise formula needed to ensure a successful dormancy and a beautiful display of flowers in the spring.
When and how to end the dormancy period
The overwintering period for a clivia should last for a minimum of 12 to 14 weeks to be effective. This duration provides the plant with a sufficient chilling period to trigger the hormonal changes necessary for flowering. Typically, you would start the dormancy period in late autumn, around October or November, and it would continue through January or early February. Keeping a note on your calendar can help you track the duration and ensure the plant receives the full rest it requires for successful bud set.
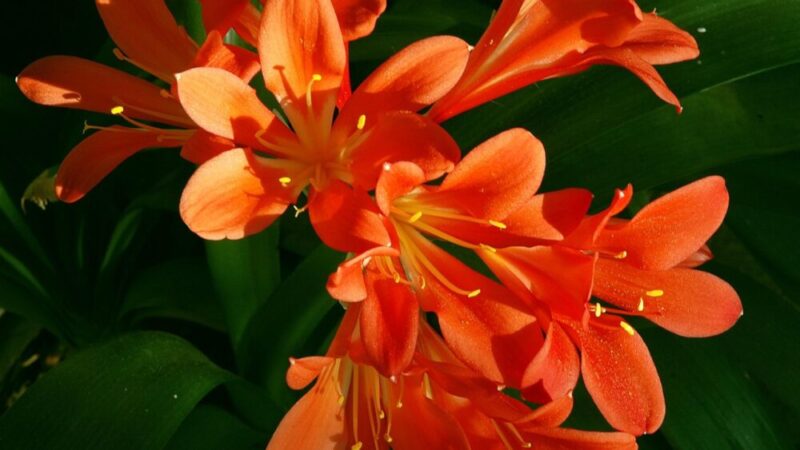
The signal to end the dormancy period comes from the plant itself. After the 12-14 week period has passed, you should begin to carefully inspect the center of the plant, down between the innermost leaves. You are looking for the emergence of the flower stalk, known as an inflorescence or scape. It will appear as a thick, flattened bud pushing its way up from the crown of the plant. The appearance of this flower bud is the definitive sign that the dormancy has been successful and it is time to transition the plant back into its growing phase.
Once you have positively identified an emerging flower stalk, you can begin the process of waking the plant up. Move it from its cool overwintering location back to its regular spot, which should be warmer and have bright, indirect light. This increase in temperature will signal to the plant that spring has arrived and will encourage the flower stalk to elongate more rapidly. It is important not to wait too long after the bud appears to move it, as the stalk may not develop to its full height if left in the cool conditions.
At the same time you move the plant to a warmer location, you should also gradually increase watering. Start by giving it a more thorough watering than it received during dormancy, and then begin to resume your normal schedule of watering whenever the top few inches of soil become dry. It is best to wait to begin fertilizing until after the plant has finished flowering. The energy for the current blooms has already been stored; fertilizing at this stage can sometimes interfere with the flowering process. Wait until the last flower has faded before you start your regular feeding program for the summer growth season.