Successful establishment of the mountain cornflower begins with a clear understanding of its preferred growing conditions and life cycle. This perennial is prized for its ability to naturalize in the garden, providing a reliable source of color with relatively little intervention. Whether starting from seed or utilizing vegetative methods, the process requires attention to detail and a professional approach. This guide outlines the essential steps to ensure your new plantings thrive and multiply effectively over time.
The best time to introduce this species into the landscape is during the cooler months of early spring or autumn. Planting during these windows allows the root system to become established without the stress of extreme summer heat. Soil preparation is the most important factor in the initial planting phase, as it dictates the ease of root penetration. A loose, loamy soil enriched with a small amount of organic matter provides the ideal starting point for young plants.
When selecting a site, consider the eventual spread of the plant, which can reach up to two feet in diameter. Crowding young plants can lead to poor air circulation and increased competition for moisture, slowing their overall development. Spacing individuals at least eighteen inches apart allows each one to develop its characteristic mounded shape. This strategic placement ensures a professional appearance and reduces the need for frequent thinning in the future.
The initial watering after planting is critical for settling the soil around the roots and eliminating air pockets. Use a gentle spray to avoid washing away the topsoil or damaging the delicate young stems. For the first few weeks, the soil should be kept consistently moist but never allowed to become waterlogged. Once new growth is visible, the frequency of watering can be gradually reduced as the plant begins to settle in.
Choosing the ideal planting site
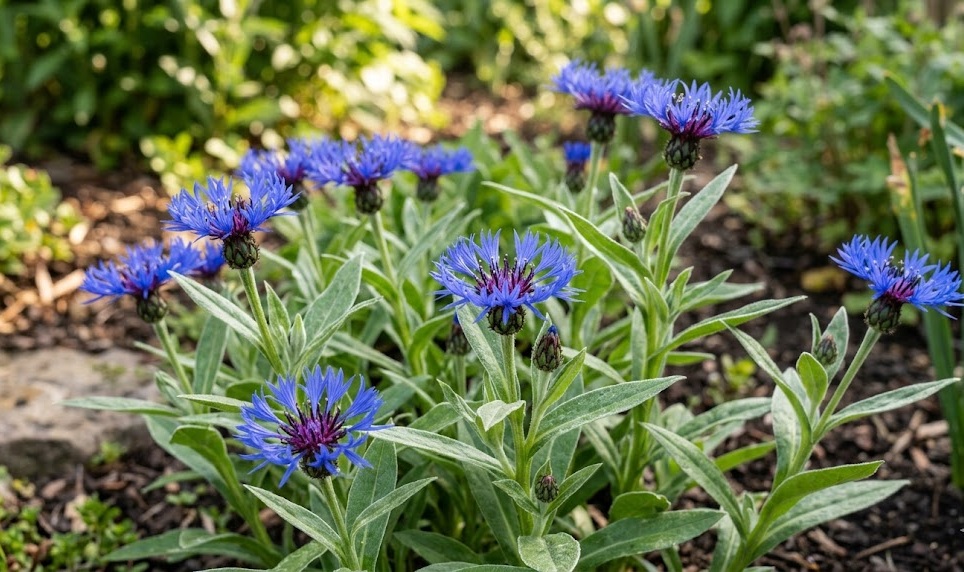
The success of a new planting is largely determined by the specific characteristics of the chosen location within the garden. This perennial prefers a spot that receives at least six hours of direct sunlight each day to produce the most vibrant blooms. While it can tolerate light shade, excessive shade often results in leggy growth and fewer flowers. Professional landscapers often use it to fill sunny borders where its rugged nature can be fully appreciated.
More articles on this topic
Soil drainage is the second most important factor when evaluating a potential planting site for this species. It will not thrive in areas where water collects after a rainstorm, as this leads to root rot and eventual death. If the existing soil is heavy clay, consider planting in raised beds or incorporating coarse sand to improve the drainage capacity. Testing the soil’s percolation rate before planting can save a great deal of effort and disappointment later.
Wind protection is another consideration that is often overlooked by less experienced gardeners when placing this plant. Although the stems are relatively sturdy, strong gusts can cause them to lean or break, especially when they are in full bloom. Planting near a low hedge or a garden wall can provide the necessary shelter without blocking the essential sunlight. This extra bit of protection helps the plant maintain its upright and attractive habit throughout the growing season.
Finally, think about how the new planting will interact with existing vegetation in terms of both aesthetics and resource competition. The mountain cornflower has a vigorous growth habit and can easily outcompete smaller, more delicate species if not managed. Choose neighbors that are equally robust or provide enough space to prevent one from overshadowing the other. A well-planned garden layout considers the mature size and vigor of every plant to ensure long-term harmony.
Effective seed starting techniques
Starting mountain cornflower from seed is a cost-effective way to produce a large number of plants for the landscape. The seeds can be sown directly into the garden bed in late summer for bloom the following spring. Alternatively, they can be started indoors in trays roughly six to eight weeks before the last expected frost. Direct sowing is often preferred as it allows the seedlings to develop a deep taproot without the stress of being moved.
More articles on this topic
If starting seeds indoors, use a high-quality seed-starting mix that is lightweight and sterile to prevent disease. The seeds should be covered only lightly with soil, as they require a small amount of light to trigger germination. Keep the trays in a warm location with consistent moisture until the first sprouts appear, which usually takes about two weeks. Once the seedlings have developed their first set of true leaves, they will need plenty of bright light to prevent them from becoming spindly.
Hardening off is a crucial step when moving indoor-grown seedlings to their permanent outdoor locations in the spring. Gradually expose the young plants to outdoor conditions over a period of seven to ten days to prevent transplant shock. Start with a few hours in a sheltered, shaded spot and slowly increase their time in the sun and wind. This transition period allows the plant’s tissues to toughen up and prepare for the rigors of the garden environment.
For direct sowing, prepare the soil by removing any weeds and breaking up large clumps to create a fine texture. Scatter the seeds evenly and press them gently into the surface to ensure good contact with the soil. Water the area with a fine mist to keep the surface moist until the seedlings are well-established and a few inches tall. Thin the young plants to the desired spacing once they are large enough to handle, selecting the strongest individuals to remain.
Professional division and propagation
Division is the most common and effective method for propagating established mountain cornflower plants while maintaining their vigor. This process should ideally be performed every three to four years in either the early spring or the early autumn. It involves lifting the entire clump from the ground and carefully separating the root mass into several smaller sections. Each new division must have a healthy portion of roots and at least two or three vigorous growth buds.
Use a sharp spade or a garden fork to lift the plant, taking care to minimize damage to the delicate peripheral roots. Once the plant is out of the ground, you can often pull the clumps apart by hand or use a sharp knife for tougher sections. Discard the older, woody center of the plant and keep only the younger, more vibrant outer portions for replanting. This rejuvenation process is essential for keeping the original plant healthy and preventing it from becoming overly congested.
Replant the new divisions immediately into prepared soil, ensuring they are placed at the same depth as they were previously growing. Water them in thoroughly and keep the soil moist for several weeks until you see signs of new growth. Division not only provides you with free plants but also improves the flowering capacity of the original specimen by reducing competition. It is a fundamental skill for any professional gardener looking to expand their collection or share plants with others.
Root cuttings provide another, more specialized method of propagation for those looking to experiment with different techniques. This involves taking small sections of the thick, fleshy roots during the dormant season and placing them in a gritty compost. These cuttings should be kept in a cool, frost-free environment until new shoots begin to emerge in the spring. While more time-consuming than division, this method can produce a large number of clones from a single parent plant.