Achieving a successful onion harvest begins long before the first bulb is placed in the ground. You must focus on creating a loose and well-aerated soil structure to allow for the proper expansion of the roots. Heavy clay soils can be particularly challenging because they restrict growth and retain too much moisture during the rainy season. By incorporating organic matter like compost, you can significantly improve the physical properties of your garden beds.
Proper soil preparation ensures that the plants have access to essential nutrients throughout their long growing season. You should aim for a soil pH that is slightly acidic to neutral for the best results. Testing your soil early in the spring will give you a clear idea of what amendments are necessary. This proactive approach prevents many of the common growth issues that plague amateur gardeners.
The site selection is just as important as the soil quality itself. Onions require a spot that receives full sun for the majority of the day to facilitate photosynthesis. Good air circulation is another critical factor that helps to prevent fungal diseases from taking hold. When you choose the right location, you are giving your crop the best possible start in life.
Once the soil is ready, you must consider the drainage capabilities of your chosen plot. Onions do not like to have “wet feet,” as excessive standing water leads to rot. Raised beds are often an excellent solution for areas with naturally heavy or poorly draining soil. Investing time in these initial steps will pay dividends when it comes time to harvest your crop.
Effective weed management
Weeds are the primary competitors for nutrients and light in any professional onion patch. Because onions have relatively thin and upright leaves, they do not provide much natural shade to suppress unwanted plant growth. You need to be diligent about removing weeds while they are still small to avoid disturbing the shallow onion roots. Hand-weeding is often the safest method when you are working very close to the developing bulbs.
More articles on this topic
Mulching can be a powerful tool in your arsenal against invasive plant species. A layer of straw or dried grass clippings helps to keep the soil cool and suppresses weed germination effectively. However, you must ensure that the mulch does not touch the onion necks directly to prevent moisture buildup. Monitoring the mulch layer throughout the season is a standard practice for experienced growers.
Hoeing between the rows is another common technique, but it requires a very careful hand. You should only scrape the very surface of the soil to avoid cutting the delicate roots that sit just below the surface. Deep cultivation can do more harm than good by damaging the plant’s ability to take up water. Consistency is the secret to keeping your garden beds clean and productive.
If you let the weeds get out of control, the onion bulbs will likely remain small and underdeveloped. Large weeds can also harbor pests and diseases that might eventually migrate to your vegetable crops. Taking twenty minutes each week to tidy up the rows makes a massive difference in the final yield. A clean garden is usually a healthy and high-yielding garden.
Temperature and climate considerations
Onions are surprisingly hardy plants, but they still have specific temperature preferences for different growth stages. During the initial leaf growth phase, they prefer cooler temperatures to build a strong foundation. As the days grow longer and warmer, the plant naturally shifts its energy toward bulb formation. Understanding this biological rhythm helps you time your planting and care activities perfectly.
More articles on this topic
Extreme heat can sometimes cause the plants to go dormant or bolt prematurely. If the weather becomes unseasonably hot, providing some temporary light shade can help the plants cope with the stress. You might notice the leaves wilting slightly during the peak of a summer afternoon. This is a normal defense mechanism, provided the plants recover once the sun begins to set.
Frost is generally not a major concern for established onions, but young seedlings need some protection. A sudden hard freeze in late spring can shock the plants and delay their development significantly. Using row covers or garden fabric can provide that extra bit of warmth during cold snaps. Being mindful of the local microclimate is a hallmark of a professional gardener.
The transition from cool spring weather to the heat of summer is the most critical period for bulb expansion. You must ensure that the plants are not stressed during this time to maximize the size of the harvest. Consistent monitoring of the weather forecast allows you to adjust your care routine as needed. Protecting your plants from environmental extremes ensures a more uniform and reliable crop.
Monitoring growth phases
The lifecycle of an onion is divided into several distinct stages that require different levels of attention. The first stage is the vegetative phase, where the plant focuses entirely on producing green leaves. Each leaf corresponds to a layer of the onion bulb, so more leaves usually mean a larger onion. You should encourage vigorous leaf growth during this period with proper nutrition and water.
Once the plant reaches a certain number of leaves and the day length is right, bulbing begins. You will see the base of the plant starting to swell as it redirects its energy downward. This is the moment when you must be most consistent with your watering and nutrient delivery. Any interruption in care during this phase can result in smaller or misshapen bulbs.
As the onions approach maturity, you will notice the necks starting to soften and weaken. This is a natural sign that the plant is finishing its growth cycle and preparing for dormancy. You do not need to intervene during this process, as it is a vital part of the ripening stage. Observing these subtle changes is part of the art of gardening.
Finally, the tops will naturally fall over, signaling that the onions are ready to be lifted. It is a mistake to harvest them too early, as they need those last few days to fully mature. On the other hand, leaving them in the ground too long can lead to secondary root growth or rot. Finding that perfect window for harvesting is something you will learn with experience.
Organic matter integration
Adding organic matter to your soil is one of the best things you can do for your onion crop. Well-rotted manure or high-quality compost provides a slow-release source of essential nutrients. It also improves the soil’s ability to hold onto moisture without becoming waterlogged or compacted. We should always aim to feed the soil rather than just feeding the plants.
The timing of organic matter application is crucial for the health of the vegetable patch. It is generally best to work compost into the soil several weeks before you plan to plant. This gives the soil microbes time to break down the material and make the nutrients available. Fresh manure should be avoided, as it can be too high in nitrogen and may burn young roots.
Cover crops are another excellent way to boost the organic content of your gardening area. Sowing a crop of clover or rye in the off-season adds biomass when it is turned under in the spring. This practice also helps to prevent soil erosion and nutrient leaching during the winter months. Sustainable gardening relies heavily on these traditional agricultural techniques.
You can also use organic teas or liquid seaweed extracts as a supplemental boost during the growing season. These liquids provide a quick dose of trace minerals that might be missing from the soil. They are particularly useful during the early leaf-building phase to ensure the plants are strong. Integrating these organic methods creates a more resilient and flavorful harvest.
Recognizing harvest maturity
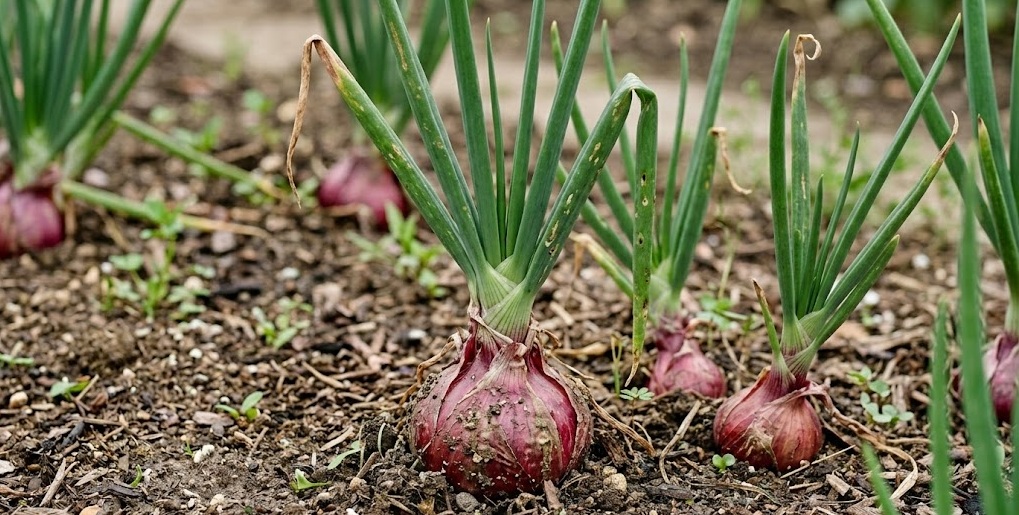
Knowing exactly when to pull your onions out of the ground is a skill that takes a few seasons to master. The most obvious sign is when the green tops turn yellow and fall over on their own. This indicates that the plant has stopped sending nutrients to the leaves and is focusing on the bulb. You should wait until at least half of the crop has collapsed before starting the harvest.
The skin of the onion should feel papery and dry to the touch when it is truly ready. If the outer layers are still thick and fleshy, the bulb may need a little more time in the soil. You can gently brush away a bit of dirt to check the size and skin quality of a few samples. This simple check prevents you from pulling the crop prematurely.
Weather also plays a huge role in deciding the exact day to begin your harvesting process. You should aim for a window of dry, sunny weather to allow the onions to dry out properly. If rain is in the long-term forecast, it is often better to harvest a few days early than to let them get soaked. Wet onions are much more prone to rotting during the storage period.
Once the onions are out of the ground, they should be left on the surface for a day or two if the weather is clear. This initial drying phase helps to cure the outer skins and prepares them for long-term storage. You must handle them gently to avoid bruising, which can lead to infection later on. A successful harvest is the culmination of months of careful planning and observation.
Post-harvest curing process
Curing is the final and perhaps most important step in the onion growing cycle. This process involves drying the bulbs in a well-ventilated area away from direct sunlight. The goal is to allow the outer skins to toughen up and the neck to seal completely. Proper curing can extend the shelf life of your onions by several months.
You can spread the onions out on a screen or hang them in braids in a cool, dry place like a shed or garage. Good airflow is essential to prevent mold and mildew from developing on the damp skins. You should avoid stacking them too deep, as this can trap moisture and heat. Monitoring the temperature and humidity of your curing area is a professional necessity.
After about two or three weeks, the roots should be brittle and the necks should be completely dry. At this point, you can trim the roots and the dried tops, leaving about an inch of the neck intact. If you cut the neck too close to the bulb, you risk opening a path for bacteria to enter. Cleaning the bulbs of any loose dirt at this stage makes them ready for the pantry.
Store your cured onions in mesh bags or crates that allow for continued air circulation. A dark, cool, and dry basement is usually the ideal environment for keeping them fresh through the winter. You should regularly check your stored crop and remove any bulbs that show signs of softening or decay. With the right care, you can enjoy the fruits of your labor for a long time.