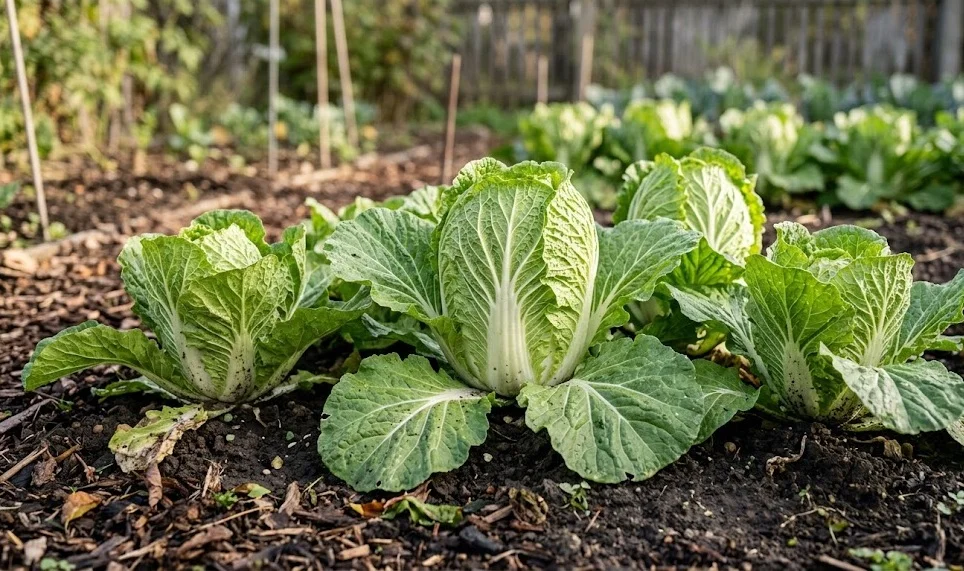
Pruning is a technique often associated with fruit trees or roses, but it also has a specialized role in the professional management of napa cabbage. While you are not shaping the plant in a traditional sense, the selective removal of leaves and the management of growth are essential for health and quality. This process involves identifying damaged foliage, managing the density of the planting, and ensuring the plant’s resources are directed toward the central head. A professional gardener uses these techniques to minimize disease risk and maximize the eventual weight and quality of the harvest.
The primary reason for pruning napa cabbage is to remove any leaves that are damaged by pests, diseases, or environmental stressors like frost or wind. These compromised leaves are often less efficient at photosynthesis and can serve as an entry point for various pathogens that might otherwise be avoided. By cleanly removing them, you improve the overall air circulation around the base of the plant and reduce the risk of rot spreading to the healthy parts of the head. This simple maintenance task should be performed regularly throughout the entire growing season for the best results.
Thinning is another form of growth management that is essential when growing napa cabbage from seeds directly in the garden bed or field. If the seedlings are left to grow too closely together, they will compete for light, water, and nutrients, leading to small and poorly developed heads. Selective removal of the smaller or weaker seedlings ensures that the remaining plants have the space they need to reach their full potential at the end of the season. This process requires a firm but gentle hand and a clear understanding of the ideal spacing requirements for the specific variety you are growing.
Trimming and preparation for harvest are the final stages where cutting back the plant becomes a critical part of the professional gardening routine. Removing the loose, outer wrapper leaves allows the gardener to inspect the firmness and quality of the central head before making the final cut at the base. This also helps in the long-term storage of the cabbage, as these older leaves are often the first to wilt or decay once the plant is removed from its roots. A professional approach to pruning and trimming ensures that only the best-quality produce reaches your table or the market.
Leaf maintenance and disease prevention
Regularly inspecting the outer foliage of your cabbage plants allows you to identify and remove any leaves that show signs of yellowing or spotting early on. These symptoms are often the first indication of a fungal or bacterial infection that could potentially ruin the entire crop if left to spread unchecked. Use a sharp and sterilized pair of garden snips to make a clean cut as close to the main stem as possible without damaging the central structure. This practice of “sanitary pruning” is a cornerstone of a professional and proactive pest and disease management strategy.
More articles on this topic
Leaves that are in direct contact with the soil are particularly vulnerable to soil-borne pathogens and should be the first candidates for removal during maintenance. These lower leaves often become dirty and moist, creating an ideal microclimate for the development of rot and other undesirable conditions in the garden. By clearing a small space between the foliage and the ground, you significantly improve the vertical air movement and keep the plant much cleaner throughout the season. This simple step can make a huge difference in the final quality and health of your napa cabbage crop.
Physical damage caused by wind or by the movement of the gardener can create jagged tears in the large and relatively fragile leaves of the cabbage. These wounds can be a drain on the plant’s resources as it attempts to heal the tissue, and they also provide a perfect hiding spot for small pests like aphids. Trimming away these damaged sections helps the plant focus its energy back on the development of the central head and improves its overall appearance in the garden. Professional gardeners take pride in the neat and healthy appearance of their vegetable rows, which is a sign of careful and dedicated maintenance.
Always remember to clean and disinfect your pruning tools between every plant to prevent the accidental transmission of diseases across your entire garden or field. A simple solution of isopropyl alcohol or a weak bleach mixture is enough to kill most common garden pathogens that might be lingering on the blades of your snips. This small extra step is a hallmark of a professional grower who understands the importance of biosecurity in a successful and productive gardening operation. Consistency in your maintenance habits will pay off with a much more reliable and high-quality harvest at the end of every season.
Thinning techniques for optimal spacing
Thinning should begin as soon as the young seedlings have developed their first set of true leaves and are clearly established in the garden soil. Identify the strongest and most vigorous individuals in the row and mark them as the ones you will keep for the duration of the season. Use a pair of small scissors to snip off the unwanted seedlings at the soil line rather than pulling them out by the roots, which could disturb their neighbors. This “snip and leave” method is a professional tip that minimizes transplant shock and ensures the remaining plants continue to grow without interruption.
More articles on this topic
The final spacing for napa cabbage should be approximately thirty to forty-five centimeters between plants, depending on the expected size of the variety you are growing. If you are unsure, it is always better to provide a little extra room than to crowd the plants and risk a poor or diseased harvest later on. Proper spacing ensures that every plant has a clear path to the sunlight and that the air can move freely between the rows throughout the day. This is particularly important for napa cabbage, which is prone to many moisture-related issues when it is grown in a crowded or stagnant environment.
As the plants continue to grow, you may find that even with proper initial thinning, some individuals are being overshadowed by their faster-growing neighbors in the patch. In these cases, you might decide to perform a second round of thinning or to selectively prune some of the larger leaves that are encroaching on the space of other plants. This dynamic management of the garden space is part of the professional gardener’s toolkit for ensuring a uniform and high-quality crop of vegetables. Every plant in your garden should have the resources it needs to become a healthy and productive part of your eventual harvest.
The “thinnings,” or the young plants that you remove during this process, are often perfectly edible and can be used as a delicious and nutrient-dense microgreen in your kitchen. This ensures that none of your hard work or resources go to waste and provides an early reward for your efforts in the garden during the spring or fall. Many professional growers consider these early greens to be one of the best perks of growing their own food and look forward to the thinning process each year. Enjoying the different stages of the plant’s life cycle is part of the joy and satisfaction of being a dedicated and professional gardener.
Post-harvest trimming and storage prep
Once the cabbage head has reached full maturity and has been cut from the base, the final stage of trimming begins in the field or in the kitchen. Most professional growers will remove the outermost two or three leaves, which may be slightly tougher or more damaged than the rest of the head. This reveals the clean, pale green or yellow leaves of the heart, which are the most tender and desirable parts for cooking and eating fresh. This post-harvest pruning also helps the cabbage stay fresh for longer by removing the parts of the plant that are most likely to wilt first.
The stem of the cabbage should be trimmed one last time to a length of about one or two centimeters below the base of the leaves to prepare it for storage. This clean cut prevents the stem from drying out too quickly and provides a neat appearance for the final product in your kitchen or for sale. If you notice any signs of internal browning or hollow sections in the stem, this is a good time to investigate further and perhaps use that particular head sooner. Professional quality control at every stage ensures that you are only storing and eating the very best of your home-grown produce.
If you are planning to store your napa cabbage for an extended period, you should avoid washing the heads until you are actually ready to use them in a recipe. Excess moisture on the surface of the leaves can encourage the growth of mold and bacteria, which can quickly lead to spoilage in the cool environment of a refrigerator or cellar. Instead, simply brush off any loose soil or debris and wrap the trimmed head loosely in a paper towel or a perforated plastic bag to maintain the ideal humidity. This professional storage technique can keep your napa cabbage crisp and delicious for several weeks or even months under the right conditions.
Reflecting on the entire lifecycle of the cabbage—from the first seedling to the final trimmed head—gives you a deep appreciation for the effort and skill required to grow high-quality food. Each step, including the specialized task of pruning and growth management, contributes to the final result that you can share with your family and friends. By applying these professional techniques, you elevate your gardening from a simple hobby to a sophisticated and productive agricultural practice. Continuous improvement and a commitment to quality are the traits of a truly professional and successful grower of napa cabbage.