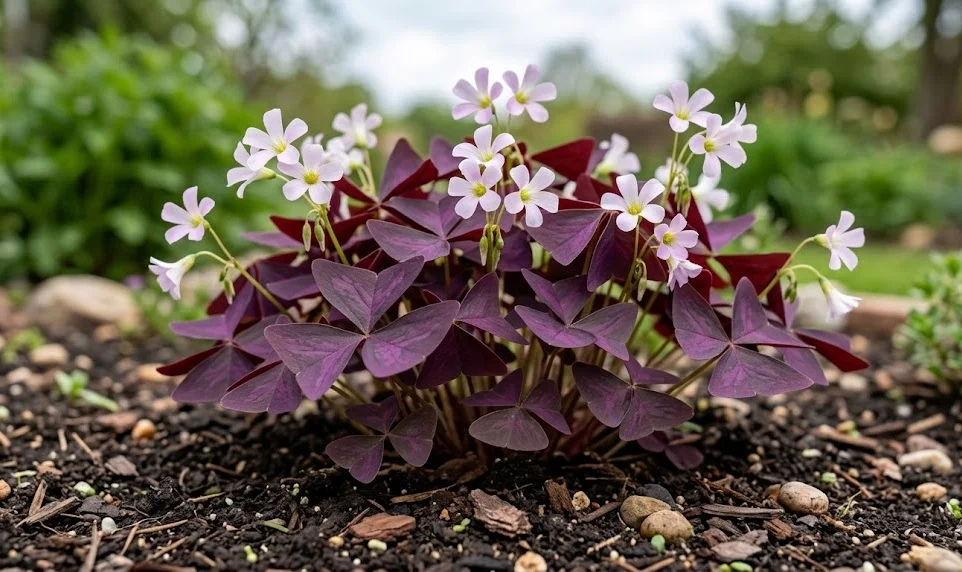
Establishing a thriving colony of wood sorrel begins with a precise approach to planting and understanding the various methods of propagation. These plants are remarkably adaptable, yet they require specific conditions to successfully transition from dormant bulbs or seeds into lush, decorative specimens. Whether you are starting with a single pot or planning a large-scale landscape feature, the initial steps of soil preparation and placement are critical. A professional approach to these early stages ensures a high survival rate and sets the foundation for years of consistent growth and floral displays.
Timing and site selection
The ideal time to plant wood sorrel depends heavily on whether you are working with spring-blooming or autumn-blooming varieties. For most common ornamental types, planting in the early spring as the soil begins to warm is the most effective strategy for ensuring a full season of growth. This timing allows the bulbs to establish a root system before the heat of summer arrives, providing the stability needed for healthy foliage. If you are planting in containers, you have more flexibility, but the principles of seasonal light and temperature still apply.
Site selection is paramount, as the amount of light and the quality of drainage will dictate the plant’s success more than almost any other factor. Look for a location that offers bright, indirect light, as the intense midday sun in many regions can scorch the delicate leaves and cause the plant to wilt. In the garden, dappled shade under larger shrubs or on the eastern side of a building often provides the perfect environment. Indoors, a north or east-facing window is usually ideal, providing enough light for photosynthesis without the risk of overheating.
Soil quality at the planting site must be evaluated to ensure it meets the plant’s requirement for excellent drainage. Wood sorrel bulbs are prone to rotting in heavy clay or compacted soils that retain too much moisture for extended periods. If your garden soil is not naturally well-draining, consider planting in raised beds or amending the area with organic matter and grit. The goal is to create a substrate that feels light and crumbly, allowing the delicate roots to penetrate easily and the bulbs to expand.
Consider the long-term placement of the plant, especially since some varieties can be quite vigorous and may spread beyond their intended borders. While this makes them excellent groundcovers, it also means they require a site where their expansion won’t interfere with more delicate or slow-growing species. Planning for this natural spread saves time and effort in the future by reducing the need for constant thinning or containment. A well-chosen site allows the wood sorrel to fulfill its role in the landscape while remaining a manageable part of the garden.
More articles on this topic
Planting procedures for bulbs
When you receive or harvest wood sorrel bulbs, they often look like small, scaly pinecones or elongated tubers. It is important to inspect them for firmness and health, discarding any that feel hollow or show obvious signs of decay or fuzzy mold. Before planting, some gardeners find success in soaking the bulbs in lukewarm water for a few hours to “wake them up” and hydrate the tissues. This step is not strictly necessary but can speed up the emergence of the first shoots in drier climates or if the bulbs have been stored for a long time.
The depth at which you plant the bulbs is a critical detail that influences how quickly they emerge and how well they are protected from the elements. A general rule of thumb is to plant the bulbs about 2 to 3 centimeters deep, ensuring they are covered by enough soil to stay moist but not so deep that they struggle to reach the surface. Space the bulbs about 5 to 10 centimeters apart to allow room for the foliage to spread and the bulbs to multiply over time. If you want a more immediate “full” look in a container, you can plant them slightly closer together.
Orientation of the bulb in the soil is often a point of confusion, but wood sorrel is generally quite forgiving in this regard. While planting the “pointed” end up is the traditional advice, the plant’s internal sensors will usually direct the shoots upward and the roots downward regardless of how it is positioned. If it is difficult to tell which end is which, simply laying the bulb horizontally in the planting hole is a safe and effective compromise. The most important thing is to ensure the soil is firmed down gently over the bulbs to remove large air pockets.
Initial watering after planting should be thorough to settle the soil around the bulbs and initiate the growth process. However, be careful not to overwater at this stage, as the bulbs do not yet have a root system to take up the moisture and are at their most vulnerable to rot. Keep the soil consistently but lightly moist until you see the first green tips appearing above the surface. Once active growth begins, you can transition to a more regular watering schedule tailored to the specific needs of the variety and its environment.
More articles on this topic
Propagation through division
Division is the most common and often the easiest way to multiply your wood sorrel collection while maintaining the health of older plants. Over a few seasons, a single bulb will produce numerous offsets, leading to a crowded container or a dense mat in the garden. Dividing these clusters every two to three years rejuvenates the parent plant by giving the bulbs more space and access to fresh nutrients. The best time to perform this task is during the dormant phase when the plant is not actively supporting foliage and flowers.
To divide, carefully lift the entire clump from the soil, being mindful not to slice through the bulbs with your shovel or trowel. Gently shake or wash away the excess soil so you can see the individual bulbs and how they are connected. Most will separate easily with a gentle tug, but if they are tightly joined, a clean, sharp knife can be used to part them. Each division should have at least one or two healthy bulbs to ensure it has enough stored energy to start a new plant successfully.
Once separated, the new divisions should be replanted immediately or stored properly if the timing isn’t right for the new location. Replanting into fresh, high-quality potting mix or well-prepared garden soil gives the new plants the best possible start. Treat these new divisions just as you would newly purchased bulbs, paying close attention to planting depth and initial moisture levels. This process allows you to turn one successful plant into a dozen or more over just a few years of careful cultivation.
Sharing divisions with fellow gardeners is a time-honored tradition and a great way to preserve specific cultivars within a community. Because wood sorrel is so prolific, you will often find yourself with more bulbs than you have room for in your own garden. These divisions are usually very hardy and can survive being transported if kept in a bit of moist peat or a paper bag for a short period. Propagating through division is not only a practical gardening task but also a social one that spreads the joy of these unique plants.
Growing from seeds
While bulb division is faster and more common, growing wood sorrel from seeds is a rewarding challenge for those interested in the plant’s full life cycle. Some species produce seed pods that “explode” when ripe, scattering seeds over a wide area, which is how they often naturalize in gardens. If you wish to collect these seeds, you must monitor the pods closely and harvest them just as they begin to turn brown but before they burst open. Collected seeds should be dried briefly and stored in a cool, dry place until you are ready to sow them.
Sowing should take place in a light, sterile seed-starting mix that provides a fine texture for the small seeds to take root. Scatter the seeds across the surface and cover them with only a very thin layer of soil or fine grit, as some varieties may require light to germinate. Maintain a consistent temperature and high humidity by using a clear plastic dome or a simple plastic wrap over the seed tray. It is important to keep the medium moist using a fine mist to avoid washing away the tiny seeds or burying them too deeply.
Germination can be erratic and may take anywhere from a week to several months depending on the species and environmental conditions. Once the seedlings have developed their first set of true leaves, they can be carefully transplanted into individual small pots. These young plants are much more delicate than those grown from bulbs and require careful monitoring of light and moisture to prevent damping off. It takes patience, but watching a tiny seed grow into a full, flowering plant is a significant horticultural achievement.
Growing from seed also offers the possibility of discovering new variations in foliage color or flower shape, especially if you have several varieties growing near each other. Cross-pollination can result in unique hybrids that add diversity to your collection. While professional breeders use this method to create new commercial cultivars, home gardeners can also enjoy the element of surprise that comes with seed propagation. It is a slower process than using bulbs, but it provides a deeper understanding of the plant’s genetic potential and resilience.