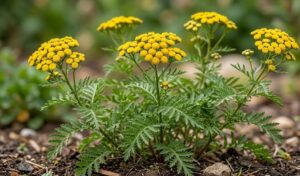
Creating a successful garden display starts with a deep understanding of how to correctly plant and expand your collection of winter heath. This hardy evergreen shrub is known for its ability to transform a dull winter landscape into a vibrant tapestry of color and texture. Achieving the best results requires careful attention to the initial site selection and the physical process of placing the plant in the ground. When done correctly, the foundation you lay during planting will support the plant for its entire life cycle.
The process of propagation offers a rewarding way for gardeners to increase their stock of plants without significant expense. Whether you choose to work with cuttings or utilize the natural process of layering, you can easily produce new specimens from your existing shrubs. This not only saves money but also ensures that the new plants are already adapted to your local climate and soil conditions. Mastering these techniques is a mark of a truly skilled and professional horticulturalist.
Timing is a critical factor in both planting and propagation, as the plant responds differently to environmental cues throughout the year. For planting, the early autumn or early spring are the most advantageous windows of opportunity for success. During these periods, the soil temperature is usually mild, and the natural rainfall helps to settle the roots into their new home. Avoiding the extreme heat of summer or the deep frost of winter ensures that the young plants can focus their energy on establishment.
Professional gardeners always approach these tasks with a plan and the necessary materials ready at hand. You should have your soil amendments, sharp tools, and planting areas prepared before you even bring the plants home from the nursery. This organized approach reduces the amount of time the roots are exposed to the air and minimizes transplant shock. A systematic method leads to a much higher success rate and a more uniform appearance in the finished garden beds.
Choosing the right location
The first step in any planting project is identifying the location that provides the best environmental conditions for the species. Winter heath thrives in a spot that receives plenty of sunlight, which is necessary for the development of its colorful flower buds. Ideally, you should look for a position that gets at least six hours of direct light during the winter months. A site that is too shady will result in leggy growth and a disappointing lack of vibrant blooms.
More articles on this topic
Soil drainage is the next most important consideration when you are scouting for the perfect planting site in your garden. This shrub will quickly decline if its roots are forced to sit in stagnant water or heavy, saturated soil for long periods. You can test the drainage by digging a small hole and filling it with water to see how quickly it disappears. If the water lingers for more than an hour, you may need to choose a different location or build a raised bed.
Protection from the harshest winter winds can make a significant difference in the survival and appearance of your plants. While the heath is very cold-hardy, desiccating winds can strip moisture from the evergreen leaves more quickly than the roots can replace it. Placing the plants on the leeward side of a fence, hedge, or larger shrubbery provides a natural buffer that preserves their health. This structural protection is especially important in more exposed or high-altitude gardening environments.
Consider the aesthetic impact of the location as well as the practical environmental factors for the best professional results. Think about where you spend your time in the winter and place the heath where it can be enjoyed from a window or a frequently used path. Massing the plants together in groups of three or five creates a much stronger visual statement than scattering them individually. A well-planned layout shows a high level of design sophistication and professional care for the landscape.
The planting process
Once you have selected the perfect site, you must prepare the soil to receive the new plant with professional precision. Dig a hole that is at least twice as wide as the current root ball but no deeper than the container it came in. Loosening the soil around the sides of the hole allows the fine, fibrous roots to penetrate the surrounding earth more easily. This extra effort during the digging stage pays off with much faster establishment and more vigorous initial growth.
More articles on this topic
Carefully remove the plant from its nursery pot and inspect the roots for any signs of being pot-bound or circled. If the roots are tightly packed, you can gently tease them outward with your fingers to encourage them to explore the new soil. Place the plant in the center of the hole and ensure that the top of the root ball is level with the soil surface. Planting too deeply can lead to crown rot, while planting too shallow can cause the roots to dry out prematurely.
Fill the space around the root ball with a mixture of native soil and specialized acidic organic matter like peat-free ericaceous compost. Firm the soil down gently with your hands to remove any large air pockets that could cause the roots to desiccate. Avoid using your feet to stomp the soil down, as this can cause excessive compaction and damage the delicate root structures. A light but firm touch is all that is needed to secure the plant in its new permanent home.
The final step in the planting process is to water the area thoroughly to settle the soil and provide immediate hydration. This initial watering is crucial, even if the weather is damp, as it helps to eliminate any remaining small air gaps around the roots. You should then apply a layer of mulch, such as shredded bark or pine needles, to help retain moisture and suppress weeds. This protective layer acts as a finishing touch that gives the planting area a clean and professional appearance.
Propagation from cuttings
Taking semi-hardwood cuttings is a reliable and popular method for producing exact copies of your favorite winter heath specimens. This process is best performed in the late summer or early autumn when the current season’s growth has begun to firm up. You should select healthy, vigorous shoots that do not have any flowers or buds currently forming on them. Using non-flowering stems ensures that the plant’s energy is directed toward root formation rather than reproduction.
Using a sharp, sterilized knife or snips, take a cutting that is approximately five to ten centimeters in length. Remove the leaves from the bottom half of the stem to create a clean area that will be inserted into the rooting medium. You can dip the base of the cutting into a rooting hormone powder to increase the speed and success of root development. This professional technique provides the cutting with the chemical signals it needs to begin its transformation into a new plant.
Insert the prepared cuttings into a pot filled with a well-draining mix of sand and peat-free compost or perlite. Space them so that their leaves do not touch, which helps to prevent the spread of fungal issues in the humid environment. Place the pot in a sheltered, bright spot that is out of direct sunlight, which could cause the cuttings to wilt. Maintaining a consistent level of moisture without overwatering is the most challenging and important part of this propagation phase.
Check the cuttings periodically for signs of growth or resistance when gently tugged, which indicates that roots have begun to form. This process can take several weeks or even a couple of months depending on the environmental conditions and the health of the parent plant. Once a strong root system has developed, you can pot the new plants individually to continue their growth before moving them to the garden. This systematic approach ensures a high success rate and healthy new additions to your landscape.
Layering for new growth
Layering is an even simpler propagation method that takes advantage of the plant’s natural tendency to root where its branches touch the ground. This technique is highly effective for winter heath because the low-growing branches are often already in close proximity to the soil surface. You can start the layering process at almost any time during the growing season, though spring is often the most productive. It requires very little equipment and relies primarily on the parent plant to support the new growth until it is independent.
Select a flexible, healthy branch that can easily be bent down to reach the soil without snapping or causing stress. Clear a small area of earth beneath the branch and dig a shallow trench a few centimeters deep. You can lightly nick the underside of the stem where it will touch the soil to stimulate the rooting response of the plant cells. This minor injury encourages the plant to produce a callus and then roots at the site of the contact.
Secure the branch firmly into the trench using a U-shaped wire or a heavy stone to ensure constant contact with the moist earth. Cover the middle section of the branch with soil, leaving the leafy tip exposed and pointing upwards toward the light. You may need to stake the tip of the branch to keep it vertical and encourage it to grow into a well-shaped new shrub. Keeping this area consistently moist will significantly speed up the formation of a new and independent root system.
After several months, or sometimes a full year, the layered branch will have developed enough roots to survive on its own. You can test this by gently uncovering a bit of the soil to check for root progress before making any cuts. Once the roots are well-established, simply sever the connection to the parent plant and carefully dig up the new specimen. This method produces larger, more robust new plants in a shorter amount of time compared to starting from small cuttings.