The successful establishment of the tall coneflower starts with a well-planned planting process that accounts for its future size and vigor. This species is known for its ability to spread and grow quite tall, making the initial choice of location one of the most important decisions a gardener will make. Whether you are starting from seed or transplanting established clumps, understanding the plant’s requirements is essential for long-term success. A thoughtful approach to propagation ensures that you can enjoy this beautiful perennial in various parts of your landscape.
Choosing the ideal planting site
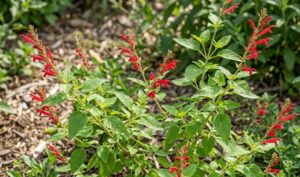
The tall coneflower is a versatile plant, but it truly excels when placed in a location that mimics its natural habitat. It prefers full sun to partial shade, where it can receive at least six hours of direct sunlight each day. Without enough light, the stems may become weak and floppy as they stretch toward the nearest light source. Sunlight also plays a crucial role in the development of the vibrant yellow petals and the overall health of the foliage.
Soil conditions are another vital consideration when selecting a site for your new plants. These perennials favor rich, moist soil that is high in organic matter, such as what you might find near the edges of a woodland or a stream. While they can tolerate a variety of soil types, they will not perform well in extremely dry or compacted earth. If your soil is heavy clay, consider adding organic amendments to improve the drainage and aeration before planting.
Space is perhaps the most critical factor to keep in mind when planning your garden layout. These plants can easily reach heights of six to eight feet and will spread horizontally through underground rhizomes. Give each plant plenty of room to grow, ideally spacing them at least three to four feet apart from neighboring plants. This prevents them from overshadowing smaller species and ensures that each individual has access to the resources it needs to thrive.
Before you begin the physical planting process, take a moment to consider the visual impact of the plant in your landscape. Because of their height, they are best suited for the back of a perennial border or as a focal point in a large meadow garden. They can also be used effectively as a natural screen or to soften the appearance of a fence or wall. Planning their placement carefully will help you create a harmonious and aesthetically pleasing garden design.
More articles on this topic
Planting techniques for success
The best time to plant the tall coneflower is in the early spring or late autumn when the temperatures are cooler and the plant is less stressed. If you are planting in the spring, wait until the danger of hard frost has passed and the soil has begun to warm up. Planting in the autumn allows the root system to become established before the plant goes dormant for the winter. Both seasons offer advantages depending on your local climate and the specific needs of your garden.
To begin planting, dig a hole that is twice as wide as the root ball and just as deep. This extra space allows the roots to spread out easily and penetrate the surrounding soil as they begin to grow. If your soil is poor, you can mix in some compost or well-rotted manure at the bottom of the hole to provide an initial boost of nutrients. Avoid planting too deep, as the crown of the plant should be level with the surface of the soil.
Carefully remove the plant from its container, taking care not to damage the delicate root system. If the roots are tightly bound, gently tease them outward to encourage them to grow into the new soil. Place the plant in the center of the hole and fill in the space with the amended soil, firming it gently with your hands to remove any large air pockets. Watering the plant immediately after planting helps to settle the soil and provides much-needed hydration to the roots.
Finish the planting process by applying a layer of mulch around the base of the plant to help retain moisture and suppress weeds. Keep the mulch a few inches away from the stems to prevent rot and allow for proper air circulation. Monitor the new plants closely during their first few weeks in the ground, ensuring they receive consistent water until they are established. With proper care during this initial phase, your coneflowers will quickly become a permanent part of your garden.
More articles on this topic
Division and root propagation
One of the most effective ways to propagate the tall coneflower is through the process of division. This technique is typically performed every three to four years to keep the plants from becoming too crowded and to rejuvenate older clumps. Early spring is the ideal time for division, just as the new growth begins to emerge from the ground. Division not only gives you more plants but also helps maintain the health and vigor of the parent plant.
To divide an established clump, start by digging around the perimeter of the plant with a sharp spade or garden fork. Carefully lift the entire root ball out of the ground, trying to keep as much of the root system intact as possible. You may need a second person to help lift larger, more established plants that have become quite heavy over time. Once the plant is out of the ground, shake off any excess soil so you can clearly see the root structure.
Use a sharp knife or a spade to cut the root ball into several smaller sections, ensuring that each division has a healthy portion of roots and at least two or three emerging shoots. Discard any old or woody center parts of the plant, as these are less likely to grow vigorously in their new location. The new divisions should be replanted immediately at the same depth they were growing previously. Water them thoroughly to help them recover from the stress of the division process.
Division is an excellent way to expand your garden without the cost of buying new plants from a nursery. It also allows you to share your favorite perennials with friends and neighbors, fostering a sense of community among local gardeners. Because the tall coneflower is so resilient, the new divisions usually establish themselves quickly and may even bloom in their first year. This simple propagation method is a cornerstone of professional perennial garden management.
Starting from seeds and naturalizing
Propagation from seed is another viable option for those who want to grow the tall coneflower in large quantities. The seeds can be collected from mature plants in the autumn once the flower heads have turned brown and dry. If you prefer a more natural look, you can simply allow the seeds to fall to the ground and germinate on their own. This self-seeding habit can lead to a beautiful, naturalized appearance in larger, less formal areas of the garden.
For more controlled propagation, you can start the seeds indoors in late winter or early spring. Sow the seeds in a high-quality potting mix and keep them in a warm, bright location until they germinate. Once the seedlings have developed their first set of true leaves, they can be transplanted into individual pots to continue growing. Hardening off the young plants before moving them outdoors is essential to prevent shock from the change in temperature and light.
Direct sowing the seeds into the garden is also an effective method, especially in the late autumn. The cold temperatures of winter act as a natural stratification process, which can improve germination rates in the spring. Prepare the soil by removing any weeds and lightly raking the surface before scattering the seeds. Cover them with a thin layer of soil and water the area gently to ensure good seed-to-soil contact.
Naturalizing the tall coneflower in a meadow or woodland edge creates a stunning visual display that requires very little maintenance once established. These plants are well-suited for such environments where they can grow and spread freely among other native species. Over time, the colony will expand, providing a consistent source of color and nectar for local wildlife. Propagation, whether through seeds or division, is a rewarding way to enhance the beauty and biodiversity of your landscape.