Planting and propagation of the slender parrot leaf
Successfully establishing the slender parrot leaf in your garden or home begins with a solid understanding of the correct planting techniques, which set the stage for a season of vigorous growth and brilliant color. This is not a plant that demands an overly complicated procedure, but attention to a few key details during the planting process can make a significant difference in its ability to thrive from the outset. Proper soil preparation, correct spacing between plants, and careful handling of the root system are all fundamental steps. By providing the right foundation, you create an environment where the plant can quickly establish itself and begin to unfurl its spectacular foliage, rewarding your initial efforts with a stunning and lasting display.
The transition from a nursery pot to its new home, whether in a garden bed or a larger container, can be a stressful time for any plant. The goal of the planting process is to minimize this transplant shock and encourage the roots to grow out into the new soil as quickly as possible. This involves ensuring the new location is fully prepared before you even remove the plant from its original container. The weather also plays a role; planting on an overcast day or in the late afternoon can help reduce stress on the plant by protecting it from the intense heat and sun during its first few hours in its new environment.
Once planted, the journey is not over. The initial care provided in the first few weeks is critical for the plant to become well-established. This period is all about ensuring the roots have the moisture they need to recover and grow, without being suffocated by waterlogged soil. Proper aftercare reinforces the good work done during planting and solidifies the plant’s foundation for future health. It is this combination of thoughtful planting and diligent initial care that truly determines the success of your slender parrot leaf.
Furthermore, the ease with which this plant can be propagated is one of its most appealing characteristics for gardeners. Expanding your collection or sharing this vibrant plant with others is a simple and rewarding process, primarily accomplished through stem cuttings. This method not only allows you to create new plants that are genetically identical to the parent but also provides an excellent way to overwinter the plant in colder climates by starting new, small plants indoors. Understanding the techniques for both planting and propagation unlocks the full potential of this versatile and colorful species.
Preparing the soil for planting
The first and most critical step in the planting process is the thorough preparation of the soil. The slender parrot leaf requires a growing medium that is both fertile and exceptionally well-draining. If you are planting directly into a garden bed, begin by loosening the soil to a depth of at least 20 to 30 centimeters using a garden fork or tiller. This breaks up any compacted earth, which is essential for allowing the plant’s roots to penetrate deeply and establish a strong anchor. Poorly prepared, compacted soil can severely restrict root growth and lead to a weak, underdeveloped plant.
More articles on this topic
Once the soil has been loosened, the next step is to amend it to improve its quality. This is the perfect time to incorporate a generous amount of organic matter, such as compost, aged manure, or leaf mold. Spreading a 5 to 10-centimeter layer of this organic material over the loosened soil and then mixing it in thoroughly will work wonders. Organic matter serves multiple functions: it enriches the soil with a slow-release source of essential nutrients, improves the soil’s structure, and enhances its ability to retain moisture while still allowing excess water to drain away effectively.
For areas with heavy clay soil, which is notoriously slow to drain, additional amendments are necessary to prevent waterlogging. In addition to the organic matter, consider mixing in materials like coarse sand or fine grit to improve porosity and aeration. This creates larger air pockets within the soil, which are vital for root health and prevent the anaerobic conditions that lead to rot. Conversely, if your soil is overly sandy and drains too quickly, increasing the amount of compost and adding some peat moss can help it to retain more moisture and nutrients.
If you are planting in containers, the principles are the same, but you will be creating your own soil mix. A high-quality, all-purpose potting mix is a good starting point, but it should be enhanced for optimal performance. A reliable recipe is to combine two parts potting mix with one part perlite or coarse sand and one part compost. This blend provides the ideal balance of fertility, moisture retention, and drainage that the slender parrot leaf loves. Before filling your containers, ensure they have been cleaned thoroughly to remove any potential pathogens from previous use.
The process of planting young plants
When you are ready to plant, the careful handling of the young plant is paramount to minimize transplant shock. Begin by watering the plant in its original nursery pot about an hour before you plan to transplant it. This ensures the root ball is well-hydrated and helps it to hold together during the transfer. When you are ready, prepare a planting hole in your prepared garden bed or container. The hole should be slightly wider than the root ball and just as deep, so that the top of the root ball will sit level with the surrounding soil surface.
More articles on this topic
To remove the plant from its pot, gently tip the container sideways and tap the bottom and sides to loosen the root ball. Avoid pulling the plant out by its stem, as this can cause significant damage. Instead, support the base of the stem with one hand while sliding the pot off with the other. Once the plant is out, take a moment to inspect the roots. If the plant is root-bound, with roots circling tightly around the bottom of the root ball, it is important to gently tease them apart with your fingers or make a few vertical cuts with a clean knife. This encourages the roots to grow outwards into the new soil rather than continuing to circle.
Carefully place the plant into the prepared hole, making sure it is centered and standing upright. Check that the top of the root ball is flush with the surrounding soil level. Planting too deeply can cause the stem to rot, while planting too high can expose the roots and cause them to dry out. Once you are satisfied with the positioning, begin backfilling the hole with the prepared soil, gently firming it down around the root ball as you go to eliminate any large air pockets. Avoid compacting the soil too tightly, as this can impede water penetration and root growth.
After the hole is completely backfilled, the final and most crucial step is to water the plant thoroughly. Provide a deep, slow soaking that settles the soil around the roots and eliminates any remaining air pockets. This initial watering is vital for rehydrating the plant after the stress of transplanting and for establishing good contact between the roots and the new soil. For the first couple of weeks after planting, monitor the soil moisture carefully and water as needed to keep the soil consistently moist but not waterlogged, giving the plant the best possible start in its new home.
Propagation through stem cuttings
Propagating the slender parrot leaf from stem cuttings is an incredibly straightforward and reliable method for creating new plants. This technique allows you to produce exact clones of the parent plant, ensuring that the desirable color and growth characteristics are preserved. The best time to take cuttings is during the spring or summer when the plant is in its active growth phase. Look for healthy, vigorous stems that are free from any signs of disease or pest damage. Using a clean, sharp knife or pair of pruning shears is essential to make a clean cut and avoid crushing the stem tissue.
Select a stem and make a cut that is about 10 to 15 centimeters long, ensuring the cut is made just below a leaf node (the point on the stem where a leaf emerges). This area is where root-promoting hormones are concentrated and where new roots are most likely to form. Once you have your cutting, gently remove the leaves from the lower half of the stem. Leaving too many leaves on the cutting can cause it to lose too much water through transpiration before it has a chance to develop roots, leading to wilting and failure. Typically, leaving two to four leaves at the top of the cutting is sufficient.
While not strictly necessary, dipping the cut end of the stem into a rooting hormone powder can significantly increase the success rate and speed up the root development process. Tap off any excess powder before planting. The cuttings can be rooted in either water or a sterile growing medium. To root in water, simply place the prepared cuttings in a jar of water, ensuring the leafless portion of the stem is submerged. Change the water every few days to keep it fresh and prevent bacterial growth. Roots should begin to appear within a week or two.
Alternatively, to root directly in soil, fill a small pot or tray with a light, well-draining medium such as a mix of peat moss and perlite or vermiculite. Moisten the medium, then use a pencil or your finger to poke a hole for the cutting. Insert the cutting into the hole and gently firm the medium around it. To create a humid environment that encourages rooting, you can cover the pot with a clear plastic bag or place it in a propagator. Keep the medium consistently moist and place the cuttings in a bright location with indirect light. Roots will typically form within a few weeks, after which the new plants can be potted up.
Less common propagation methods
While stem cuttings are by far the most common and efficient way to propagate the slender parrot leaf, it is also possible to grow the plant from seed, although this method is used less frequently by home gardeners. Growing from seed can be a longer process and may result in some variation in the appearance of the offspring, especially if the seeds are collected from a hybrid variety. However, it can be a rewarding experience and is a viable option if you wish to produce a large number of plants. Seeds can be purchased from commercial suppliers or, in some cases, harvested from mature plants after they have flowered.
To start from seed, sow them indoors in a tray or pot filled with a sterile seed-starting mix, typically about 6 to 8 weeks before the last expected frost date in your region. The seeds are small and should be sown on the surface of the soil and only very lightly covered with a fine layer of the mix or vermiculite. Gently moisten the soil using a spray bottle to avoid dislodging the seeds. To promote germination, the seed tray should be kept in a warm location, ideally with a consistent temperature of around 21°C to 24°C.
Maintaining consistent moisture and warmth is key to successful germination. Covering the seed tray with a clear plastic dome or plastic wrap helps to create a greenhouse-like effect, trapping humidity and heat. Place the tray in a location that receives bright, indirect light. Germination can be somewhat variable but typically occurs within 10 to 21 days. Once the seedlings have emerged and developed their first set of true leaves, the cover can be removed to improve air circulation and prevent damping-off disease.
After the seedlings have grown large enough to handle and have developed at least two sets of true leaves, they can be carefully transplanted into individual small pots. Continue to grow them in a bright, protected location until they are well-established and all danger of frost has passed. Before planting them outdoors, it is essential to harden them off. This process involves gradually acclimating the young plants to outdoor conditions over a period of 7 to 10 days by exposing them to increasing amounts of sunlight and temperature fluctuations. This prevents shock and ensures their successful transition to the garden.
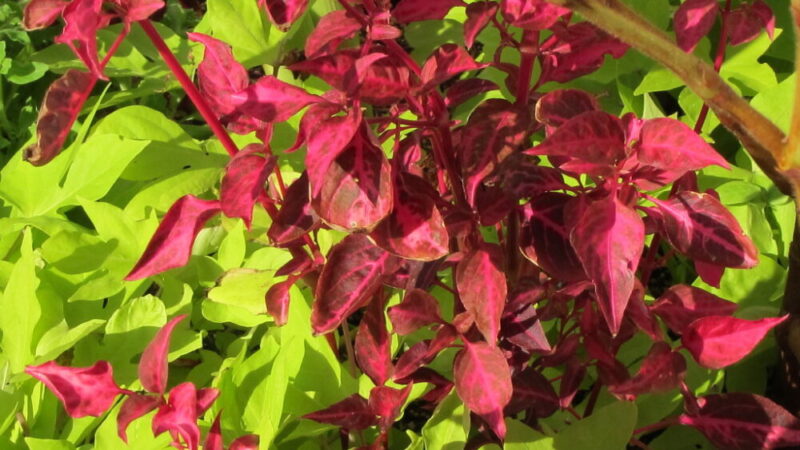
📷 Flickr / Szerző: cultivar413 / Licence: CC BY 2.0