Establishing a new narrow-spiked ligularia in your garden starts with selecting the perfect moment and location for its introduction. This plant is a heavy feeder and a lover of moisture, so the planting process must prioritize long-term access to nutrients and water. Proper installation ensures that the root system can expand quickly and support the large leaves that will emerge in the coming weeks. A professional approach to planting sets the stage for a dramatic and healthy floral display.
The timing of planting is crucial for the survival of the young perennial as it settles into its new home. Early spring is widely considered the best time because the soil is naturally moist and temperatures are still moderate. This allows the roots to establish themselves before the intense heat of the summer puts a high demand on the foliage. Autumn is also a viable option, provided the plant has enough time to anchor itself before the first hard freeze.
When you bring a new plant home, it is essential to keep it well-watered while it sits in its nursery container. The transition from the controlled environment of a greenhouse to your garden can be stressful for the delicate leaves. If the weather is particularly sunny or windy, keep the pot in a shaded area until you are ready to put it in the ground. Preparing the site ahead of time will minimize the amount of time the roots are exposed to the air.
Digging the hole requires more effort than simply matching the size of the container. You should aim for a hole that is twice as wide as the root ball to allow for easy lateral expansion of the roots. Loosening the soil at the bottom and sides of the hole prevents the roots from circling and encourages them to move outward. Incorporating organic matter directly into the backfill soil provides an immediate boost for the developing plant.
Selecting the ideal site
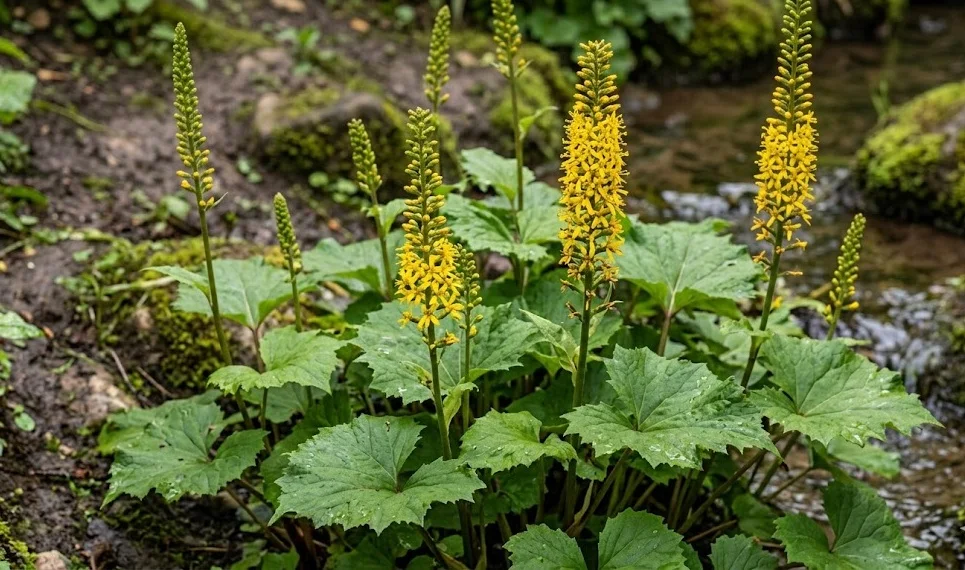
Choosing the right location is the single most important decision you will make for your new planting. The narrow-spiked ligularia is a woodland edge plant, meaning it thrives in dappled light or partial shade. Full sun is generally too intense for the large foliage, leading to constant wilting and brown edges on the leaves. Look for areas that are naturally damp, such as the edge of a pond or a shaded depression in the landscape.
More articles on this topic
Soil quality should be heavy and moisture-retentive, but not completely devoid of structure. If your garden has sandy soil, you will need to amend it heavily with compost and peat to hold the necessary water. Conversely, very thick clay can be broken up with organic matter to ensure that roots can breathe. A site that naturally collects rainwater can be an asset, provided the water does not become completely stagnant for long periods.
Proximity to other plants should be considered to ensure that the ligularia has enough room to reach its full size. These perennials can grow quite large, with some specimens reaching over a meter in width when happy. Crowding them too closely with other large perennials can lead to competition for soil moisture and poor air circulation. Leaving a generous buffer zone allows the architectural shape of the plant to be fully appreciated by anyone visiting the garden.
Environmental protection from strong winds will keep the tall flower spikes and large leaves in pristine condition. A site backed by a wall, a fence, or a dense shrubbery offers a windbreak that prevents mechanical damage. This is particularly important during the summer months when the plant is at its most vulnerable to desiccation. A sheltered location also helps maintain a higher level of local humidity around the foliage, which the plant dearly loves.
Step-by-step planting process
Once the site is chosen, begin the planting by thoroughly soaking the area with water to ensure deep moisture. Place the plant in the hole and check the depth to ensure the crown is level with the surrounding soil. Planting too deep can cause the crown to rot, while planting too shallow can lead to the roots drying out prematurely. Adjust the soil at the bottom of the hole until the height is exactly right for the specimen.
More articles on this topic
Carefully remove the plant from its container, taking care not to damage the thick, fleshy roots. If the plant is root-bound, gently tease the roots outward with your fingers to encourage them to grow into the new soil. Place the root ball in the center of the hole and begin filling the space with your amended soil mixture. Firm the soil gently with your hands as you go to remove any large air pockets that could dry out the roots.
After the hole is filled, create a small basin or depression around the base of the plant to help catch and direct water. This simple trick ensures that during the first few weeks, every drop of water reaches the root ball directly. Give the new planting a very deep soak immediately after finishing the task to settle the soil and hydrate the roots. You should see the plant perk up within a few hours if the moisture has been applied correctly.
The final step in the planting process is applying a thick layer of mulch around the base of the plant. Use organic materials like shredded leaves, compost, or bark to create a barrier that holds moisture in the soil. Keep the mulch a few centimeters away from the actual crown to prevent moisture from sitting directly against the stems. This protective layer will also suppress weeds that would otherwise compete with your new ligularia for resources.
Propagation via division
Dividing established clumps is the most reliable way to create new plants that are identical to the parent. This variety responds very well to division, provided it is done during the dormant period or in very early spring. A healthy clump can usually be divided every three to four years to maintain its vigor and spread it to new areas. You will know it is time when the center of the plant starts to look less productive than the edges.
To begin the division, use a sharp spade to dig an wide circle around the entire perimeter of the plant. Lift the whole root mass out of the ground, trying to keep as much of the soil attached as possible. Once the clump is on the surface, you can use a clean knife or the edge of your spade to slice it into sections. Each new piece must have at least one strong growth bud and a substantial portion of the root system attached.
Replant the divisions immediately into prepared soil to prevent the roots from drying out in the air. Treat these new plants with the same care as a freshly purchased nursery specimen, focusing on consistent moisture. It is normal for divided plants to take a season to fully recover and reach their full blooming potential. By the second year, they should be indistinguishable from established plants in the rest of the garden.
This method of propagation is not only economical but also beneficial for the health of the original plant. Overcrowded roots can lead to smaller leaves and fewer flower spikes as the competition for nutrients increases. By thinning out the clump, you allow the remaining sections to grow with renewed energy and space. Sharing these divisions with fellow gardeners is a tradition that many professional horticulturists enjoy as part of their seasonal work.
Growing from seeds
Propagating the narrow-spiked ligularia from seed is a rewarding but much slower process than division. The seeds should be collected in late summer or autumn once the flower spikes have turned brown and the seed heads are dry. You can sow them immediately in a cold frame or store them in a cool, dry place for spring planting. Keep in mind that seeds may require a period of cold stratification to break their dormancy successfully.
If you choose to start seeds indoors, use a high-quality seed starting mix that is kept consistently moist. The seeds should be sown on the surface or barely covered, as they often require some light to trigger germination. Provide a cool environment, as high heat can actually inhibit the growth of these woodland species. Germination can be erratic, so do not be discouraged if the seedlings appear at different times over several weeks.
Once the seedlings have developed their first true leaves, they can be carefully transplanted into individual pots. Use a nutrient-rich potting soil and continue to monitor the moisture levels daily to prevent wilting. These young plants are much more delicate than established ones and should be kept in a sheltered, shaded spot. Avoid exposing them to direct sunlight or drying winds during their first few months of life.
It will usually take two to three years of growth before a seed-grown plant is large enough to produce its first flower spike. During this time, the focus should be on building a strong root system and healthy foliage. While it requires patience, growing from seed allows you to produce a large number of plants for a mass planting at a very low cost. It is an excellent way to fill a large shade garden or woodland area over time.