The successful establishment of this charming spring flower begins with a precise understanding of its planting requirements and the various methods of propagation available to the grower. Whether you are starting with dormant bulbs or trying your hand at growing from seed, the timing and soil preparation are the most influential factors. This species is particularly rewarding for those who appreciate the subtle beauty of early season blooms and wish to naturalize them in a grassy or wooded area. Following professional guidelines ensures that your initial efforts will lead to a self-sustaining and expanding colony over the years.
Selecting the right location is the first and perhaps most important step in the entire planting process for this small bulbous plant. It thrives in positions where it can receive ample sunlight during its brief spring growing window but remains protected during the summer. Ideally, the site should have soil that is well-drained and relatively loose, allowing the bulbs to settle in without the risk of stagnant water. Areas under deciduous trees are often perfect, as the plants can bloom before the trees develop their full summer canopy.
Before planting, the soil must be prepared to a depth of at least fifteen centimeters to provide a hospitable environment for the developing root systems. Incorporating organic matter such as well-rotted compost or leaf mold will improve the soil structure and provide a slow-release source of nutrients. If the soil is particularly heavy or contains a lot of clay, adding some coarse grit or sharp sand is highly recommended. A well-prepared bed reduces the stress on the bulbs during their first year and encourages rapid establishment.
The timing for planting the bulbs is strictly tied to the late summer or early autumn months when they are in their most dormant state. Planting at this time allows the bulbs to develop a healthy root system before the ground freezes hard in the winter. If the bulbs are planted too late, they may not have enough time to establish themselves, leading to poor flowering or even failure in the spring. Aiming for a planting window between September and October generally provides the best results in most temperate climates.
Bulb planting techniques
When planting the bulbs, the depth of the hole should be roughly two to three times the height of the bulb itself. This depth provides enough insulation from temperature fluctuations while still allowing the young shoots to reach the surface easily in the spring. It is important to place the bulb with the pointed end facing upwards, as this is where the leaves and flower stalks will emerge. If the orientation is wrong, the plant will waste valuable energy trying to reorient its growth underground.
More articles on this topic
Spacing between the individual bulbs should be around five to eight centimeters to allow for future growth and the natural development of bulblets. Planting them too closely can lead to premature crowding, which reduces the vigor of the colony and can limit the number of flowers produced. A more natural look is often achieved by scattering the bulbs and planting them where they land rather than in rigid, formal rows. This “drifting” technique mimics the way the plants would naturally spread in the wild.
Once the bulbs are placed in the holes, they should be covered with the prepared soil and firmed down gently to remove any large air pockets. Watering the area immediately after planting helps to settle the soil around the bulbs and initiates the root development process. It is important not to overwater at this stage, as the bulbs are still relatively inactive and could rot if the soil becomes soggy. A light, thorough watering is usually sufficient to start the establishment phase.
Marking the planting area with small stakes or labels is a professional practice that prevents accidental digging during the long dormant period. Since there will be no visible growth above ground for several months, it is easy to forget exactly where the bulbs are located. This is especially important if you plan to add other plants to the same bed later in the season. Clear documentation of your planting map ensures that your investment is protected from future garden maintenance activities.
Growing from seeds
Propagating this species from seed is a slower process than using bulbs, but it is a highly effective way to produce a large number of plants. The seeds should be collected as soon as the capsules turn brown and begin to split open in late spring or early summer. Fresh seeds have a much higher germination rate than those that have been stored for a long period under sub-optimal conditions. Immediately after collection, the seeds can be sown directly into a prepared seedbed or into specialized nursery trays.
More articles on this topic
A specialized seed-starting mix that is both light and moisture-retentive is ideal for ensuring the successful germination of the tiny seeds. The seeds should be sown thinly on the surface and covered with only a very fine layer of compost or grit. They require a period of cold stratification, which naturally occurs if they are sown outdoors in the autumn and allowed to experience the winter chill. This natural cycle triggers the internal mechanisms that tell the seed it is time to grow when spring arrives.
During the first year, the seedlings will produce only a single, thread-like leaf and will spend most of their energy developing a tiny underground bulb. It is crucial to keep the seedbed free of weeds and to ensure that it does not dry out completely during this sensitive stage. Many growers prefer to keep the seedlings in a cold frame or a protected area where environmental conditions can be more easily monitored. Patience is required, as it may take three to four years before a seed-grown plant is large enough to produce its first flower.
Once the young bulbs have reached a manageable size, they can be carefully transplanted to their permanent positions in the garden. This is best done during the dormant season to minimize the risk of transplant shock to the developing root systems. Moving them in small clumps with the surrounding soil intact helps protect the delicate tissues and ensures a smoother transition. Growing from seed is a rewarding way to increase the genetic diversity of your garden’s population over the long term.
Division of bulblets
The most common and efficient way to propagate established colonies is through the natural process of bulb division. Over time, a healthy parent bulb will produce several smaller “daughter” bulbs or offsets around its base. These offsets can be separated and replanted to create new colonies or to increase the density of an existing one. This process not only provides new plants but also helps to rejuvenate the original colony by reducing competition for local resources.
Division is best performed every three to five years, or whenever the colony shows signs of overcrowding such as reduced flowering. The bulbs should be lifted carefully using a hand fork during the late summer when the foliage has completely died back. It is important to dig deeply enough to get under the entire bulb cluster without slicing through the individual bulbs. Once lifted, the soil can be gently shaken off to reveal the structure of the bulb group.
Separating the bulblets from the parent is usually a simple task that can be done by hand with a gentle twisting motion. Any bulblets that are firm and healthy-looking can be used for replanting, while soft or damaged ones should be discarded. It is best to replant the divided bulbs as soon as possible to prevent them from drying out excessively in the air. If immediate replanting is not possible, they should be stored in a cool, dry place in a paper bag or a box of dry peat.
When replanting the offsets, they should be treated with the same care and attention as newly purchased bulbs. Small bulblets may not flower in their first year after division, as they need time to reach a critical size for reproduction. However, they will quickly establish themselves and begin to contribute to the overall beauty of the site within a season or two. This method of propagation is a cost-effective and reliable way to expand your collection of these charming spring ephemerals.
Establishing a naturalized colony
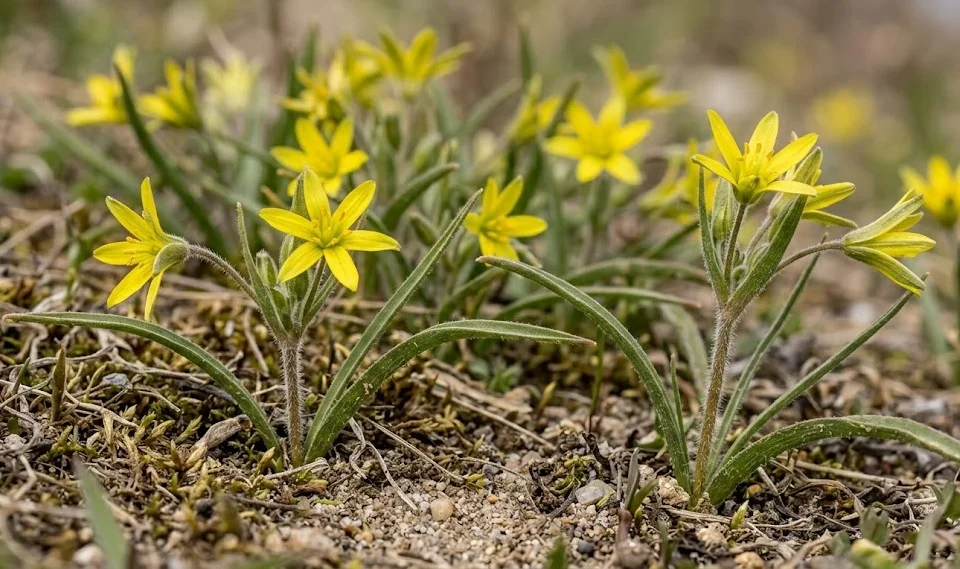
Naturalizing this species in a lawn or meadow area requires a slightly different approach than planting in a dedicated garden bed. The goal is to create a population that looks like it has always been there and that can sustain itself with minimal human intervention. Success in naturalizing depends on choosing a site where the grass is not mown too early in the spring. The foliage of the star-of-Bethlehem must be allowed to mature and die back naturally before any heavy maintenance occurs.
To plant in an existing lawn, small plugs of turf can be removed, and a group of three to five bulbs can be placed in each hole. This creates small clusters that will eventually spread and merge over time, creating a more realistic and aesthetic effect. The holes should be filled with a mix of soil and compost to give the bulbs a good start in their new environment. This method minimizes the impact on the existing lawn while still allowing the new plants to find their place.
Long-term success in a naturalized setting is often tied to the management of the surrounding grass and other low-growing plants. Avoid using broad-spectrum herbicides in the area, as these can be devastating to the delicate bulbs and their foliage. Instead, focus on mechanical controls and timing your mowing schedule to coincide with the plant’s dormant phase. A meadow that is allowed to grow a bit longer in the early spring provides the perfect nursery for these small, yellow stars.
Observing how the colony spreads naturally can provide clues about the most favorable microclimates within your specific landscape. You may notice that they thrive better in certain areas with slightly more moisture or better protection from the wind. Using this information, you can strategically add more bulbs to those successful areas to accelerate the naturalization process. Over time, a well-managed colony will become a highlight of the early spring garden, returning faithfully year after year.