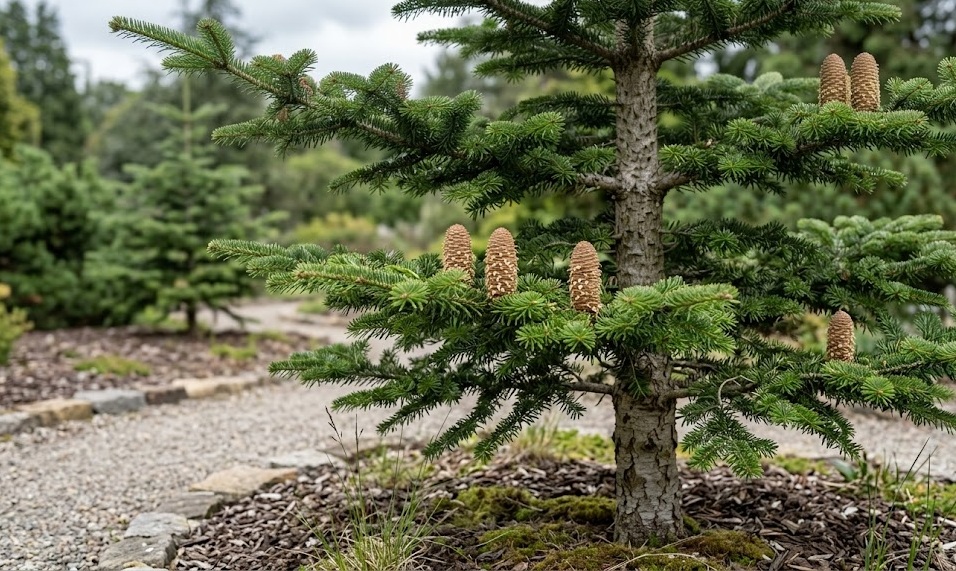
The successful establishment of a Greek fir begins with a precise planting technique and a strategic approach to propagation that respects the biological needs of this Mediterranean conifer. Whether you are starting with a young sapling from a nursery or attempting to grow new trees from seed, the initial stages of life are the most critical for determining future success. This process requires patience, as the species is known for its slow initial growth and specific requirements for soil structure and moisture levels. By mastering the art of planting and the science of propagation, you can ensure a robust start for these majestic evergreens in any suitable landscape.
Strategic site selection and preparation
The first step in planting a Greek fir is choosing a location that mimics its native high-altitude environment while providing room for its extensive future growth. You must look for a spot that offers full sun exposure, although in particularly hot climates, some afternoon shade can prevent the young foliage from scorching. The site should have excellent air drainage to prevent the stagnation of cold air or high humidity, which can lead to fungal issues. It is essential to visualize the tree at its mature height and width to ensure it won’t interfere with power lines or building foundations decades down the line.
Soil preparation is the most labor-intensive part of the planting process, but it is the one that pays the most dividends in the long run. You should start by digging a hole that is at least twice as wide as the root ball but no deeper, as the tree needs to sit on undisturbed soil to prevent settling. Testing the drainage of the hole by filling it with water and timing how long it takes to disappear is a crucial step before placing the tree. If the water lingers for more than a few hours, you will need to amend the area with grit or consider planting on a slightly raised mound.
The composition of the backfill soil should be a thoughtful mix of the native earth and high-quality organic amendments. You should avoid using too much commercial potting soil, as this can create a “pot effect” where the roots refuse to grow out into the surrounding native ground. Instead, blend in some aged compost or leaf mold to improve the nutrient profile and moisture-holding capacity of the soil. This approach encourages the roots to venture out quickly, anchoring the tree firmly against the wind and searching for deep-seated water sources.
Before the tree goes into the ground, you should inspect the root system for any signs of being pot-bound or having circling roots. If the roots are tightly coiled, you need to gently tease them outward or make several shallow vertical cuts to encourage outward growth. This ensures that the root system develops in a radial pattern, providing the best possible stability and resource absorption. Taking these extra minutes to prepare the roots can be the difference between a tree that thrives and one that eventually tips over in a storm.
More articles on this topic
Technical steps for successful planting
When you are ready to place the Greek fir into its permanent home, the depth at which it is planted is perhaps the most critical factor. You must ensure that the “root flare”—the point where the trunk expands and the first major roots emerge—is visible at or slightly above the soil surface. Planting too deep can lead to trunk rot and oxygen deprivation, while planting too shallow can cause the roots to dry out and die. Once the tree is positioned correctly, you should double-check its vertical alignment from multiple angles before you begin backfilling the hole.
Backfilling should be done in stages, gently tamping the soil down with your hands rather than your feet to avoid over-compaction. You should add water as you fill the hole to help settle the soil and eliminate any large air pockets that could cause the roots to desiccate. Avoid adding high-nitrogen fertilizers directly into the planting hole, as this can burn the tender new roots and encourage excessive top growth at the expense of root development. Instead, focus on providing a stable, hydrated environment that allows the tree to recover from the stress of being moved.
Immediately after planting, you should create a temporary soil basin or “doughnut” around the perimeter of the planting hole to hold irrigation water. This ensures that water is directed straight to the root ball where it is needed most during the first critical months of establishment. Apply a three-inch layer of organic mulch, such as shredded bark or wood chips, over the entire planting area, keeping it a few inches away from the trunk. This mulch layer is essential for regulating soil temperature, conserving moisture, and preventing competition from weeds and grass.
Staking the tree is usually only necessary if the site is exceptionally windy or if the tree feels unstable in its hole. If you do use stakes, you must ensure that they are attached with soft, flexible ties that allow the trunk to move slightly in the breeze. This movement is important because it stimulates the tree to produce “reaction wood,” which strengthens the trunk over time. Be sure to remove the stakes after the first growing season, as leaving them on too long can weaken the tree and lead to girdling of the bark.
More articles on this topic
Propagation from seed and germination
Growing a Greek fir from seed is a rewarding but slow process that requires a high degree of technical precision and patience. You should begin by collecting cones in the late summer or early autumn when they have turned from purple to brown but before they fully disintegrate. Once the scales open, you can shake out the winged seeds, which should be stored in a cool, dry place until you are ready to begin the stratification process. It is important to remember that not all seeds will be viable, so it is best to start with a larger quantity than you think you will need.
Cold stratification is necessary to break the seed’s natural dormancy and mimic the winter conditions it would experience in the mountains of Greece. You should place the seeds in a mixture of damp sand or peat moss and keep them in a refrigerator at a temperature of about 4°C for 60 to 90 days. During this time, you must check the seeds periodically to ensure the medium hasn’t dried out and that no mold is beginning to form. This period of chilling prepares the embryo inside the seed to emerge rapidly once it is moved to a warmer environment.
Once the stratification period is complete, you should sow the seeds in a well-draining seed-starting mix, barely covering them with a thin layer of fine grit or soil. Place the trays in a bright location with indirect light and maintain a consistent temperature of around 15-18°C. Germination can be irregular and may take several weeks, so do not be discouraged if the first sprouts appear at different times. Keeping the soil consistently moist but never waterlogged is the key to preventing “damping off,” a common fungal disease that kills young seedlings.
As the seedlings grow and produce their first true needles, they will need careful monitoring to ensure they are not scorched by direct sun or dried out by low humidity. You should begin a very dilute liquid fertilization program once the plants have established a few sets of needles to support their early development. When the seedlings are large enough to handle, usually after one or two years, they can be transplanted into individual pots to grow on for another few seasons. This gradual process ensures that by the time they are ready for the garden, they have a sturdy stem and a healthy, compact root system.
Vegetative propagation and grafting techniques
Vegetative propagation of the Greek fir through cuttings is notoriously difficult and is rarely the primary method used by home gardeners or even professionals. However, if you wish to try, you must take semi-hardwood cuttings in the late summer from the current year’s growth. These cuttings should be treated with a high-strength rooting hormone and placed in a specialized propagation chamber with high humidity and bottom heat. Even with the best equipment, the success rate for rooting Abies species is often quite low, and the resulting plants may grow horizontally rather than vertically.
Grafting is a more reliable method for propagating specific cultivars or ensuring that a tree has a vigorous root system from the start. You should use a seedling of a compatible species, such as a vigorous Abies alba or another Abies cephalonica, as the rootstock. The grafting process involves joining a scion (a shoot from the desired tree) to the rootstock using a technique like the side-veneer graft. This is typically performed in the late winter while both plants are dormant, requiring a clean environment and a very sharp knife to ensure successful tissue fusion.
After the graft is made, the union must be wrapped tightly with grafting tape or rubber bands and sealed with wax to prevent it from drying out. The grafted plants are then kept in a greenhouse or a protected cold frame where temperature and humidity can be strictly controlled. You will know the graft has been successful when the buds on the scion begin to swell and push out new growth in the spring. Once the union is strong, the top of the rootstock is removed, allowing the new scion to become the main part of the tree.
Managing the transition of these propagated plants from a controlled environment to the outdoors is a delicate process known as “hardening off.” You should gradually expose the young trees to increasing amounts of sunlight and wind over several weeks to build up their structural strength and leaf cuticle thickness. This careful acclimation prevents the shock that often kills young trees when they are moved too quickly from a greenhouse to the garden. By taking the time to propagate correctly, you are continuing the lineage of this beautiful species and contributing to the diversity of your landscape.