Successful planting of the Christmas orchid begins with the careful selection of the right container and potting material. Since these plants are epiphytic in nature, they require a structure that mimics the bark of a tree rather than traditional garden soil. Professional growers emphasize the importance of using a medium that allows for maximum aeration while retaining just enough moisture. Choosing the correct pot size is also vital, as these orchids tend to perform best when their roots are slightly confined.
The timing of planting or repotting is equally important for the long-term health and vigor of the specimen. The ideal window for this task is usually just after the flowering period ends and as new root growth begins to emerge. Attempting to repot while the plant is in full bloom or during its deepest dormancy can cause unnecessary stress and set back its development. Observing the root tips for fresh green growth is the most reliable indicator that the plant is ready for a new home.
Before you begin the planting process, it is helpful to gather all the necessary supplies and ensure they are properly sanitized. Using clean pots and sterilized cutting tools is non-negotiable in professional orchid culture to prevent the spread of pathogens. Preparing the potting medium by soaking it in water beforehand ensures that it is fully hydrated and ready to support the plant. This proactive approach sets the stage for a smooth transition and rapid establishment of the orchid in its new container.
Humanizing the process means understanding that every plant has its own unique personality and set of needs. Some orchids may have particularly extensive root systems that require a bit more patience and care during the handling process. Taking your time to spread the roots gently throughout the new medium will prevent breakage and promote faster recovery. A professional touch is characterized by a combination of technical skill and a genuine respect for the living organism being handled.
Selection of containers and growth media
The choice between plastic and clay pots significantly influences how you will manage the watering schedule for your orchid. Plastic containers are excellent for retaining moisture, making them a good choice for growers who live in dry climates or have limited time for watering. On the other hand, clay pots are porous and allow for better evaporation, which is ideal for those who tend to overwater or live in humid areas. Regardless of the material, the container must have large drainage holes to ensure that excess water can escape immediately.
More articles on this topic
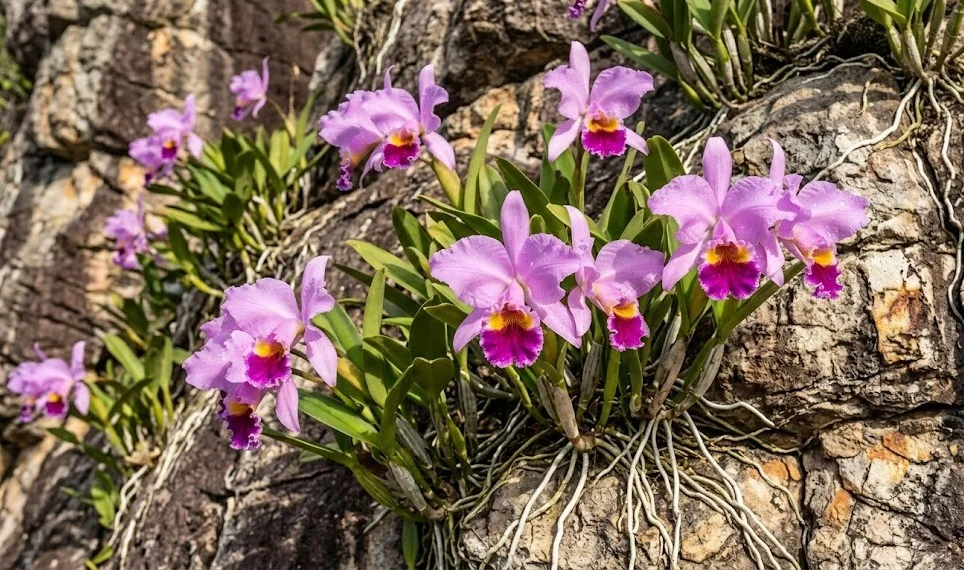
Specialized orchid pots often feature slits or holes on the sides to further enhance the airflow to the root zone. This is a professional-grade feature that mimics the breezy conditions found in the canopy of South American forests. Increased ventilation helps to dry the medium more evenly and prevents the core of the root ball from becoming soggy. If you are using a standard pot, you can create additional drainage by adding a layer of large stones or broken pottery at the bottom.
The substrate itself is typically a blend of materials designed to provide structural support and moisture retention without compaction. High-quality fir bark is the most common base, often supplemented with perlite for aeration and horticultural charcoal to keep the mix fresh. Some growers also include a small amount of sphagnum moss to increase the moisture-holding capacity for younger or thirstier plants. It is important to avoid low-quality mixes that contain fine peat or soil, as these will quickly suffocate the roots.
Before using any organic medium, it is a professional best practice to soak it in water for at least twenty-four hours. This ensures that the bark chips are fully saturated and will not pull moisture away from the orchid’s roots once planted. Drain the excess water thoroughly before you begin the potting process to keep the working area manageable. Selecting and preparing your materials with care is the first step toward a successful and rewarding planting experience.
The art of repotting and root care
When it is time to repot, start by gently removing the orchid from its old container while being careful not to snap the brittle roots. If the plant is stuck, you can lightly squeeze the sides of a plastic pot or use a thin tool to loosen the edges. Once the plant is free, take the opportunity to inspect the root system thoroughly for any signs of decay or damage. Healthy roots are usually firm and white or green, while dead roots will feel mushy, hollow, and often appear brown.
More articles on this topic
Using a pair of sterilized scissors, carefully trim away any dead or diseased root material to make room for healthy new growth. This step is crucial because leaving rotting tissue in the new pot can lead to further infections and decline. After trimming, it is a professional trick to dust the cut ends with a little bit of cinnamon powder to provide natural protection. Be mindful not to disturb the healthy roots more than necessary, as they are the plant’s primary lifeline for water and nutrients.
Place the orchid in its new pot, positioning it so that the oldest pseudobulbs are near the edge and the new growth has plenty of room to expand. Hold the plant at the correct depth, ensuring that the base of the bulbs is level with or slightly above the surface of the medium. Gradually add the prepared potting mix around the roots, using a small stick or your fingers to settle the material into any large gaps. Avoid packing the medium too tightly, as the roots still need access to oxygen to function correctly.
After the repotting is complete, it is best to wait a few days before giving the plant its first full watering. This allows any minor injuries to the roots to callous over and reduces the risk of fungal infections in the fresh wounds. Keep the newly potted orchid in a slightly more shaded area with high humidity for a week or two to help it recover from the stress. Successful repotting is a blend of precision and gentleness that ensures the continued health of your Christmas orchid.
Propagation through division of pseudobulbs
Division is the most common and reliable method for propagating established Christmas orchids in a domestic or professional setting. This process involves separating a large, healthy plant into two or more smaller sections, each with its own root system. To ensure the success of the new divisions, each section must have at least three to four healthy pseudobulbs to provide enough energy. Attempting to grow a single bulb on its own is rarely successful and usually leads to a very slow and difficult recovery.
Begin by identifying the natural breaking points in the rhizome, which is the thick horizontal stem that connects the pseudobulbs. Use a sharp, sterilized knife to make a clean cut through the rhizome, ensuring that you do not crush the surrounding tissue. Once the sections are separated, treat each cut surface with a fungicide or cinnamon to prevent any potential infections. Each division can then be treated as an individual plant and potted into its own container using the methods described previously.
Propagating through division is an excellent way to rejuvenate an older plant that has become too large for its container or has lost vigor in the center. It allows you to expand your collection or share these beautiful winter-blooming orchids with friends and fellow enthusiasts. The best time for division is the same as for repotting, typically in the spring when the plant is entering a new growth phase. With proper care, these new divisions will often produce flowers within a year or two of being separated.
After dividing, it is vital to provide the new plants with a stable environment and consistent care to minimize the shock of the procedure. Keep them in a warm, humid spot with bright but indirect light to encourage the development of new roots. Avoid overwatering during the first few weeks, as the reduced root systems cannot process as much moisture as the original plant. Observing the first signs of new growth on a division is a rewarding experience that confirms your success as an orchid propagator.
Growing orchids from seed and specialized techniques
Growing Christmas orchids from seed is a complex and time-consuming process that is usually reserved for professional breeders and scientists. Orchid seeds are microscopic and lack the stored energy reserves found in most other types of plant seeds. In nature, they rely on a symbiotic relationship with specific fungi to provide them with the nutrients needed for germination. In a laboratory setting, this process is replicated using a specialized agar medium that contains all the necessary sugars and minerals.
The seeds must be sown in a completely sterile environment to prevent the growth of mold or bacteria, which would quickly overwhelm the tiny seedlings. This technique, known as flasking, requires specialized equipment and a high degree of technical skill to be successful. It can take several years for a seedling to grow large enough to be removed from the flask and transitioned to a traditional potting medium. Despite the challenges, this is the primary way that new hybrids and varieties are created within the horticultural industry.
Another advanced propagation method is tissue culture, also known as meristemming, which allows for the creation of exact genetic clones of a superior parent plant. This involve taking a small piece of actively growing tissue and placing it on a nutrient-rich medium under sterile conditions. This technique is used commercially to produce thousands of identical orchids for the mass market, ensuring consistent flower quality and growth habits. While not practical for most home growers, it is the backbone of the global orchid industry.
For the dedicated enthusiast, understanding these advanced methods provides a deeper appreciation for the complexity and beauty of orchid biology. While division remains the most accessible way to multiply your plants, the world of seed growing and tissue culture offers endless possibilities for innovation. Whether you are a casual gardener or a professional grower, the journey of propagating orchids is one of constant learning and discovery. Each new plant represents a commitment to the preservation and celebration of these extraordinary tropical flowers.