Successful establishment of the Chinese lantern begins with a strategic approach to planting and the chosen propagation method. This plant is known for its vigor, but giving it the right start is crucial for developing a healthy and manageable colony. Whether you are starting from seed or using vegetative methods, precision in the early stages will pay dividends in the future. Professionals understand that the timing and technique used during planting dictate the plant’s performance for years to come.
When selecting a site for planting, consider both the light requirements and the soil composition to ensure longevity. The location should be prepared well in advance to remove any competing weeds and to incorporate organic matter. Because this species spreads so readily, some gardeners choose to plant it in buried containers to limit its reach. This proactive step is often the difference between a controlled ornamental and an invasive problem.
Propagation can be achieved through several reliable techniques, each offering different advantages depending on the season. Sowing seeds is the most cost-effective way to produce a large number of plants, though it requires more patience. For those looking for immediate results, division of existing clumps is the preferred method among experienced horticulturists. Understanding the mechanics of each process allows for greater flexibility in garden planning.
Once the planting is complete, the initial care phase is vital for the development of a strong root system. Consistent moisture and protection from the elements will help the young plants transition to their new environment. Avoid the temptation to over-fertilize during this period, as the goal is root establishment rather than rapid top growth. A steady, measured approach at the beginning leads to a more resilient and productive plant in the long run.
Propagation from seed
Starting Chinese lanterns from seed requires a bit of preparation to ensure high germination rates and healthy seedlings. The seeds can be sown indoors about six to eight weeks before the last expected frost in the spring. Using a high-quality seed-starting mix that is light and well-draining will prevent many common seedling diseases. It is important to keep the soil consistently moist but never waterlogged during the germination period.
More articles on this topic
Providing a source of bottom heat can significantly speed up the germination process, which usually takes two to three weeks. Once the seedlings emerge, they require bright, indirect light to prevent them from becoming leggy and weak. A sunny windowsill or professional-grade grow lights will provide the necessary energy for the first sets of true leaves to develop. Thinning the seedlings early on ensures that the strongest individuals have enough space to grow.
Hardening off the young plants is a critical step before they are moved permanently into the garden soil. This process involves gradually exposing them to outdoor conditions over a period of seven to ten days. Start with a few hours in a sheltered, shady spot and slowly increase the time and intensity of sunlight. This transition prevents transplant shock, which can severely set back or even kill young, tender plants.
If sowing directly outdoors, wait until the soil has warmed up significantly and the danger of frost has passed. The seeds should be planted shallowly and kept moist until they have firmly established themselves in the bed. Direct sowing is often easier but may result in a shorter growing season and later lantern development. Regardless of the method, starting with fresh, high-quality seeds is the first step toward a successful harvest.
Division of rhizomes
The most common and effective way to propagate this species is through the division of its vigorous underground rhizomes. This process is best performed in the early spring just as the first signs of new growth begin to appear. By lifting the entire root mass, you can see the natural points where the plant can be separated. Using a sharp, clean spade or garden knife ensures that the cuts are clean and heal quickly.
More articles on this topic
Each division should have at least two or three healthy buds or “eyes” and a substantial portion of the root system. This ensures that the new plant has enough energy reserves to establish itself quickly in its new location. It is an excellent way to rejuvenate an older, overcrowded patch while simultaneously expanding your garden display. Many professionals recommend this method because the resulting plants are clones of the parent and will be identical in quality.
Replanting the divisions should be done immediately to prevent the delicate root hairs from drying out in the air. Place them at the same depth they were previously growing to avoid burying the crown too deeply. Firm the soil around the roots to eliminate any large air pockets that could cause the rhizomes to rot. A deep watering right after planting will help settle the soil and jumpstart the growth process.
This method also provides an opportunity to inspect the root system for any signs of pests or disease before spreading the plant. Healthy rhizomes should be firm and white or light tan in color, never soft or blackened. If any issues are found, those sections should be discarded rather than replanted to protect the health of the garden. Division is a powerful tool for maintaining both the quality and the quantity of your Chinese lantern collection.
Site preparation and soil depth
Choosing the right location involves more than just finding a sunny spot in the backyard. The soil must be prepared to a depth of at least twelve inches to accommodate the deep-reaching roots of the plant. Incorporating aged compost or leaf mold into the entire planting area improves the overall structure and fertility. This preparation creates a subterranean environment where the rhizomes can move and expand without resistance.
The depth at which the plant is placed in the soil is a critical factor for its long-term stability and health. If planted too shallowly, the roots may dry out or be exposed to extreme temperature fluctuations near the surface. Conversely, planting too deeply can lead to crown rot, especially in soils that tend to hold moisture. The goal is to set the plant so that the crown sits exactly at the soil line for optimal performance.
Spacing between plants should be carefully planned to allow for future growth and adequate air circulation. A distance of eighteen to twenty-four inches between individual plants is generally recommended for a full, yet manageable, look. This gap prevents the colony from becoming a solid, impenetrable mass too quickly, which can harbor pests. Professional layouts often account for the eventual spread of the plant within the first two seasons.
For those planting in containers, the depth of the pot becomes a limiting factor that must be managed. Choose a container that is at least fourteen inches deep and has ample drainage holes at the bottom. The potting medium should be a high-quality, soil-based mix that won’t compact over time under the weight of the water. Container planting is an excellent way to enjoy the beauty of the lanterns while keeping the invasive roots completely contained.
Timing and environmental cues
Success in planting often comes down to timing the operation with the local climate and weather patterns. Early spring is widely considered the best time for both planting and propagation as the plant is entering its most active growth phase. The cool, moist conditions of spring allow the roots to establish before the heat of summer puts stress on the foliage. Watching for the first signs of local vegetation waking up is a great natural cue to start your work.
In some regions, late autumn planting is also possible, provided the plants have enough time to root before the ground freezes. This allows the Chinese lanterns to be ready for an immediate start as soon as the weather warms up in the spring. However, this carries a higher risk of frost heaving, where the freezing and thawing of the soil pushes the plants out of the ground. Mulching heavily after an autumn planting is essential to protect the new additions through the winter.
Avoid planting during periods of extreme heat or drought, as this puts unnecessary strain on the young plants. If you must plant during the summer, provide extra shade and ensure the soil remains consistently moist. Ideally, choose a cloudy day or work in the late afternoon to give the plants a few hours of cooler temperatures. Paying attention to these subtle environmental factors can significantly increase the survival rate of your transplants.
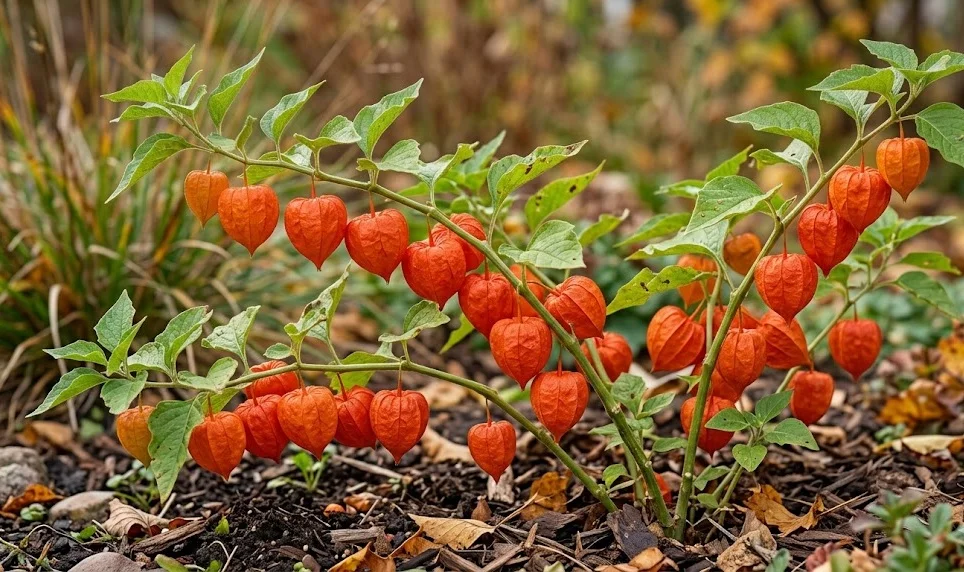
Finally, keep records of when and where you plant to track the success of different methods and locations over time. Professional gardeners often use these logs to refine their techniques and improve their results each year. Understanding the specific timing that works for your unique microclimate is a journey of observation and experience. The rewards of this diligence will be evident in the vibrant orange display that follows every successful planting season.