Establishing a new golden currant plant requires a thoughtful approach to site selection and timing to ensure a successful start. You must consider the long-term growth habits of the shrub to give it enough space to reach its full mature size without crowding. Successful propagation allows you to expand your collection or share this resilient species with other gardening enthusiasts in your community. This guide covers everything you need to know about the initial stages of bringing this vibrant plant into your landscape.
Selecting the perfect site
The first step in any successful planting project is finding a location that meets the plant’s biological needs. You should look for a spot that receives plenty of sunlight but also offers some protection from the strongest winds. The soil in this area must have excellent drainage to prevent the roots from sitting in stagnant water. Taking the time to observe your garden’s microclimates will help you make the best choice.
Soil composition is a major factor that determines how quickly your new plant will become established. You should avoid areas with heavy, compacted clay or very sandy soil that does not hold any moisture. Adding a generous amount of well-rotted compost to the planting site can improve almost any soil type. A rich, loamy environment provides the perfect foundation for the young roots to explore and grow.
Consider the surrounding plants and how they will interact with your new golden currant over time. You need to ensure there is at least four to five feet of space between the currant and its nearest neighbors. This spacing allows for proper airflow and gives you easy access for future pruning and harvesting tasks. A well-planned garden layout prevents many problems before they ever have a chance to start.
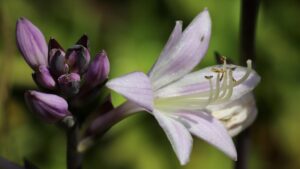
Finally, think about the aesthetic role the plant will play in your overall landscape design. The golden currant is known for its beautiful spring flowers and attractive fall foliage, making it a great focal point. You might want to place it where you can enjoy its fragrance during the blooming season from a nearby path. Combining practical needs with visual appeal creates a truly successful and enjoyable garden space.
More articles on this topic
Step by step planting guide
Once you have chosen the site, the actual process of putting the plant in the ground requires careful execution. You should dig a hole that is twice as wide as the root ball but no deeper than the container it came in. Loosening the soil on the sides of the hole helps the new roots penetrate the surrounding earth more easily. This preparation is essential for a smooth transition from the pot to the permanent garden site.
Gently remove the plant from its container and inspect the roots for any signs of being pot-bound. If the roots are circling the base, you should carefully tease them outward to encourage a more natural growth pattern. Place the plant in the center of the hole and ensure that it is sitting at the same level it was in the nursery. Proper planting depth is critical for the long-term health of the main stem and crown.
Fill the hole back in with a mixture of native soil and the organic matter you prepared earlier. You should firm the soil down gently with your hands to remove any large air pockets around the root system. Avoid packing it too tightly, as this can crush the delicate young roots and restrict their growth. A steady, gentle touch is the best way to ensure the plant feels secure in its new home.
Immediately after planting, you must give the shrub a thorough soaking to settle the soil and hydrate the roots. This initial watering is the most important one the plant will ever receive in its new location. You might also want to add a light layer of mulch around the base to help hold that moisture in the ground. This simple final step completes the planting process and sets the stage for a successful establishment.
More articles on this topic
Methods of effective propagation
Propagating your own plants is a rewarding way to increase your garden’s productivity at very little cost. The most common method for golden currants is taking hardwood cuttings during the dormant winter months. You should select healthy, one-year-old wood that is about the thickness of a pencil for the best results. These cuttings have a high success rate and will reliably produce a plant that is identical to the parent.
To prepare a cutting, make a clean snip just below a bud at the base and a slanted cut at the top. You can dip the bottom end in a rooting hormone to speed up the process, although it is not strictly necessary. Place the cuttings in a pot of well-draining soil or even directly into a prepared nursery bed in the garden. Keeping the soil consistently moist but not soggy is the secret to getting them to strike roots.
Another method involves softwood cuttings taken in the late spring or early summer when the plant is growing fast. These cuttings are more delicate and require a bit more attention to humidity and temperature to survive. You should keep them in a shaded area and perhaps cover them with a clear plastic dome to maintain moisture. This technique allows you to produce new plants much earlier in the growing season than hardwood cuttings.
Layering is a third option that is very simple and has a nearly perfect success rate for the patient gardener. You simply bend a flexible lower branch down to the ground and bury a small section of it under the soil. Secure it in place with a landscape staple and wait for roots to form at the buried node. Once a strong root system has developed, you can snip the new plant away from the parent and move it.
Initial establishment phase
The first year after planting is the most critical time for the long-term survival of your golden currant. You must be diligent about watering, especially during dry spells when the young roots are still shallow. A consistent supply of moisture allows the plant to focus its energy on building a strong root system rather than just surviving. Monitoring the leaves for signs of wilting will tell you when it is time to intervene.
Weed control is also very important during this phase to reduce competition for light and nutrients. You should hand-pull any weeds that appear near the base of the shrub to avoid damaging the roots with tools. Keeping the area clear allows the young currant to have full access to the resources in the soil. A clean base also makes it easier for you to see how the plant is progressing.
Resist the urge to fertilize heavily during the first growing season as the plant needs to adjust to its new environment. Too much nitrogen can encourage excessive top growth that the immature root system cannot yet support. A light top-dressing of compost is usually all that is needed to provide a gentle boost of nutrients. Patience during this first year will lead to a much stronger and healthier plant in the future.
By the end of the first season, you should see signs of significant new growth and a well-established frame. This is the point where you can begin to think about the long-term shape and productivity of the shrub. You have successfully navigated the most difficult part of the plant’s life cycle in your garden. Now you can look forward to years of beautiful flowers and delicious fruit from your well-planted currant.