Successfully establishing mealycup sage in your garden begins with a well-planned planting strategy and an understanding of its reproductive methods. Whether you choose to start from seeds or use vegetative propagation techniques, the goal is to create a robust root system before the summer heat arrives. This professional guide covers everything from the initial sowing phase to the final transplanting process in the outdoor landscape. By mastering these techniques, you can easily increase your plant inventory and ensure a vibrant display of color every year.
Starting from seeds
Growing sage from seeds is a rewarding process that allows you to start many plants at a very low cost. You should begin the sowing process indoors about eight to ten weeks before the average date of the last spring frost. Using a high-quality seed-starting mix ensures that the delicate roots have the right balance of aeration and moisture. Lightly press the seeds into the surface of the soil, as they require some light to trigger the germination process.
Maintaining a consistent temperature of around 70 degrees Fahrenheit is ideal for encouraging the seeds to sprout within two weeks. You can use a heat mat under the trays to provide bottom heat, which often speeds up the development of the young seedlings. Once the first green shoots appear, move the trays to a very bright location or under professional-grade grow lights. Insufficient light at this stage will result in weak, leggy plants that struggle to survive the transition to the garden.
Watering the seedlings should be done with a gentle spray or by bottom-watering to avoid disturbing the tiny seeds and roots. You should keep the soil consistently moist but never soggy, as young plants are susceptible to a condition called damping off. As the seedlings grow their first set of true leaves, you can begin to apply a very diluted liquid fertilizer once a week. This early boost of nutrients helps build the strength needed for the upcoming transplanting phase later in the spring.
Thinning the seedlings is a difficult but necessary step to ensure that the strongest plants have enough room to grow. You should select the most vigorous shoot in each cell and carefully remove the others using a small pair of scissors. This prevents the roots from becoming tangled and reduces competition for light and nutrients among the young plants. Investing time in these early stages of care pays off with much healthier and more productive mature plants in the summer.
More articles on this topic
Transplanting to the garden
The process of moving plants from a controlled indoor environment to the outdoor garden requires a period of gradual adjustment. You should start the hardening-off process about two weeks before you plan to put the plants in the ground permanently. Begin by placing them in a sheltered, shady spot for a few hours each day and slowly increase their exposure to sun and wind. This transition helps thicken the plant’s cell walls and prevents the shock that often leads to stunted growth.
Choosing the right location for your sage is the next critical step for ensuring a successful and long-lasting floral display. You should look for a spot that receives full sun for the majority of the day and has excellent soil drainage. Avoid areas where water tends to collect after rain, as this will lead to root rot and eventual plant failure. Preparing the soil by removing weeds and adding a bit of organic matter will give your transplants the best possible start.
When you are ready to plant, dig a hole that is twice as wide as the root ball and just as deep as the original container. Carefully remove the plant from its pot and loosen any roots that may have started to circle the bottom of the soil. Place the plant in the hole and fill in the gaps with native soil, pressing down gently to remove any large air pockets. Watering deeply immediately after planting helps settle the soil and ensures the roots have immediate access to moisture.
Spacing your plants correctly is important for providing enough room for them to reach their full mature size without overcrowding. You should leave about twelve to eighteen inches between each plant to allow for proper air circulation and future growth. Overcrowded beds are more prone to disease and the plants may compete too heavily for available water and nutrients. Following these spacing guidelines will result in a more professional-looking garden that stays healthy throughout the entire season.
More articles on this topic
Propagation through cuttings
Taking stem cuttings is an excellent way to create exact clones of your favorite mealycup sage plants during the growing season. You should select healthy, non-flowering stems for this process, as they have more energy to devote to root production. Use a sharp, sterilized knife or shears to take a four-inch cutting just below a leaf node where growth hormones are concentrated. This method is particularly useful in late summer when you want to save a specific variety for the next year.
Prepare the cuttings by removing the lower leaves so that only the top few remain to provide energy through photosynthesis. You can dip the cut end into a rooting hormone powder to increase the chances of success and speed up the rooting process. Place the stems into a pot filled with a light, sterile medium such as a mix of peat and perlite or vermiculite. Keeping the cuttings in a humid environment, perhaps by covering the pot with a clear plastic bag, helps prevent them from wilting.
Check the cuttings for root development after about three to four weeks by giving them a very gentle tug to see if there is resistance. Once you feel that roots have formed, you can begin to acclimate the new plants to lower humidity levels by removing the cover. It is important to keep the young clones in a bright but indirect light source until they are fully established and growing new leaves. This vegetative method is often faster than starting from seeds and ensures you get the exact color you desire.
Transplanting the rooted cuttings into individual pots allows them to develop a stronger root system before they are eventually moved to the garden. You should use a standard potting mix and continue to provide regular water and light as they grow into small bushes. These plants can often be kept indoors over the winter in a sunny window to provide a head start for the following spring. Mastering the art of cuttings is a vital skill for any serious gardener looking to maintain a high-quality plant collection.
Division and layout strategies
While mealycup sage is not typically divided as often as other perennials, older clumps can sometimes benefit from being split every few years. You should perform this task in the early spring just as the first signs of new growth begin to appear above the ground. Carefully dig up the entire root mass and use a sharp spade or garden knife to separate it into smaller sections. Ensure that each new piece has a healthy portion of both roots and emerging green shoots for the best results.
Replanting the divisions immediately is crucial to prevent the exposed roots from drying out and causing stress to the plant. You should follow the same planting procedures as you would for new transplants, including the use of high-quality soil and deep initial watering. Division not only gives you more plants for your garden but also rejuvenates the original specimen by removing older, less productive wood. This practice helps maintain the overall vigor and flowering potential of your sage collection over many years.
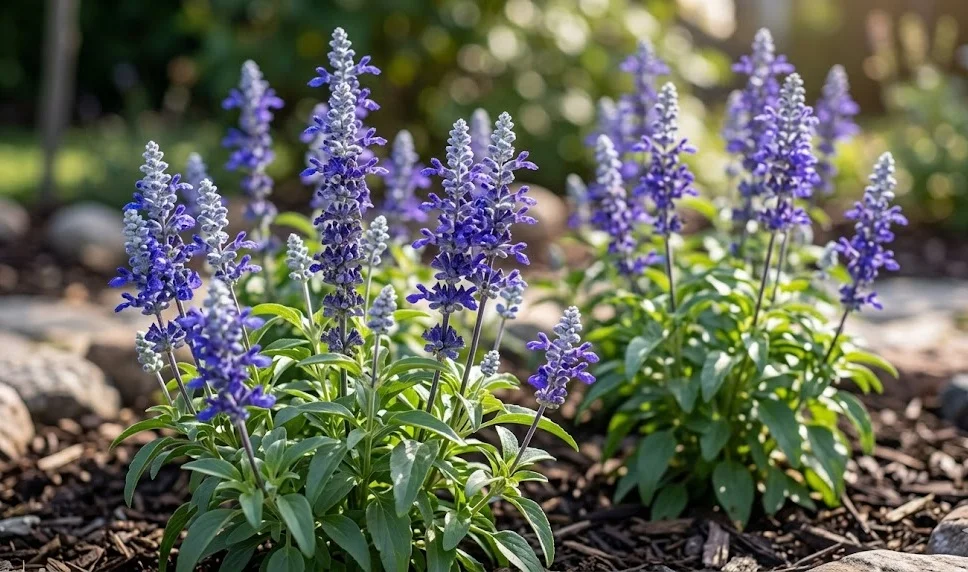
Planning the layout of your sage planting can have a significant impact on the visual appeal and health of your garden design. You might consider planting in large, sweeping drifts to create a dramatic wash of blue color that draws the eye through the landscape. Mixing different varieties with slightly different heights or shades of blue can add depth and interest to the display. A well-thought-out layout makes the garden feel intentional and professionally designed rather than a random collection of individual plants.
Consider the role of companion plants when deciding where to place your newly propagated sage within the larger garden context. Plants with silver foliage or bright yellow flowers often provide a stunning contrast to the deep blues of the mealycup sage. You should also think about the bloom times of neighboring plants to ensure that there is continuous color throughout the entire growing season. Successful planting is as much about the artistic arrangement as it is about the technical aspects of horticultural care.