Planting and propagating arugula

Successfully planting and propagating arugula is a straightforward process that promises a quick and flavorful reward for the gardener. This peppery green is most commonly grown from seed, a method that is both reliable and economical, allowing for successive plantings and a continuous harvest. The key to a thriving arugula patch lies in understanding the optimal timing for sowing, the correct seed depth, and the appropriate spacing to allow each plant to flourish. Whether starting seeds directly in the garden or getting a head start indoors, the fundamental principles remain the same. By following a few simple guidelines, you can easily establish a productive crop that will supply fresh leaves for weeks.
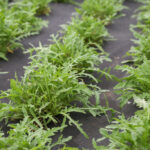
The primary method for cultivating arugula is direct sowing into the garden bed. This approach is preferred by many because arugula grows so quickly that transplanting is often an unnecessary step. Direct sowing also avoids the potential for transplant shock, which can temporarily set back the growth of young seedlings. The process begins with preparing a well-draining, fertile soil bed in a location that receives adequate sunlight. The seeds are small, so creating a fine, smooth soil surface is important for ensuring good seed-to-soil contact, which is essential for successful germination.
Once the bed is prepared, the seeds can be sown. Arugula seeds should be planted at a shallow depth, typically around 0.5 to 1 centimeter deep. Planting them too deeply can hinder or prevent germination. The seeds can be sown in rows spaced about 25-30 centimeters apart to allow for easy weeding and harvesting. Within the rows, the seeds can be sprinkled thinly, with the intention of thinning the seedlings later. This initial dense sowing helps to ensure a full, healthy stand of plants, even if some seeds fail to germinate.
After sowing, the seeds must be kept consistently moist until they germinate, which usually occurs within 5 to 10 days, depending on the soil temperature. Gentle watering is crucial to avoid dislodging the small seeds. Using a watering can with a fine rose or a gentle mist setting on a hose nozzle will provide the necessary moisture without disturbing the soil surface. Maintaining this moisture is the final critical step in the initial planting phase, setting the stage for the rapid emergence of the vibrant green seedlings.
Sowing seeds directly outdoors
Direct sowing is the most common and effective method for planting arugula, perfectly suited to its rapid growth cycle. The process should begin as soon as the soil can be worked in early spring. Arugula is cold-tolerant, so seeds can be planted several weeks before the average last frost date, which gives the crop a valuable head start. A soil thermometer can be a useful tool; aim for a soil temperature of at least 4°C for germination, although faster and more uniform sprouting will occur when the soil warms to around 15°C. This early start allows the plants to mature before the summer heat arrives.
More articles on this topic
The preparation of the planting area is a critical first step for successful direct sowing. Choose a site with well-drained soil and adequate sunlight, and clear it of all weeds and debris. The soil should be loosened to a depth of about 20 centimeters and amended with compost or other organic matter to improve its fertility and texture. Rake the surface to create a fine, level seedbed, which is essential for achieving the correct planting depth and ensuring good seed-to-soil contact for the small arugula seeds. A smooth surface makes the entire process much easier.
When sowing the seeds, create shallow furrows or drills in the prepared bed, no deeper than 1 centimeter. Space these rows approximately 25 to 30 centimeters apart to give the mature plants enough room to spread out. Lightly sprinkle the seeds along the bottom of the furrows. Aim for a spacing of about one seed every 2-3 centimeters; you will thin them out later. After distributing the seeds, gently cover them with the fine soil you displaced and lightly tamp it down to ensure contact.
Once the seeds are covered, the final step is to water them in thoroughly but gently. It is crucial to keep the seedbed consistently moist until germination occurs, which can take up to ten days. Use a gentle spray to avoid washing the seeds away. This initial period is when the seeds are most vulnerable, and allowing the soil to dry out can severely impact the germination rate. Continued attention to watering after the seedlings emerge will ensure they establish a strong root system and grow vigorously.
Starting arugula indoors
While direct sowing is more common, starting arugula seeds indoors can be a beneficial strategy for several reasons. It allows gardeners in colder climates to get a significant head start on the growing season, potentially yielding a harvest several weeks earlier than with direct sowing. Starting indoors also provides a more controlled environment for germination, protecting the delicate seedlings from unpredictable spring weather, pests, and diseases. This method can lead to a higher success rate, ensuring a full and healthy crop ready for transplanting.
More articles on this topic
To start arugula indoors, you will need seed trays or small pots filled with a high-quality seed-starting mix. This type of mix is specifically designed to be lightweight and to drain well, which is ideal for germinating seeds. Fill your containers with the mix and lightly moisten it before sowing the seeds. Plant two to three seeds per cell or pot at a depth of about 0.5 centimeters. Planting multiple seeds is a good practice to ensure that at least one germinates in each container.
After sowing, place the containers in a warm location to encourage germination. While arugula seeds do not require light to germinate, they do need warmth, with an ideal soil temperature between 15°C and 20°C. A heating mat can be used to provide consistent bottom heat if your indoor space is cool. Cover the trays with a plastic dome or plastic wrap to maintain high humidity, which will aid in the germination process. Be sure to check daily and remove the cover as soon as the first seedlings emerge to prevent fungal problems.
Once the seedlings have germinated, they will need abundant light to grow strong and healthy. Place them under grow lights for 12-16 hours a day or in a south-facing window that receives plenty of direct sunlight. If you have multiple seedlings in one pot, thin them to the strongest one by snipping the others at the soil line with scissors. The seedlings can be transplanted outdoors after they have developed two sets of true leaves and have been properly hardened off over a period of a week to acclimate them to outdoor conditions.
Succession planting for a continuous harvest
Succession planting is a highly effective technique used to ensure a continuous supply of fresh arugula throughout the growing season, rather than having a single large harvest. Because arugula grows so quickly, maturing in as little as 30 to 40 days, it is an ideal candidate for this method. The basic principle is to sow a small batch of seeds every two to three weeks. This staggered planting schedule results in a continuous series of small, manageable harvests, preventing a glut of arugula that all matures at once.
To implement a successful succession planting strategy, it is important to plan ahead. Start by sowing your first batch of seeds in early spring as soon as the soil is workable. Then, mark your calendar to sow a new, small row or block of seeds every two weeks thereafter. This regular interval is key to maintaining a steady flow of young, tender leaves. As you harvest from the oldest patch, the next one will be just reaching maturity, creating a seamless cycle of planting and harvesting.
The success of this technique also depends on adapting to the changing seasons. As spring progresses into summer and temperatures rise, the risk of bolting increases. During this period, you may need to adjust your strategy. Consider planting heat-tolerant varieties of arugula or sowing seeds in a location that receives afternoon shade. You might also pause your succession planting during the hottest weeks of summer and then resume it in late summer for a bountiful autumn and early winter harvest.
Effective space management is another important aspect of succession planting. Since you will be continuously planting new seeds, it is helpful to have a dedicated area in your garden for this purpose. As one patch of arugula is harvested and cleared, the space is immediately ready for the next sowing. This intensive use of garden space is highly efficient and maximizes the productivity of your plot. It ensures that you are making the most of your available area while enjoying the freshest possible arugula from spring through fall.
Thinning seedlings
Thinning is a crucial step in the process of growing arugula from seed, whether sown directly in the garden or started indoors. It is the practice of selectively removing some seedlings to provide adequate space for the remaining ones to grow to their full potential. While it may seem counterintuitive to remove healthy seedlings, overcrowding leads to intense competition for essential resources such as light, water, and nutrients. This competition results in stunted, weaker plants that produce smaller leaves and are more susceptible to pests and diseases.
The ideal time to thin arugula seedlings is when they have developed their first set of true leaves, which appear after the initial two cotyledon leaves. At this stage, the seedlings are typically about 5-7 centimeters tall and robust enough to handle the disturbance. It is easier to select the strongest and most vigorous seedlings to keep. The goal is to create the optimal spacing for mature plants, which for most arugula varieties is about 10-15 centimeters apart in all directions.
There are two primary methods for thinning. The first, and often preferred, method is to use a small pair of scissors or shears to snip the unwanted seedlings off at the soil line. This technique minimizes soil disturbance around the roots of the seedlings you are keeping, reducing the risk of damage to their delicate root systems. The second method is to gently pull the unwanted seedlings out by hand. This should be done carefully, especially if the seedlings are close together, by holding the soil down around the remaining plants to avoid uprooting them as well.
The seedlings that you remove during the thinning process do not have to go to waste. These young, tender plants are perfectly edible and are considered a delicacy, often referred to as microgreens. They are packed with a concentrated, peppery flavor and are excellent additions to salads, sandwiches, or as a garnish. Therefore, the process of thinning can be thought of as your very first harvest, providing an early taste of the delicious crop to come.
📷 Flickr / Szerző: Maja Dumat / Licence: CC BY 2.0