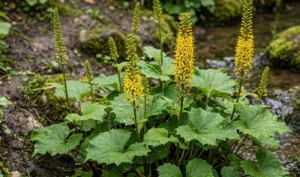
Preparing rose rockcress for the cold months is a vital task that ensures this perennial returns with vigor when the spring sun begins to warm the earth. Although it is native to the relatively mild coast of California, many varieties are surprisingly resilient to frost if they are properly prepared. You must start your winterization process well before the ground freezes, focusing on strengthening the plant’s internal structures and protecting its vulnerable crown. A little foresight in the autumn will prevent significant heartbreak when the snow begins to melt.
The first step in a professional overwintering strategy is to gradually reduce the amount of water you provide as the days grow shorter and cooler. This encourages the plant to enter its natural dormancy and slows down the production of soft, new growth that would be easily damaged by ice. You want the plant to be hydrated but not saturated; a waterlogged root system is far more likely to freeze and crack during a hard frost. Think of this as helping the plant “harden off” for the challenges ahead.
You should also take the time to clean up the area around the base of the mound, removing any fallen leaves or spent summer flowers. This debris can trap moisture and harbor fungal spores or pests through the winter, leading to rot once the spring rains arrive. A clean, open base allows for better air circulation even during the damp winter months. If you find any dead or diseased stems during this cleanup, prune them away to leave only the healthiest tissue for the winter.
Providing a protective layer of mulch is one of the most effective ways to insulate the roots from extreme temperature fluctuations. However, for rose rockcress, you should avoid heavy organic mulches like wood chips or thick straw, which can hold too much moisture against the stems. Instead, use a layer of fine gravel, grit, or even pine needles which offer insulation without the risk of rot. This professional choice keeps the plant’s crown dry while still protecting the sensitive root zone from the cycle of freezing and thawing.
Preparing for the first frost
As the first frost of the season approaches, you should keep a close eye on the local weather forecast to determine if any immediate action is needed. While a light frost will generally not harm an established rockcress, a sudden and severe cold snap can shock the plant if it hasn’t had time to acclimate. If extreme temperatures are predicted, you might consider covering the plants overnight with a piece of breathable frost cloth or a burlap sack. Always remember to remove these covers in the morning so the plant can still receive light and air.
More articles on this topic
You should avoid applying any fertilizer during the late autumn months, as this would encourage the plant to produce new shoots. These tender new parts have very thin cell walls and are almost guaranteed to be destroyed by the first hard freeze. The goal is to have the plant in a state of suspended animation where its energy is stored safely in the roots and main stems. A “lean and mean” plant is much more likely to survive a harsh winter than one that has been pampered with late-season food.
Checking the drainage of your rock garden one last time is a professional move that can save your plants from winter drowning. If you notice any areas where water tends to pool after autumn rains, you should take steps to redirect that moisture away from your rockcress. This might involve adding more grit to the soil or creating small channels to encourage runoff. Winter wetness is often a far greater threat to this species than the actual cold temperatures themselves.
If your plants are in containers, you need to decide if they should remain outside or be moved to a more sheltered location. Pots are much more vulnerable to freezing solid than the ground, which can kill even the hardiest perennials. You might choose to move the containers against the wall of a house or into an unheated garage or shed for the duration of the winter. If they stay outside, wrapping the pots in bubble wrap or burlap can provide that extra bit of insulation needed to protect the roots.
Protecting the plant through deep winter
Once the winter has fully set in, your primary role becomes one of quiet observation and occasional intervention. You should periodically check your plants after heavy snowfalls to ensure the weight of the snow isn’t crushing the delicate branches. While a light blanket of snow can actually act as a great insulator, a heavy, wet accumulation can cause physical damage. Gently brushing away excess snow with a soft broom can help maintain the plant’s structural integrity throughout the season.
More articles on this topic
If you live in an area that experiences frequent cycles of freezing and thawing, you must watch out for a phenomenon known as frost heaving. This happens when the soil expands and contracts, literally pushing the plant and its roots out of the ground. If you see the crown of your rockcress exposed or the plant looking “tilted,” you should gently press it back into the soil on a day when the ground is thawed. Adding a bit more gravel mulch around the base can also help weight the plant down and protect any exposed roots.
Ice buildup is another winter hazard that requires a professional touch to manage without causing harm. If a layer of clear ice forms over the foliage after a freezing rain, it is often best to leave it alone rather than trying to chip it off. Attempting to remove the ice manually will almost certainly break the brittle frozen leaves and stems. The ice will eventually melt on its own, and as long as it doesn’t persist for weeks on end, the plant should be able to breathe enough to survive.
During long periods without snow or rain, the soil can actually become dangerously dry even in the middle of winter. If the ground is not frozen and there has been no moisture for several weeks, you might need to give your rockcress a very light watering. You should only do this on a relatively warm day when the water has time to soak in before the temperature drops again at night. Maintaining a minimal level of moisture in the root zone prevents the roots from desicating in the dry winter air.
The transition to spring growth
As the days begin to lengthen and the first signs of spring appear, you should start to gradually remove any winter protection you have provided. If you used frost cloths or extra mulch, take them away in stages to avoid shocking the plant with a sudden change in environment. This slow transition allows the rockcress to “wake up” naturally as the air and soil temperatures rise. Keep your frost cloths handy, however, as late-season cold snaps can still occur and threaten the emerging new growth.
This is the perfect time to perform a thorough inspection of the plant to see how well it weathered the winter months. You should look for any brown or blackened tips that may have been nipped by the frost and prune them back to healthy green tissue. Removing this dead wood early prevents it from becoming a source of rot as the weather turns damp and warm. You will likely see the first tiny flower buds starting to form deep within the foliage, signaling that the plant is ready for a new season.
A light cleaning of the surrounding soil will help refresh the area and ensure that the new growth has plenty of space to expand. If the winter mulch has become compacted or thin, you can add a fresh layer of grit to keep the base of the plant tidy and dry. This is also a good moment to check the soil pH and make any minor adjustments before the main growing season begins. A fresh start in the spring sets the stage for a spectacular floral display in the coming weeks.
Finally, take a moment to appreciate the resilience of your rose rockcress and the success of your overwintering efforts. Every plant that returns healthy and strong is a testament to your skill and the professional care you provided during the challenging months. Use the observations you made over the winter to refine your plan for next year, making the process even more efficient. Gardening is a continuous cycle of learning, and each successful winter brings you one step closer to mastering the art of perennial care.